Archive for the ‘Pakete’ Category.
2018-11-17, 15:54
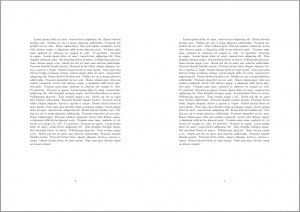
Für meine Studentinnen und Studenten erstelle ich zu jeder Vorlesung eine kurze Wiederholung auf Basis der exam Klasse. Üblicherweise reicht ein DIN A5 Blatt, daher liegt es nahe, zwei DIN A5 Blätter auf ein DIN A4 Blatt zu drucken.
Um nicht den Text zweimal setzen zu müssen, gibt es zwei nützliche Lösungen (neben der Nutzung von Adobe Acrobat):
Duplizieren der Seite mittels pdftk:
Für pdftk habe ich eine kleine Batch-Datei duplicate.bat geschrieben, die dann mittels duplicate datei1.pdf datei2.pdf aufgerufen wird.
@echo off

pdftk %1 cat 1-end 1-end output %2
Duplizieren der Seiten in LaTeX mittels pgfpages
Über TSX (https://tex.stackexchange.com/questions/142187/compile-two-a5-pages-on-one-a4-page/142272) bin ich auf eine Lösung gestoßen, die im LaTeX-Lauf selbst die Seite dupliziert:
\documentclass[a4paper,ngerman,12pt]{article}

\usepackage{pgfpages}                                 % <— load the package
\pgfpagesuselayout{2 on 1}[a4paper,landscape,border shrink=5mm] % <— set options

\usepackage{atbegshi}  % duplicate the content at shipout time
\AtBeginShipout{%
  \pgfpagesshipoutlogicalpage{1}\copy\AtBeginShipoutBox
  \pgfpagesshipoutlogicalpage{2}\box\AtBeginShipoutBox
  \pgfshipoutphysicalpage
}

\usepackage{blindtext}
\begin{document}

\blindtext[3]

\end{document} |
\documentclass[a4paper,ngerman,12pt]{article}
\usepackage{pgfpages} % <— load the package
\pgfpagesuselayout{2 on 1}[a4paper,landscape,border shrink=5mm] % <— set options
\usepackage{atbegshi} % duplicate the content at shipout time
\AtBeginShipout{%
\pgfpagesshipoutlogicalpage{1}\copy\AtBeginShipoutBox
\pgfpagesshipoutlogicalpage{2}\box\AtBeginShipoutBox
\pgfshipoutphysicalpage
}
\usepackage{blindtext}
\begin{document}
\blindtext[3]
\end{document}
Uwe Ziegenhagen likes LaTeX and Python, sometimes even combined.
Do you like my content and would like to thank me for it? Consider making a small donation to my local fablab, the Dingfabrik Köln. Details on how to donate can be found here Spenden für die Dingfabrik.
More Posts - Website
2018-10-07, 13:22
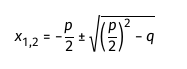
Hier ein kurzes Beispiel für den serifenlosen Mathematik-Font Fira Math.
\documentclass{article}
\usepackage{amsmath}
\usepackage[mathrm=sym]{unicode-math}
\setmathfont{Fira Math}

\begin{document}
\[
x_{1,2} = -\frac{p}{2} \pm \sqrt{\left(\frac{p}{2}\right)^2 - q}
 \]
\end{document} |
\documentclass{article}
\usepackage{amsmath}
\usepackage[mathrm=sym]{unicode-math}
\setmathfont{Fira Math}
\begin{document}
\[
x_{1,2} = -\frac{p}{2} \pm \sqrt{\left(\frac{p}{2}\right)^2 - q}
\]
\end{document}
Uwe Ziegenhagen likes LaTeX and Python, sometimes even combined.
Do you like my content and would like to thank me for it? Consider making a small donation to my local fablab, the Dingfabrik Köln. Details on how to donate can be found here Spenden für die Dingfabrik.
More Posts - Website
2018-09-05, 05:46
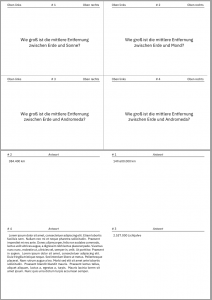
Vor einigen Wochen habe ich eine Möglichkeit gesucht, Lernkarten mittels LaTeX zu erstellen: Frage auf der Vorderseite, Antwort auf der Rückseite.
Auf github habe ich dann https://github.com/kellertuer/Kartei gefunden, das genau diese Anforderungen umsetzt. Das Projekt ist leider noch nicht auf CTAN, vielleicht werde ich dem Autor mal dabei helfen. Aktuell muss man halt alle Dateien von github holen und a) in den lokalen TeX-Baum legen oder b) einfach in das eigene Projektverzeichnis packen.
Hier jetzt ein Beispiel:
\documentclass[a6paper,12pt,print,grid=front]{kartei}

\usepackage[utf8]{inputenc}
\usepackage[T1]{fontenc}
\usepackage{babel}
\usepackage{graphicx}
\usepackage[sfdefault]{plex-sans}
\usepackage[]{blindtext}
\setlength{\parindent}{6pt}
\setlength{\parskip}{0pt}

\begin{document}
	\begin{karte}[Oben links]{Wie groß ist die mittlere Entfernung zwischen Erde und Sonne?}[Oben rechts]
	149.600.000 km
	\end{karte}
	\begin{karte}[Oben links]{Wie groß ist die mittlere Entfernung zwischen Erde und Mond?}[Oben rechts]
	384.400 km
	\end{karte}
	\begin{karte}[Oben links]{Wie groß ist die mittlere Entfernung zwischen Erde und Andromeda?}[Oben rechts]
	2.537.000 Lichtjahre
	\end{karte}
	\begin{karte}[Oben links]{Wie groß ist die mittlere Entfernung zwischen Erde und Andromeda?}[Oben rechts]
	\blindtext
	\end{karte}
\end{document} |
\documentclass[a6paper,12pt,print,grid=front]{kartei}
\usepackage[utf8]{inputenc}
\usepackage[T1]{fontenc}
\usepackage{babel}
\usepackage{graphicx}
\usepackage[sfdefault]{plex-sans}
\usepackage[]{blindtext}
\setlength{\parindent}{6pt}
\setlength{\parskip}{0pt}
\begin{document}
\begin{karte}[Oben links]{Wie groß ist die mittlere Entfernung zwischen Erde und Sonne?}[Oben rechts]
149.600.000 km
\end{karte}
\begin{karte}[Oben links]{Wie groß ist die mittlere Entfernung zwischen Erde und Mond?}[Oben rechts]
384.400 km
\end{karte}
\begin{karte}[Oben links]{Wie groß ist die mittlere Entfernung zwischen Erde und Andromeda?}[Oben rechts]
2.537.000 Lichtjahre
\end{karte}
\begin{karte}[Oben links]{Wie groß ist die mittlere Entfernung zwischen Erde und Andromeda?}[Oben rechts]
\blindtext
\end{karte}
\end{document}
Uwe Ziegenhagen likes LaTeX and Python, sometimes even combined.
Do you like my content and would like to thank me for it? Consider making a small donation to my local fablab, the Dingfabrik Köln. Details on how to donate can be found here Spenden für die Dingfabrik.
More Posts - Website
2018-06-23, 17:58
Hier ein Beispiel, wie man mit LaTeX einfach Ordnerrücken beschriften kann. Es nutzt das Paket ticket.sty, das ich auch schon für Wahlkarten im Verein oder Namensschilder genutzt habe.
Hinweise:
- Beim ersten Kompilieren gibt es eine Fehlermeldung, da die Datei
Ordner.tdf noch geschrieben werden muss.
- Nach Anpassungen innerhalb von
filecontents* muss zweimal übersetzt werden. Das erste Übersetzen schreibt die TDF Datei, das zweite Übersetzen nutzt dann diese Datei.
- Als Schriftart nutze ich die IBM Plex Sans, die in TeX Live 2018 standardmäßig dabei ist,
in TeX Live 2017 nicht. Die Datei wird aber auch so übersetzt, nutzt dann aber die Palatino.
\documentclass[a4paper,12pt]{scrartcl}
\usepackage[total={210mm,297mm},top=0mm,left=0mm,bottom=0mm,includefoot,landscape]{geometry}
\usepackage[Ordner]{ticket}
\usepackage{graphicx}
\usepackage{filecontents}

\IfFileExists{plex-sans.sty}{%
\usepackage[sfdefault]{plex-sans}%
}{
\usepackage{palatino}%
}

\begin{filecontents*}{Ordner.tdf}
\unitlength=1mm
\hoffset=10mm
\voffset=-15mm
\ticketNumbers{1}{3}
\ticketSize{190}{58} % Breite und Höhe der Labels in mm
\ticketDistance{0}{0} % Abstand der Labels
\end{filecontents*}

\usepackage[utf8]{inputenc}
\usepackage[T1]{fontenc}
\usepackage{babel}
\usepackage{xcolor}

\renewcommand{\ticketdefault}{}%
\makeatletter
\@boxedtrue % Rahmen um Ticket
\@emptycrossmarkfalse % Falzmarken
\@cutmarktrue % Schnittmarken
\makeatother

\newcommand{\mylabel}[1]{
\ticket{%
\put(15,15){\scalebox{7}{\bfseries #1}}
}}

\begin{document}
\mylabel{Ausbildung}
\mylabel{Steuern}
\mylabel{Rente}
\end{document} |
\documentclass[a4paper,12pt]{scrartcl}
\usepackage[total={210mm,297mm},top=0mm,left=0mm,bottom=0mm,includefoot,landscape]{geometry}
\usepackage[Ordner]{ticket}
\usepackage{graphicx}
\usepackage{filecontents}
\IfFileExists{plex-sans.sty}{%
\usepackage[sfdefault]{plex-sans}%
}{
\usepackage{palatino}%
}
\begin{filecontents*}{Ordner.tdf}
\unitlength=1mm
\hoffset=10mm
\voffset=-15mm
\ticketNumbers{1}{3}
\ticketSize{190}{58} % Breite und Höhe der Labels in mm
\ticketDistance{0}{0} % Abstand der Labels
\end{filecontents*}
\usepackage[utf8]{inputenc}
\usepackage[T1]{fontenc}
\usepackage{babel}
\usepackage{xcolor}
\renewcommand{\ticketdefault}{}%
\makeatletter
\@boxedtrue % Rahmen um Ticket
\@emptycrossmarkfalse % Falzmarken
\@cutmarktrue % Schnittmarken
\makeatother
\newcommand{\mylabel}[1]{
\ticket{%
\put(15,15){\scalebox{7}{\bfseries #1}}
}}
\begin{document}
\mylabel{Ausbildung}
\mylabel{Steuern}
\mylabel{Rente}
\end{document}
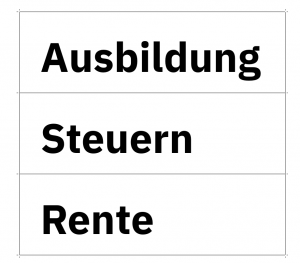
Beispiel Ordnerrücken
Uwe Ziegenhagen likes LaTeX and Python, sometimes even combined.
Do you like my content and would like to thank me for it? Consider making a small donation to my local fablab, the Dingfabrik Köln. Details on how to donate can be found here Spenden für die Dingfabrik.
More Posts - Website
2017-12-10, 19:04
Hier ein Beispiel aus der Dokumentation des pixelart Pakets von Louis Paternault
\documentclass[12pt]{scrartcl}
\usepackage[utf8]{inputenc}
\usepackage{pixelart}

\begin{document}

I
\bwpixelart[color=red, scale=.05, raise=-0.3ex]{%
001101100
011111110
111111111
111111111
111111111
011111110
001111100
000111000
000010000
}
\LaTeX

\end{document} |
\documentclass[12pt]{scrartcl}
\usepackage[utf8]{inputenc}
\usepackage{pixelart}
\begin{document}
I
\bwpixelart[color=red, scale=.05, raise=-0.3ex]{%
001101100
011111110
111111111
111111111
111111111
011111110
001111100
000111000
000010000
}
\LaTeX
\end{document}

Uwe Ziegenhagen likes LaTeX and Python, sometimes even combined.
Do you like my content and would like to thank me for it? Consider making a small donation to my local fablab, the Dingfabrik Köln. Details on how to donate can be found here Spenden für die Dingfabrik.
More Posts - Website
2017-12-10, 18:16
pdflatex packt einiges an Meta-Daten in eine PDF-Datei:
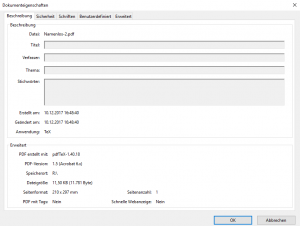
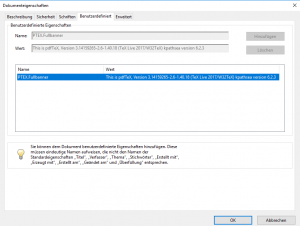
Mit dem pdfprivacy (http://mirror.ctan.org/macros/latex/contrib/pdfprivacy) Paket von Laurens Sion lassen sich diese Informationen unterdrücken.
Aus der Dokumentation:
„Creating pdfs with pdfLATEX populates several pdf meta-data fields such as date/time of creation/modification, information about the latex instal-
lation (e.g., pdfTEX version), and the relative paths of included pdfs. The pdfprivacy package provides support for emptying several of these pdf meta-
data fields as well as suppressing some pdfTEX meta-data entries in the resulting pdf.“
Die Optionen stehen dabei für:
- nodocdata
- Specify whether document meta-data should be removed from the PDF. Document meta-data includes: (i) Title, (ii) Subject, (iii) Author, and (iv) Keywords.
- noproducerdata
- Specify whether meta-data on the PDF-producing application should be removed. This includes: (i) Creator, and (ii) Producer.
- noeditdata
- Specify whether meta-data on the edit and creation dates should be removed. This includes: (i) creation date, and (ii) modification date.
- noptexdata
-
Specify whether the PTEX meta-data entries should be suppressed. This includes: (i) PTEX.Fullbanner, (ii) PTEX.FileName, (iii) PTEX.PageNumber, and (iv) PTEX.InfoDict.
- nopdftrailerid
-
Specify whether the pdfrailerid should be omitted.
Diese letzte Option zur pdftrailerid sagt mir nichts, die anderen Optionen sind sicherlich selbsterklärend. Hier ein Beispiel:
\documentclass[12pt,ngerman]{scrartcl}

\usepackage[utf8]{inputenc}
\usepackage[T1]{fontenc}
\usepackage{booktabs}
\usepackage{babel}
\usepackage{graphicx}
\usepackage{csquotes}
\usepackage{paralist}
\usepackage{xcolor}

\usepackage[nodocdata=false,noeditdata=true,noproducerdata=true,noptexdata=true,nopdftrailerid=false]{pdfprivacy}

\begin{document}

Hallo Welt!

\end{document} |
\documentclass[12pt,ngerman]{scrartcl}
\usepackage[utf8]{inputenc}
\usepackage[T1]{fontenc}
\usepackage{booktabs}
\usepackage{babel}
\usepackage{graphicx}
\usepackage{csquotes}
\usepackage{paralist}
\usepackage{xcolor}
\usepackage[nodocdata=false,noeditdata=true,noproducerdata=true,noptexdata=true,nopdftrailerid=false]{pdfprivacy}
\begin{document}
Hallo Welt!
\end{document}
Uwe Ziegenhagen likes LaTeX and Python, sometimes even combined.
Do you like my content and would like to thank me for it? Consider making a small donation to my local fablab, the Dingfabrik Köln. Details on how to donate can be found here Spenden für die Dingfabrik.
More Posts - Website
Schlagwörter:
LaTeX,
PDF,
Privacy Category:
LaTeX,
Pakete |
Kommentare deaktiviert für PDFs anonymisieren mit dem pdfprivacy Paket
2017-12-10, 15:39
Hier ein Beispiel, wie man mit varioref und prettyref Referenzen in LaTeX aufpeppen kann:
\documentclass[ngerman]{scrartcl}
\usepackage[latin1]{inputenc}
\usepackage[T1]{fontenc}
\usepackage{babel}
\usepackage{xcolor}

% sinnloser Text
\usepackage{blindtext}

\usepackage{varioref}
\usepackage{prettyref}

% for prettyref
\newrefformat{eq}{\textup{(\ref{#1})}}
\newrefformat{cha}{Kapitel \ref{#1}}
\newrefformat{sec}{Abschnitt \ref{#1}}
\newrefformat{tab}{Tabelle \ref{#1} auf Seite \pageref{#1}}
\newrefformat{fig}{Abbildung \ref{#1} auf Seite \pageref{#1}}

\usepackage{showlabels}

\begin{document}

\section{Erster Abschnitt}\label{sec:erst}

\blindtext[3]

\begin{figure}[h]%
\rule{\columnwidth}{5cm}
\caption{Hallo Welt!}%
\label{fig:test1}%
\end{figure}

\blindtext[1]

\section{Zweiter Abschnitt}

\blindtext[5]

\begin{figure}%
\rule{\columnwidth}{5cm}
\caption{Hallo Welt!}%
\label{fig:test2}%
\end{figure}

\blindtext[4]

\begin{itemize}
	\item Ohne Paket: Siehe Abbildung \textcolor{red}{\ref{fig:test1}} auf Seite \textcolor{red}{\pageref{fig:test1}}
	\item Varioref: Siehe Abbildung \textcolor{red}{\vref{fig:test1}}
	\item Varioref: Siehe die Abbildung \textcolor{red}{\vpageref{fig:test1}}
	\item Ohne Paket: Siehe Abbildung \textcolor{red}{\ref{fig:test2}} auf Seite \textcolor{red}{\pageref{fig:test2}}
	\item Varioref: Siehe Abbildung \textcolor{red}{\vpageref{fig:test2}}
	\item Varioref: Siehe Abbildung \textcolor{red}{\vref{fig:test2}}
	\item Varioref: Siehe Abbildungen \textcolor{red}{\vrefrange{fig:test1}{fig:test2}}
	\item Varioref: Siehe die Abbildungen \textcolor{red}{\vpagerefrange{fig:test1}{fig:test2}}
	\item Prettyref: \textcolor{red}{\prettyref{fig:test1}}
	\item Prettyref: \textcolor{red}{\prettyref{sec:erst}}
	\item Varioref: Siehe Abbildung \textcolor{red}{\vref{fig:test3}}
	\item Varioref: Siehe Abbildung \textcolor{red}{\vref{fig:test4}}
\end{itemize}

\clearpage

\begin{figure}%
\rule{\columnwidth}{5cm}
\caption{Hallo Welt!}%
\label{fig:test3}%
\end{figure}

\clearpage

\begin{figure}%
\rule{\columnwidth}{5cm}
\caption{Hallo Welt!}%
\label{fig:test4}%
\end{figure}

\end{document} |
\documentclass[ngerman]{scrartcl}
\usepackage[latin1]{inputenc}
\usepackage[T1]{fontenc}
\usepackage{babel}
\usepackage{xcolor}
% sinnloser Text
\usepackage{blindtext}
\usepackage{varioref}
\usepackage{prettyref}
% for prettyref
\newrefformat{eq}{\textup{(\ref{#1})}}
\newrefformat{cha}{Kapitel \ref{#1}}
\newrefformat{sec}{Abschnitt \ref{#1}}
\newrefformat{tab}{Tabelle \ref{#1} auf Seite \pageref{#1}}
\newrefformat{fig}{Abbildung \ref{#1} auf Seite \pageref{#1}}
\usepackage{showlabels}
\begin{document}
\section{Erster Abschnitt}\label{sec:erst}
\blindtext[3]
\begin{figure}[h]%
\rule{\columnwidth}{5cm}
\caption{Hallo Welt!}%
\label{fig:test1}%
\end{figure}
\blindtext[1]
\section{Zweiter Abschnitt}
\blindtext[5]
\begin{figure}%
\rule{\columnwidth}{5cm}
\caption{Hallo Welt!}%
\label{fig:test2}%
\end{figure}
\blindtext[4]
\begin{itemize}
\item Ohne Paket: Siehe Abbildung \textcolor{red}{\ref{fig:test1}} auf Seite \textcolor{red}{\pageref{fig:test1}}
\item Varioref: Siehe Abbildung \textcolor{red}{\vref{fig:test1}}
\item Varioref: Siehe die Abbildung \textcolor{red}{\vpageref{fig:test1}}
\item Ohne Paket: Siehe Abbildung \textcolor{red}{\ref{fig:test2}} auf Seite \textcolor{red}{\pageref{fig:test2}}
\item Varioref: Siehe Abbildung \textcolor{red}{\vpageref{fig:test2}}
\item Varioref: Siehe Abbildung \textcolor{red}{\vref{fig:test2}}
\item Varioref: Siehe Abbildungen \textcolor{red}{\vrefrange{fig:test1}{fig:test2}}
\item Varioref: Siehe die Abbildungen \textcolor{red}{\vpagerefrange{fig:test1}{fig:test2}}
\item Prettyref: \textcolor{red}{\prettyref{fig:test1}}
\item Prettyref: \textcolor{red}{\prettyref{sec:erst}}
\item Varioref: Siehe Abbildung \textcolor{red}{\vref{fig:test3}}
\item Varioref: Siehe Abbildung \textcolor{red}{\vref{fig:test4}}
\end{itemize}
\clearpage
\begin{figure}%
\rule{\columnwidth}{5cm}
\caption{Hallo Welt!}%
\label{fig:test3}%
\end{figure}
\clearpage
\begin{figure}%
\rule{\columnwidth}{5cm}
\caption{Hallo Welt!}%
\label{fig:test4}%
\end{figure}
\end{document}
Hier die Ausgabe der Referenzen auf der letzten Seite. Alles, was in rot gesetzt wird, wird so über das entsprechende TeX gesteuert.
Uwe Ziegenhagen likes LaTeX and Python, sometimes even combined.
Do you like my content and would like to thank me for it? Consider making a small donation to my local fablab, the Dingfabrik Köln. Details on how to donate can be found here Spenden für die Dingfabrik.
More Posts - Website
2017-05-03, 20:30
Letzten Montag habe ich die neue Version meines varsfromjobname Pakets auf CTAN hochgeladen, es gibt auch ein Github Repo dazu: https://github.com/UweZiegenhagen/VarsFromJobname
What does this package do?
Using varsfromjobname.sty one can easily extract information from the filename, if it follows a certain form.
The standard LaTeX command \jobname returns the name of the LaTeX (master) file. If the filename consists of tokens separated by hyphen we can easily extract certain tokens that can be used inside the document.
The package expects the filename to be of the form one-two-three-four-five-six-seven-eight-nine.tex and offers the following commands:
\getfromjobname{param}, with param in the range of 1 to 9 (a highlevel interface to the following commands)
\getonefromjobname
\gettwofromjobname
\getthreefromjobname
\getfourfromjobname
\getfivefromjobname
\getsixfromjobname
\getsevenfromjobname
\geteightfromjobname
\getninefromjobname
Why can it be useful?
You can use this package for example to define the date of the document in the filename, personally I use it e.g. for scrlttr2 letters.
Change History
- Version 0.5, as of January 11th 2009: Initial version published
- Version 1.0, to be published May 2017: Added various commands which extract necessary information also from included documents. Modified code as suggested by egreg
Shortcomings
- \getfromjobname is not fully expandable, use one of the other commands if you need expansion
- Version 1.0 cannot extract information from included sub-documents
- The package cannot handle more than nine tokens, see the reference to egreg’s answer on TSX below for an updated version
Uwe Ziegenhagen likes LaTeX and Python, sometimes even combined.
Do you like my content and would like to thank me for it? Consider making a small donation to my local fablab, the Dingfabrik Köln. Details on how to donate can be found here Spenden für die Dingfabrik.
More Posts - Website
2016-07-31, 23:55
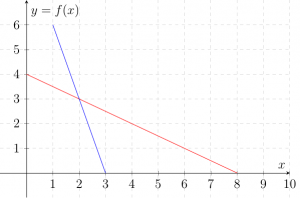
Hier ein kleines Beispiel für pgfplots, das ich aus diversen TSX Beiträgen für einen Python Artikel zusammengebaut habe:
\documentclass[12pt,english]{standalone}
\usepackage[T1]{fontenc}
\usepackage{tikz}
\usepackage{pgfplots}
\pgfplotsset{compat=newest}
\pagestyle{empty}

\begin{document}
\begin{tikzpicture}
\begin{axis}[
    domain=0:9,
    axis lines = center,
    xlabel = {$x$},
    ylabel = {$y = f(x)$},
    height=8cm, width=11cm, grid=major,grid style={dashed, gray!30},
    xmin=-1, xmax=10, ymin=-1, ymax=7,xtick={1,2,...,10},ytick={1,2,...,6}]

\addplot[draw=red,domain=0:8]{-0.5*x+4};
\addplot[draw=blue,domain=1:3]{-3*x+9};
\end{axis}
\end{tikzpicture}
\end{document} |
\documentclass[12pt,english]{standalone}
\usepackage[T1]{fontenc}
\usepackage{tikz}
\usepackage{pgfplots}
\pgfplotsset{compat=newest}
\pagestyle{empty}
\begin{document}
\begin{tikzpicture}
\begin{axis}[
domain=0:9,
axis lines = center,
xlabel = {$x$},
ylabel = {$y = f(x)$},
height=8cm, width=11cm, grid=major,grid style={dashed, gray!30},
xmin=-1, xmax=10, ymin=-1, ymax=7,xtick={1,2,...,10},ytick={1,2,...,6}]
\addplot[draw=red,domain=0:8]{-0.5*x+4};
\addplot[draw=blue,domain=1:3]{-3*x+9};
\end{axis}
\end{tikzpicture}
\end{document}
Uwe Ziegenhagen likes LaTeX and Python, sometimes even combined.
Do you like my content and would like to thank me for it? Consider making a small donation to my local fablab, the Dingfabrik Köln. Details on how to donate can be found here Spenden für die Dingfabrik.
More Posts - Website
2016-06-11, 22:33
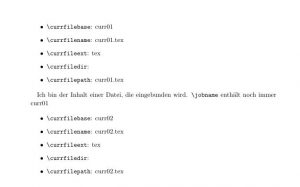
Hier ein Beispiel für das currentfile Paket. Während \jobname auch bei eingebundenen Dateien nur den Namen der Hauptdatei ausspuckt, kann man mit den Befehlen des currentfile Pakets auf die einzelnen Dateien zugreifen.
\documentclass{scrartcl}
\usepackage{filecontents}
\usepackage{currfile}

\begin{filecontents}{curr02.tex}

Ich bin der Inhalt einer Datei, die eingebunden wird. \verb|\jobname| enthält: \jobname

	\begin{itemize}
		\item \verb|\currfilebase|: \currfilebase
		\item \verb|\currfilename|: \currfilename
		\item \verb|\currfileext|: \currfileext
		\item \verb|\currfiledir|: \currfiledir
		\item \verb|\currfilepath|: \currfilepath
	\end{itemize}

\end{filecontents}

\begin{document}

	\begin{itemize}
		\item \verb|\currfilebase|: \currfilebase
		\item \verb|\currfilename|: \currfilename
		\item \verb|\currfileext|: \currfileext
		\item \verb|\currfiledir|: \currfiledir
		\item \verb|\currfilepath|: \currfilepath
	\end{itemize}

\input{curr02}

\end{document} |
\documentclass{scrartcl}
\usepackage{filecontents}
\usepackage{currfile}
\begin{filecontents}{curr02.tex}
Ich bin der Inhalt einer Datei, die eingebunden wird. \verb|\jobname| enthält: \jobname
\begin{itemize}
\item \verb|\currfilebase|: \currfilebase
\item \verb|\currfilename|: \currfilename
\item \verb|\currfileext|: \currfileext
\item \verb|\currfiledir|: \currfiledir
\item \verb|\currfilepath|: \currfilepath
\end{itemize}
\end{filecontents}
\begin{document}
\begin{itemize}
\item \verb|\currfilebase|: \currfilebase
\item \verb|\currfilename|: \currfilename
\item \verb|\currfileext|: \currfileext
\item \verb|\currfiledir|: \currfiledir
\item \verb|\currfilepath|: \currfilepath
\end{itemize}
\input{curr02}
\end{document}
Uwe Ziegenhagen likes LaTeX and Python, sometimes even combined.
Do you like my content and would like to thank me for it? Consider making a small donation to my local fablab, the Dingfabrik Köln. Details on how to donate can be found here Spenden für die Dingfabrik.
More Posts - Website