Posts tagged ‘LaTeX’

Aktienkurse mit Python und LaTeX auswerten

Hier ein einfaches Beispiel, wie man mit Python und LaTeX ein PDF mit Kursinformationen erstellen kann.

Zuerst der Python-Teil, der die Apple-Kursdaten seit dem 1.1.2021 in einen Dataframe lädt und dann in eine LaTeX-Tabelle schreibt:

import pandas
import pandas_datareader.data as web
 
YAHOO_TODAY="http://download.finance.yahoo.com/d/quotes.csv?s=%s&f=sd1ohgl1vl1"
 
history = web.DataReader('AAPL', "yahoo", start="2021-1-1")
history.to_latex('aapl.tex')

Dann noch der LaTeX-Teil, der a) den Python-Code aus dem LaTeX-Lauf heraus ausführt und b) die erzeugte Tabellen-Datei nur dann einbindet, wenn sie wirklich auch erzeugt wurde.

\documentclass[12pt,ngerman]{scrartcl}
\usepackage[a4paper, top=1cm,bottom=1cm,left=1cm, right=1cm]{geometry}
\usepackage[T1]{fontenc}
\usepackage{booktabs}
 
\makeatletter
\newcommand{\testfileexists}[1]{%
  \IfFileExists{#1}%
    {\def\inputtestedfile{\@@input #1 }}
    {\let\inputtestedfile\@empty}%
}
\makeatother
 
\begin{document}
 
\write18{python runpy.py}
 
  \testfileexists{aapl}
      \inputtestedfile
 
 
\end{document}

Uwe

Uwe Ziegenhagen likes LaTeX and Python, sometimes even combined. Do you like my content and would like to thank me for it? Consider making a small donation to my local fablab, the Dingfabrik Köln. Details on how to donate can be found here Spenden für die Dingfabrik.

More Posts - Website

Farbige Boxen in LaTeX mit tcolorbox

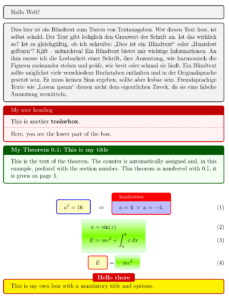
Hier einige Beispiele für farbige Boxen mit dem tcolorbox Paket, entnommen der Paketbeschreibung

\documentclass[12pt,ngerman]{scrartcl}
 
\usepackage[utf8]{inputenc}
\usepackage[T1]{fontenc}
\usepackage{booktabs}
\usepackage{babel}
\usepackage{graphicx}
\usepackage{csquotes}
\usepackage{paralist}
\usepackage{xcolor}
\usepackage{blindtext}
\usepackage{microtype}
 
\usepackage{empheq}
\usepackage[most]{tcolorbox}
\tcbuselibrary{theorems}
 
\newtcbtheorem[number within=section]{mytheo}{My Theorem}%
{colback=green!5,colframe=green!35!black,fonttitle=\bfseries}{th}
 
\begin{document}
 
 
\begin{tcolorbox}
Hallo Welt!
\end{tcolorbox}
 
 
\begin{tcolorbox}
\blindtext
\end{tcolorbox}
 
\begin{tcolorbox}[colback=red!5!white,colframe=red!75!black,title=My nice heading]
This is another \textbf{tcolorbox}.
\tcblower
Here, you see the lower part of the box.
\end{tcolorbox}
 
\begin{mytheo}{This is my title}{theoexample}
This is the text of the theorem. The counter is automatically assigned and,
in this example, prefixed with the section number. This theorem is numbered with
\ref{th:theoexample}, it is given on page~\pageref{th:theoexample}.
\end{mytheo}
 
 
\begin{equation}
\tcbset{fonttitle=\footnotesize}
\tcboxmath[colback=yellow!25!white,colframe=blue]{ a^2 = 16 }
\quad \Rightarrow \quad
\tcboxmath[colback=blue!25!white,colframe=red,title=Implication]%
{ a = 4 ~\vee~ a=-4. }
\end{equation}
 
 
\newtcbox{\otherbox}[1][]{nobeforeafter,math upper,tcbox raise base,
enhanced,frame hidden,boxrule=0pt,interior style={top color=green!10!white,
bottom color=green!10!white,middle color=green!50!yellow},
fuzzy halo=1pt with green,#1}
\begin{empheq}[box=\otherbox]{align}
a&=\sin(z)\\
E&=mc^2 + \int_a^b x\, dx
\end{empheq}
\begin{equation}
\tcbhighmath{E} = \otherbox{mc^2}
\end{equation}
 
 
\newtcolorbox{mybox}[2][]{colback=red!5!white,
colframe=red!75!black,fonttitle=\bfseries,
colbacktitle=red!85!black,enhanced,
attach boxed title to top center={yshift=-2mm},
title=#2,#1}
\begin{mybox}[colback=yellow]{Hello there}
This is my own box with a mandatory title
and options.
\end{mybox}
 
\begin{tcolorbox}[enhanced,
size=minimal,auto outer arc,
width=2.1cm,octogon arc,
colback=red,colframe=white,colupper=white,
fontupper=\fontsize{6mm}{6mm}\selectfont\bfseries\sffamily,
halign=center,valign=center,
square,arc is angular,
borderline={0.2mm}{-1mm}{red} ]
STOP
\end{tcolorbox}
 
\begin{tcolorbox}[enhanced,
size=minimal,auto outer arc,
width=2.1cm,octogon arc,
colback=green,colframe=white,colupper=black,
fontupper=\fontsize{6mm}{6mm}\selectfont\bfseries\sffamily,
halign=center,valign=center,
square,arc is angular,
borderline={0.2mm}{-1mm}{green}]
GO
\end{tcolorbox}
\end{document}

Uwe

Uwe Ziegenhagen likes LaTeX and Python, sometimes even combined. Do you like my content and would like to thank me for it? Consider making a small donation to my local fablab, the Dingfabrik Köln. Details on how to donate can be found here Spenden für die Dingfabrik.

More Posts - Website

Kurszertifikate mit LaTeX erstellen

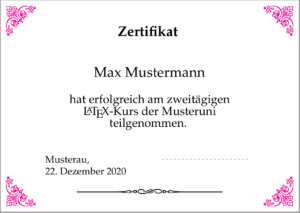
Das pgfornaments Paket erlaubt es, spezielle Schmuckzeichen für beispielsweise Kurszertifikate zu nutzen. Hier ein Beispiel, das ich gern für die Teilnehmerinnen und Teilnehmer meiner LaTeX-Kurse nutze.

\documentclass[16pt,ngerman]{scrartcl}
 
\usepackage[utf8]{inputenc}
\usepackage[T1]{fontenc}
\usepackage{booktabs}
\usepackage{eso-pic,calc} 
\usepackage{babel}
\usepackage{graphicx}
\usepackage{csquotes}
\usepackage{paralist}
\usepackage{xcolor}  
\usepackage[a4paper,landscape,bottom=1.5cm]{geometry} % left=0pt,right=0pt,top=0pt,bottom=0pt
\usepackage{palatino,dashrule}
\usepackage{pgfornament}
\pagestyle{empty}
 
\setlength{\parindent}{0pt}
 
\makeatletter
\AddToShipoutPicture{%
  \begingroup 
    \setlength{\@tempdima}{5mm}%
    \setlength{\@tempdimb}{\paperwidth-\@tempdima-3cm}%
    \setlength{\@tempdimc}{\paperheight-\@tempdima}%
    \put(\LenToUnit{\@tempdima},\LenToUnit{\@tempdimc}){%
            \pgfornament[color=magenta,anchor=north west,width=3cm]{63}} 
    \put(\LenToUnit{\@tempdima},\LenToUnit{\@tempdima}){%
            \pgfornament[color=magenta,anchor=south west,width=3cm,symmetry=h]{63}}
    \put(\LenToUnit{\@tempdimb},\LenToUnit{\@tempdima+\paperheight-1cm}){%
            \pgfornament[color=magenta,anchor=north east,width=3cm,symmetry=v]{63}}    
    \put(\LenToUnit{\@tempdimb},\LenToUnit{\@tempdima+\paperheight-21cm}){%
            \pgfornament[color=magenta,anchor=south east,width=3cm,symmetry=c]{63}} 
  \endgroup  
} 
\let\strippt\strip@pt     
\makeatother   
 
 
\begin{document}
 
\centering\Huge
 
\textbf{Zertifikat}
\vspace{20mm}
\begin{center}
Max Mustermann%\hdashrule[0.75ex]{14cm}{1pt}{3mm}
\end{center}
\vspace{1cm}\huge
 
hat erfolgreich am zweitägigen \LaTeX-Kurs der Musteruni teilgenommen. \vspace{2cm}\LARGE\flushleft
 
Musterau, \hfill\hdashrule[0.75ex]{9.5cm}{1pt}{2mm}
 
\today
 
\begin{center}
\vfill\pgfornament[width=0.7\textwidth]{88}
\end{center}
\end{document}

Uwe

Uwe Ziegenhagen likes LaTeX and Python, sometimes even combined. Do you like my content and would like to thank me for it? Consider making a small donation to my local fablab, the Dingfabrik Köln. Details on how to donate can be found here Spenden für die Dingfabrik.

More Posts - Website

Schöne Matrizen mit nicematrix

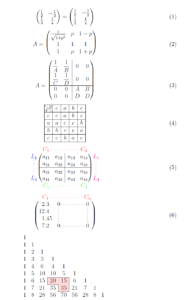
Um ansprechende Matrizen zu setzen gibt es mit dem nicematrix Paket ein recht neues Paket, das sich alle anschauen sollten, die viel mit Matrizen zu tun haben. Die folgenden Beispiele sind der Dokumentation entnommen, teilweise braucht man mehrere LaTeX-Läufe für das finale Ergebnis.

%!TEX TS-program = Arara
% arara: pdflatex: {shell: yes}
\documentclass[12pt,ngerman]{scrartcl}
 
\usepackage[utf8]{inputenc}
\usepackage[T1]{fontenc}
\usepackage{babel}
\usepackage{xcolor} 
 
\usepackage{tikz}
\usepackage{siunitx}
\usepackage{nicematrix}
\NiceMatrixOptions{cell-space-top-limit = 1pt,cell-space-bottom-limit = 1pt}
\begin{document}
 
\begin{equation}
\begin{pmatrix}
\frac12 & -\frac12 \\
\frac13 & \frac14 \\
\end{pmatrix}
=
\begin{pNiceMatrix}
\frac12 & -\frac12 \\
\frac13 & \frac14 \\
\end{pNiceMatrix}
\end{equation}
 
\begin{equation}
A = \begin{pNiceMatrix}[baseline=2]
\frac{1}{\sqrt{1+p^2}} & p & 1-p \\
1 & 1 & 1 \\
1 & p & 1+p
\end{pNiceMatrix}
\end{equation}
 
 
\NiceMatrixOptions{cell-space-top-limit=1pt,cell-space-bottom-limit=1pt}
 
\begin{equation}
A=\begin{pNiceArray}{cc|cc}[baseline=line-3]
\dfrac1A & \dfrac1B & 0 & 0 \\
\dfrac1C & \dfrac1D & 0 & 0 \\
\hline
0 & 0 & A & B \\
0 & 0 & D & D \\
\end{pNiceArray}
\end{equation}
 
 
\begin{equation}
\begin{NiceArray}{*{5}{c}}[hvlines]
\diagbox{x}{y} & e & a & b & c \\
e & e & a & b & c \\
a & a & e & c & b \\
b & b & c & e & a \\
c & c & b & a & e
\end{NiceArray}
\end{equation}
 
 
\NiceMatrixOptions{code-for-first-row = \color{red},
code-for-first-col = \color{blue},
code-for-last-row = \color{green},
code-for-last-col = \color{magenta}}
 
\begin{equation}
\begin{pNiceArray}{cc|cc}[first-row,last-row=5,first-col,last-col,nullify-dots]
& C_1 & \Cdots & & C_4 & \\
L_1 & a_{11} & a_{12} & a_{13} & a_{14} & L_1 \\
\Vdots & a_{21} & a_{22} & a_{23} & a_{24} & \Vdots \\
\hline
& a_{31} & a_{32} & a_{33} & a_{34} & \\
L_4 & a_{41} & a_{42} & a_{43} & a_{44} & L_4 \\
& C_1 & \Cdots & & C_4 &
\end{pNiceArray}
\end{equation}
 
\begin{equation}
\begin{pNiceArray}{ScWc{1cm}c}[nullify-dots,first-row]
{C_1} & \Cdots & & C_n \\
2.3 & 0 & \Cdots & 0 \\
12.4 & \Vdots & & \Vdots \\
1.45 \\
7.2 & 0 & \Cdots & 0
\end{pNiceArray}
\end{equation}
 
\[\begin{NiceMatrix}[
code-before =
{
\tikz \draw [fill = red!15]
(row-7-|col-4) -- (row-8-|col-4) -- (row-8-|col-5) --
(row-9-|col-5) -- (row-9-|col-6) |- cycle ;
}
]1
\\
1 & 1 \\
1 & 2 & 1 \\
1 & 3 & 3 & 1 \\
1 & 4 & 6 & 4 & 1 \\
1 & 5 & 10 & 10 & 5 & 1 \\
1 & 6 & 15 & 20 & 15 & 6 & 1 \\
1 & 7 & 21 & 35 & 35 & 21 & 7 & 1 \\
1 & 8 & 28 & 56 & 70 & 56 & 28 & 8 & 1
\end{NiceMatrix}\]
 
 
\(
\begin{bNiceMatrix}
C[a_1,a_1] & \Cdots & C[a_1,a_n]
& \hspace*{20mm} & C[a_1,a_1^{(p)}] & \Cdots & C[a_1,a_n^{(p)}] \\
\Vdots & \Ddots & \Vdots
& \Hdotsfor{1} & \Vdots & \Ddots & \Vdots \\
C[a_n,a_1] & \Cdots & C[a_n,a_n]
& & C[a_n,a_1^{(p)}] & \Cdots & C[a_n,a_n^{(p)}] \\
\rule{0pt}{15mm} & \Vdotsfor{1} & & \Ddots & & \Vdotsfor{1} \\
C[a_1^{(p)},a_1] & \Cdots & C[a_1^{(p)},a_n]
& & C[a_1^{(p)},a_1^{(p)}] & \Cdots & C[a_1^{(p)},a_n^{(p)}] \\
\Vdots & \Ddots & \Vdots
& \Hdotsfor{1} & \Vdots & \Ddots & \Vdots \\
C[a_n^{(p)},a_1] & \Cdots & C[a_n^{(p)},a_n]
& & C[a_n^{(p)},a_1^{(p)}] & \Cdots & C[a_n^{(p)},a_n^{(p)}]
\end{bNiceMatrix}
\)
 
\end{document}

Uwe

Uwe Ziegenhagen likes LaTeX and Python, sometimes even combined. Do you like my content and would like to thank me for it? Consider making a small donation to my local fablab, the Dingfabrik Köln. Details on how to donate can be found here Spenden für die Dingfabrik.

More Posts - Website

Das subcaption Paket als subfigure Ersatz

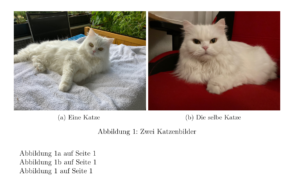
Um mehreren nebeneinander gesetzten Bildern separate Bildunterschriften zu geben, war das subfigure Paket lange Standard. Mit dem subcaption Paket von Axel Sommerfeldt gibt es einen würdigen Nachfolger, der aktiv gepflegt wird.

Hier ein Beispiel, zum Übersetzen bitte eigene Bilder nutzen:

\documentclass[12pt,ngerman]{scrartcl}
 
\usepackage[utf8]{inputenc}
\usepackage[T1]{fontenc}
\usepackage{babel}
\usepackage{graphicx}
\usepackage{subcaption}
 
\begin{document}
 
\begin{figure}
\centering
\subcaptionbox{Eine Katze \label{cat1}}
{\includegraphics[width=0.49\textwidth]{Bilder/Katze1}}
\subcaptionbox{Die selbe Katze \label{cat2}}
{\includegraphics[width=0.49\textwidth]{Bilder/Katze2}}
\caption{Zwei Katzenbilder}\label{katzenbilder}
\end{figure}
 
Abbildung \ref{cat1} auf Seite \pageref{katzenbilder}
 
Abbildung \ref{cat2} auf Seite \pageref{katzenbilder}
 
Abbildung \ref{katzenbilder} auf Seite \pageref{katzenbilder}
 
\end{document}

Uwe

Uwe Ziegenhagen likes LaTeX and Python, sometimes even combined. Do you like my content and would like to thank me for it? Consider making a small donation to my local fablab, the Dingfabrik Köln. Details on how to donate can be found here Spenden für die Dingfabrik.

More Posts - Website

Flyer mit LaTeX gestalten

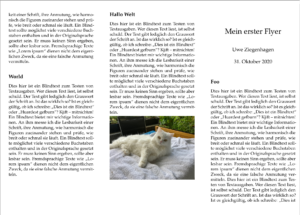
Um einen einfachen Flyer zu erstellen gibt es nichts besseres als die leaflet-Klasse. Hier ein einfaches Beispiel, die Katzenbilder muss man zum Übersetzen auskommentieren oder ersetzen.

\documentclass[12pt,ngerman]{leaflet}
 
\usepackage[utf8]{inputenc}
\usepackage[T1]{fontenc}
\usepackage{booktabs}
\usepackage{babel}
\usepackage{graphicx}
\usepackage{csquotes}
\usepackage{paralist}
\usepackage{xcolor}
\usepackage{palatino}
\usepackage{blindtext}
\usepackage{microtype}
 
\author{Uwe Ziegenhagen}
\title{Mein erster Flyer}
 
\begin{document}
\maketitle
\thispagestyle{empty}
 
\section{Foo}
 
\blindtext[2]
 
\section{Bar}
 
\includegraphics[width=\textwidth]{Bilder/Katze2}
 
\blindtext
 
\section{Hello}
 
\blindtext[4]
 
\section{World}
 
\blindtext
 
\section{Hallo Welt}
 
\blindtext
 
\includegraphics[width=\textwidth]{Bilder/Katze1}
 
\end{document}

leaflet-01

Uwe

Uwe Ziegenhagen likes LaTeX and Python, sometimes even combined. Do you like my content and would like to thank me for it? Consider making a small donation to my local fablab, the Dingfabrik Köln. Details on how to donate can be found here Spenden für die Dingfabrik.

More Posts - Website

CTAN-Pakete per REST-API hochladen

Vermutlich ist es nicht so bekannt, dass man LaTeX-Pakete auch per REST-API auf CTAN hochladen kann. Das ist insbesondere dann praktisch, wenn man öfter Pakete aktualisieren muss, wie ich es beispielsweise mit der DTK Bibliografie mehrmals im Jahr mache.

Manfred Lotz vom CTAN-Team hat dazu ein Python-Skript geschrieben (https://gitlab.com/Lotz/pkgcheck/blob/master/ctan_upload.py), das diese API befüttert.

Ich habe sein Skript noch ein wenig angepasst (ich erstelle auch die ZIP-Datei damit und kopiere die richtigen Dateien an ihren Platz), mein Skript findet ihr im Github unter https://github.com/dante-ev/dtk-bibliography/blob/master/pack_and_upload_to_ctan.py. Für den Upload selbst benötigt man noch eine TOML-Datei, in der die Upload-Informationen als Key-Value-Paare stehen. Ein Beispiel für eine solche TOML-Datei findet ihr bei Manfred unter https://gitlab.com/Lotz/pkgcheck/-/blob/master/pkgcheck.toml.

Uwe

Uwe Ziegenhagen likes LaTeX and Python, sometimes even combined. Do you like my content and would like to thank me for it? Consider making a small donation to my local fablab, the Dingfabrik Köln. Details on how to donate can be found here Spenden für die Dingfabrik.

More Posts - Website

Lose-Blatt-Sammlungen mit LaTeX

Für ein spezielles Projekt habe ich eine Möglichkeit gesucht, eine Lose-Blatt-Sammlung mit LaTeX zu gestalten. Lose-Blatt-Sammlung heißt in dem Zusammenhang:

1) Für jede (logische) Seite existiert ein separates Unterdokument.

2) Im Dateinamen jedes Unterdokuments ist die Seitennummer enthalten.

3) Einzelne Seiten können dadurch problemlos ausgetauscht werden, ohne dass sich die Seitenzahlen der anderen Seiten ändern.

4) Jedes Unterdokument besteht grundsätzlich aus nur einer physischen Textseite, kann jedoch auch länger sein. Daher hat jedes Unterdokument eine Seitennummerierung der Form xx-yy. xx steht dabei für die logische Seitennummer im Hauptdokument, die aus dem Dateinamen gezogen wird, yy für die fortlaufende (physische) Seitennummer im Unterdokument selbst. Die fortlaufende Seitennummer für das Gesamtdokument werte ich nicht aus.

5) Alle Dokumente stehen natürlich unter Versionverwaltung, hier nutze ich Subversion.

Wie habe ich es umgesetzt?

Das Hauptdokument sieht wie folgt aus. Neben dem svn-multi Paket, das die Subversion-Daten bereitstellt, nutze ich varsfromjobname, um die einzelnen Komponenten der Dateinamen (xx-yy.tex) auswerten zu können. Die einzelnen Teile von Kopf- und Fußzeile werden durch scrlayer-scrpage modifiziert.

%!TEX TS-program = Arara
% arara: pdflatex: {shell: yes}
 
\documentclass[12pt,ngerman,headsepline,footsepline]{scrartcl}
\usepackage[utf8]{inputenc}
\usepackage[T1]{fontenc}
\usepackage{babel}
\usepackage{csquotes}
\usepackage{xcolor}
\usepackage{svn-multi}
\usepackage{currfile}
\usepackage{varsfromjobname}
 
\usepackage{blindtext}
\addtokomafont{pagenumber}{\textit}
\addtokomafont{sectionentrypagenumber}{\color{white}}
\usepackage[left=3cm,right=1.5cm,top=2cm,bottom=3cm]{geometry}
 
\usepackage[headsepline=0.25pt,footsepline=0.25pt]{scrlayer-scrpage}
\pagestyle{scrheadings}
 
\svnidlong{$HeadURL: svn://192.168.0.80/Dokumente/Uwe/Main.tex $}
{$LastChangedDate: 2020-07-16 10:42:03 +0200 (Do, 16 Jul 2020) $}
{$LastChangedRevision: 62 $}
{$LastChangedBy: uwe $}
 
\title{Main Document}
\author{Max Mustermann}
 
\begin{document}
 
\tableofcontents
 
\include{sub-01}
\include{sub-02}
 
\end{document}

Die Subdokumente sehen jeweils wie folgt aus. Über die *foot und *head Befehle werden die Seitenköpfe und -füße mit den Komponenten aus dem Dateinamen befüllt, \addsec fügt die Dokumente zum Inhaltsverzeichnis hinzu.

%!TeX root=main.tex
 
\svnidlong
{$HeadURL: svn://192.168.0.42/Dokumente/Uwe/Sub-01.tex $}
{$LastChangedDate: 2020-07-16 10:10:19 +0200 (Do, 16 Jul 2020) $}
{$LastChangedRevision: 60 $}
{$LastChangedBy: uwe $}
 
\setcounter{page}{1}
 
\ohead{V\svnfilerev\ vom \svnfileday.\svnfilemonth.\svnfileyear}
\ofoot[\gettwofromcurrfilename-\pagemark]{\gettwofromcurrfilename-\pagemark}
\ifoot[\currfilename]{\currfilename} % inner foot
\ihead[]{} % inner head
\cfoot[]{} % center foot
\chead[]{} % center head
 
 
\addsec{\gettwofromcurrfilename~\getonefromcurrfilename}
 
 
\blindtext[6]

Beispieldokument: Main.pdf

Uwe

Uwe Ziegenhagen likes LaTeX and Python, sometimes even combined. Do you like my content and would like to thank me for it? Consider making a small donation to my local fablab, the Dingfabrik Köln. Details on how to donate can be found here Spenden für die Dingfabrik.

More Posts - Website

Mehrsprachige Beamerfolien erstellen – Teil 2

Basierend auf dem letzten Blog-Artikel dazu und einer Frage, die ich 2014 auf TSX gestellt habe, habe ich den Code für mehrsprachige Beamer-Folien angepasst.

\documentclass[ngerman]{beamer}
 
\usepackage{comment}
\makeatletter
\newif\if@ngerman
\newif\if@option@ngerman
\DeclareOption{ngerman}{%
	\@ngermantrue
	\@option@ngermantrue
}
\ProcessOptions*\relax
\newcommand*{\ifngerman}{%
	\if@ngerman
	\expandafter\@firstoftwo
	\else
	\expandafter\@secondoftwo
	\fi
}
\makeatother
 
\ifngerman{
\usepackage[main=ngerman]{babel}
\includecomment{DE}
\excludecomment{EN}
}{
\usepackage[main=english]{babel}
\includecomment{EN}
\excludecomment{DE}
}
 
\begin{document}
	\begin{DE}
		\begin{frame}[fragile]{Hallo Welt}
		Hallo Welt
	\end{frame}
\end{DE}
 
\begin{EN}
	\begin{frame}[fragile]{Hello World}
	Hello World
\end{frame}
\end{EN}
 
\end{document}

Uwe

Uwe Ziegenhagen likes LaTeX and Python, sometimes even combined. Do you like my content and would like to thank me for it? Consider making a small donation to my local fablab, the Dingfabrik Köln. Details on how to donate can be found here Spenden für die Dingfabrik.

More Posts - Website

Mehrsprachige Beamer-Folien erstellen

Unter https://tex.stackexchange.com/questions/443714/bilingual-slides-beamer-comment-package-and-non-ascii-characters-umlauts-dia gibt es ein gutes Beispiel, wie man mehrsprachige Beamer-Folien erstellen kann. Je nach gesetztem \newcommand{\lvlang}{EN} wird entweder die englische oder deutsche Version erzeugt.

Der Code müsste sich noch verbessern lassen, wenn man beispielsweise globale Klassenoptionen wie english oder ngerman auswertet. Nachtrag: Siehe dazu https://www.uweziegenhagen.de/?p=4352

Hier ein vollständiges Beispiel:

\documentclass{beamer}
 
\newcommand{\lvlang}{EN}
 
\usepackage[utf8]{inputenc}
\usepackage[T1]{fontenc}
 
\usepackage{comment}
\long\def\WriteCommentLine#1{\immediate\write\CommentStream{\unexpanded{#1}}}
\let\ThisComment\WriteCommentLine
 
\usepackage{ifthen}
\newcommand{\iflvlangde}[2]{%
  \ifthenelse{\equal{\lvlang}{DE}}{#1}{#2}%
}
 
\makeatletter
\iflvlangde{
  \usepackage[main=ngerman]{babel}
  \includecomment{DE}
  \excludecomment{EN}
}{
  \usepackage[main=english]{babel}
  \includecomment{EN}
  \excludecomment{DE}
}
\makeatother
 
\begin{document}
\begin{DE}
\begin{frame}[fragile]{Hallo Welt}
  Hallo Welt
\end{frame}
\end{DE}
 
\begin{EN}
\begin{frame}[fragile]{Hello World}
  Hello World
\end{frame}
\end{EN}
 
\end{document}

Uwe

Uwe Ziegenhagen likes LaTeX and Python, sometimes even combined. Do you like my content and would like to thank me for it? Consider making a small donation to my local fablab, the Dingfabrik Köln. Details on how to donate can be found here Spenden für die Dingfabrik.

More Posts - Website