2022-03-19, 20:52
Hier noch ein weiteres Beispiel, wie man sich mit Python sinnlose manuelle Arbeiten erleichtern kann. Gegeben sei die folgende Verzeichnisstruktur:
Verzeichnis1
 Ordner1
  Unterordner1
   Willich.txt
 Ordner2
  Unterordner2
   Willich.txt
 Ordner3
  Unterordner3
   Willich.txt
Die in den Ordnern liegenden Dateien sind alle gleich benannt (trotz unterschiedlicher Inhalte), sollen aber für die weitere Verarbeitung in einen Ordner verschoben werden. Man kann sie jetzt manuell nach dem Schema „Ordnerx-Unterordnerx-Dateiname“ umbenennen, man kann es aber auch lassen und ein kurzes Python-Skript dazu schreiben. Spätestens bei 20 oder 30 Dateien lohnt sich der Aufwand der initialen Entwicklung, das Beispiel lässt sich auch leicht auf andere Aufgaben übertragen. Die folgende Python-Datei speichert man in „Verzeichnis1“, dieses Verzeichnis bildet dann den root-Pfad. Der Rest ist dann einfach nur cleveres Auswerten des Pfades und das Wechseln der Backslashes in Unterstriche, um den neuen Pfad zu bauen.
import os

for (root,dirs,files) in os.walk('.'):

    for file in files:
        fullpath = os.path.join(root,file)

        if fullpath.endswith('.txt'):
            newpath = root+'\\'+root[2:].replace('\\','_')+'_'+file
            print(newpath)
os.rename(fullpath, newpath) |
import os
for (root,dirs,files) in os.walk('.'):
for file in files:
fullpath = os.path.join(root,file)
if fullpath.endswith('.txt'):
newpath = root+'\\'+root[2:].replace('\\','_')+'_'+file
print(newpath)
os.rename(fullpath, newpath)
Uwe Ziegenhagen likes LaTeX and Python, sometimes even combined.
Do you like my content and would like to thank me for it? Consider making a small donation to my local fablab, the Dingfabrik Köln. Details on how to donate can be found here Spenden für die Dingfabrik.
More Posts - Website
2021-12-23, 20:35
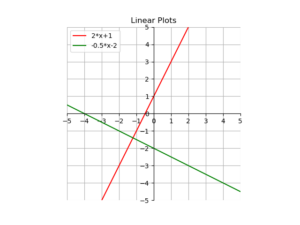
Hier ein kurzes Beispiel, wie man mit matplotlib Funktionen plotten kann.
import matplotlib.pyplot as plt
import numpy as np

ax = plt.gca()
plt.gca().set_aspect('equal')

ax.set_xticks(range(-6,6,1))
ax.set_yticks(range(-6,6,1))
ax.set_xlim([-5, 5])
ax.set_ylim([-5, 5])

ax.spines['top'].set_color('none')
ax.spines['bottom'].set_position('zero')
ax.spines['left'].set_position('zero')
ax.spines['right'].set_color('none')

x = np.linspace(-5,5,100)
y = 2*x+1
y2 = -0.5*x-2

plt.plot(x, y,  'r', label='2*x+1')
plt.plot(x, y2, 'g', label='-0.5*x-2')

plt.title('Linear Plots')

plt.legend(loc='upper left')

plt.grid()
plt.show() |
import matplotlib.pyplot as plt
import numpy as np
ax = plt.gca()
plt.gca().set_aspect('equal')
ax.set_xticks(range(-6,6,1))
ax.set_yticks(range(-6,6,1))
ax.set_xlim([-5, 5])
ax.set_ylim([-5, 5])
ax.spines['top'].set_color('none')
ax.spines['bottom'].set_position('zero')
ax.spines['left'].set_position('zero')
ax.spines['right'].set_color('none')
x = np.linspace(-5,5,100)
y = 2*x+1
y2 = -0.5*x-2
plt.plot(x, y, 'r', label='2*x+1')
plt.plot(x, y2, 'g', label='-0.5*x-2')
plt.title('Linear Plots')
plt.legend(loc='upper left')
plt.grid()
plt.show()
Uwe Ziegenhagen likes LaTeX and Python, sometimes even combined.
Do you like my content and would like to thank me for it? Consider making a small donation to my local fablab, the Dingfabrik Köln. Details on how to donate can be found here Spenden für die Dingfabrik.
More Posts - Website
2021-12-23, 20:14
Angenommen, wir haben eine Excel-Datei Daten.xlsx mit Werten, die in ein entsprechendes XML-Dokument überführt werden müssen.
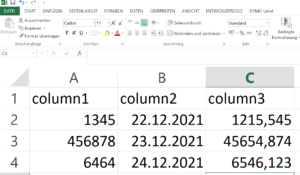
Mit Python und der Jinja2 Template-Engine ist das flink gemacht. Zuerst definieren wir das Template template.xml:
<?xml version='1.0' encoding='UTF-8'?>
	<table name="Tablename">
	{% for _,row in data.iterrows() %}
	<ROW>
    <COLUMN1>{{row['column1']}}</COLUMN1>
    <COLUMN2>{{row['column2']}}</COLUMN2>
    <COLUMN3>{{row['column3']}}</COLUMN3>
	</ROW>
	{% endfor %}
</table> |
<?xml version='1.0' encoding='UTF-8'?>
<table name="Tablename">
{% for _,row in data.iterrows() %}
<ROW>
<COLUMN1>{{row['column1']}}</COLUMN1>
<COLUMN2>{{row['column2']}}</COLUMN2>
<COLUMN3>{{row['column3']}}</COLUMN3>
</ROW>
{% endfor %}
</table>
Dann definieren wir den Python-Code:
import pandas as pd # data wrangling
import jinja2 # template engine
import os # for file-related stuff

# create jinja env that can load template from filesystem
jinja_env = jinja2.Environment(loader = jinja2.FileSystemLoader(os.path.abspath('.')))

df = pd.read_excel('Daten.xlsx')
template = jinja_env.get_template('template.xml')

with open('FertigesXML.xml','w') as output:
output.write(template.render(data=df)) |
import pandas as pd # data wrangling
import jinja2 # template engine
import os # for file-related stuff
# create jinja env that can load template from filesystem
jinja_env = jinja2.Environment(loader = jinja2.FileSystemLoader(os.path.abspath('.')))
df = pd.read_excel('Daten.xlsx')
template = jinja_env.get_template('template.xml')
with open('FertigesXML.xml','w') as output:
output.write(template.render(data=df))
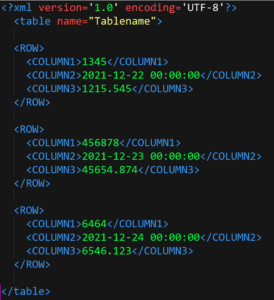
Lassen wir den Python-Code laufen, so erhalten wir das folgende XML:
Uwe Ziegenhagen likes LaTeX and Python, sometimes even combined.
Do you like my content and would like to thank me for it? Consider making a small donation to my local fablab, the Dingfabrik Köln. Details on how to donate can be found here Spenden für die Dingfabrik.
More Posts - Website
2021-05-09, 11:03
Hier ein bisschen Python-Code, um zwei CSV Dateien miteinander zu vergleichen. Die Ergebnisse des spalten- und zeilenweisen Vergleichs werden dann zusammengefasst dargestellt, um schnell einen Überblick zu bekommen, wo eine tiefergehende Analyse notwendig ist.
import sys
import collections
import pandas as pd
from tabulate import tabulate


file1 = pd.read_csv('file1.csv', sep=';', encoding='UTF-8')
file2 = pd.read_csv('file2.csv', sep=';', encoding='UTF-8')

columnnames1 = list(file1)
columnnames2 = list(file2)

if collections.Counter(columnnames1) == collections.Counter(columnnames2):
    print ("Number of columns and Names match, Comparison possible...\n\n")
else:
    print ("Number of columns and Names are not matching!!! Please check the input!")
    sys.exit('Error!')

# add suffixes to distinguish between actual and expected in the merger
file1 = file1.add_suffix('_e') # expected
file2 = file2.add_suffix('_t') # t


# merge them using the given key, use outer join
comparison = pd.merge(file1,file2, how='outer',
                      left_on=['Key_e'],
                      right_on=['Key_t'])

# create the columnwise comparison
for col in columnnames1:
    comparison[(col + '_c')] = comparison[(col + '_t')] == comparison[(col + '_e')]

# reorder the columns
comparison=comparison.reindex(sorted(comparison.columns),axis=1)

print(tabulate(comparison, tablefmt="pipe", headers="keys"))


# save the result as Excel file
comparison.to_excel('result.xlsx')

# names of the comparison column
check_colnames= [s + '_c' for s in columnnames1]

# initialize an empty dataframe for the log
logdf=pd.DataFrame(index=[True,False])

for column in check_colnames:
    t=comparison[column].value_counts() # returns a series
    tt=pd.DataFrame(t) # makes a DF out of the series
    logdf = logdf.join(tt,how='outer') # join the two dfs

# transpose for better readability
logdf = logdf.transpose()

# Ensure fixed sequence of the columns
logdf=logdf.reindex(sorted(logdf.columns),axis=1)

# write to disk
logdf.to_excel('logfile.xlsx')

# for better viewing on the screen
logdf.fillna('-',inplace=True)
pd.options.display.float_format = '{:,.0f}'.format

print(tabulate(logdf, tablefmt="pipe", headers="keys")) |
import sys
import collections
import pandas as pd
from tabulate import tabulate
file1 = pd.read_csv('file1.csv', sep=';', encoding='UTF-8')
file2 = pd.read_csv('file2.csv', sep=';', encoding='UTF-8')
columnnames1 = list(file1)
columnnames2 = list(file2)
if collections.Counter(columnnames1) == collections.Counter(columnnames2):
print ("Number of columns and Names match, Comparison possible...\n\n")
else:
print ("Number of columns and Names are not matching!!! Please check the input!")
sys.exit('Error!')
# add suffixes to distinguish between actual and expected in the merger
file1 = file1.add_suffix('_e') # expected
file2 = file2.add_suffix('_t') # t
# merge them using the given key, use outer join
comparison = pd.merge(file1,file2, how='outer',
left_on=['Key_e'],
right_on=['Key_t'])
# create the columnwise comparison
for col in columnnames1:
comparison[(col + '_c')] = comparison[(col + '_t')] == comparison[(col + '_e')]
# reorder the columns
comparison=comparison.reindex(sorted(comparison.columns),axis=1)
print(tabulate(comparison, tablefmt="pipe", headers="keys"))
# save the result as Excel file
comparison.to_excel('result.xlsx')
# names of the comparison column
check_colnames= [s + '_c' for s in columnnames1]
# initialize an empty dataframe for the log
logdf=pd.DataFrame(index=[True,False])
for column in check_colnames:
t=comparison[column].value_counts() # returns a series
tt=pd.DataFrame(t) # makes a DF out of the series
logdf = logdf.join(tt,how='outer') # join the two dfs
# transpose for better readability
logdf = logdf.transpose()
# Ensure fixed sequence of the columns
logdf=logdf.reindex(sorted(logdf.columns),axis=1)
# write to disk
logdf.to_excel('logfile.xlsx')
# for better viewing on the screen
logdf.fillna('-',inplace=True)
pd.options.display.float_format = '{:,.0f}'.format
print(tabulate(logdf, tablefmt="pipe", headers="keys"))
Uwe Ziegenhagen likes LaTeX and Python, sometimes even combined.
Do you like my content and would like to thank me for it? Consider making a small donation to my local fablab, the Dingfabrik Köln. Details on how to donate can be found here Spenden für die Dingfabrik.
More Posts - Website
2021-02-14, 13:09
Hier ein einfaches Beispiel, wie man mit Python und LaTeX ein PDF mit Kursinformationen erstellen kann.
Zuerst der Python-Teil, der die Apple-Kursdaten seit dem 1.1.2021 in einen Dataframe lädt und dann in eine LaTeX-Tabelle schreibt:
import pandas
import pandas_datareader.data as web

YAHOO_TODAY="http://download.finance.yahoo.com/d/quotes.csv?s=%s&f=sd1ohgl1vl1"

history = web.DataReader('AAPL', "yahoo", start="2021-1-1")
history.to_latex('aapl.tex') |
import pandas
import pandas_datareader.data as web
YAHOO_TODAY="http://download.finance.yahoo.com/d/quotes.csv?s=%s&f=sd1ohgl1vl1"
history = web.DataReader('AAPL', "yahoo", start="2021-1-1")
history.to_latex('aapl.tex')
Dann noch der LaTeX-Teil, der a) den Python-Code aus dem LaTeX-Lauf heraus ausführt und b) die erzeugte Tabellen-Datei nur dann einbindet, wenn sie wirklich auch erzeugt wurde.
\documentclass[12pt,ngerman]{scrartcl}
\usepackage[a4paper, top=1cm,bottom=1cm,left=1cm, right=1cm]{geometry}
\usepackage[T1]{fontenc}
\usepackage{booktabs}

\makeatletter
\newcommand{\testfileexists}[1]{%
  \IfFileExists{#1}%
    {\def\inputtestedfile{\@@input #1 }}
    {\let\inputtestedfile\@empty}%
}
\makeatother

\begin{document}

\write18{python runpy.py}

  \testfileexists{aapl}
      \inputtestedfile


\end{document} |
\documentclass[12pt,ngerman]{scrartcl}
\usepackage[a4paper, top=1cm,bottom=1cm,left=1cm, right=1cm]{geometry}
\usepackage[T1]{fontenc}
\usepackage{booktabs}
\makeatletter
\newcommand{\testfileexists}[1]{%
\IfFileExists{#1}%
{\def\inputtestedfile{\@@input #1 }}
{\let\inputtestedfile\@empty}%
}
\makeatother
\begin{document}
\write18{python runpy.py}
\testfileexists{aapl}
\inputtestedfile
\end{document}
Uwe Ziegenhagen likes LaTeX and Python, sometimes even combined.
Do you like my content and would like to thank me for it? Consider making a small donation to my local fablab, the Dingfabrik Köln. Details on how to donate can be found here Spenden für die Dingfabrik.
More Posts - Website
2021-01-17, 11:58
Hier ein Beispiel, wie man Bilder für eine Animation mit matplotlib erstellen kann, adaptiert von im Netz gefundenen Code
Der folgende Python-Code erzeugt 720 einzelne Bilder und legt diese im Dateisystem ab. Mittels magick -quality 100 *.png outputfile.mpeg werden dann die Bilder zu einem MPEG-Video kombiniert. Hinweis: Nur unter Windows heißt der Befehl „magick“ da „convert“ auch ein Systemprogramm ist.
import matplotlib.pyplot as plt
import pandas as pd
import seaborn as sns
from mpl_toolkits.mplot3d import Axes3D

df = sns.load_dataset('iris')
sns.set(style = "darkgrid")

fig = plt.figure()
fig.set_size_inches(16, 9)

ax = fig.add_subplot(111, projection = '3d')

x = df['sepal_width']
y = df['sepal_length']
z = df['petal_width']

ax.set_xlabel("sepal_width")
ax.set_ylabel("sepal_lesngth")
ax.set_zlabel("petal_width")

c = {'setosa':'red', 'versicolor':'blue', 'virginica':'green'}

ax.scatter(x, y, z,c=df['species'].apply(lambda x: c[x]))

for angle in range(0, 720):
    ax.view_init((angle+1)/10, angle)
    plt.draw()
    plt.savefig('r:/'+str(angle).zfill(3)+'.png')
Eine kürzere Version der Animation habe ich unter https://www.youtube.com/watch?v=gdgvXpq4k1w abgelegt.
Hinweise zu anderen Konvertierungsprogrammen gibt es unter anderem hier: https://www.andrewnoske.com/wiki/Convert_an_image_sequence_to_a_movie
Uwe Ziegenhagen likes LaTeX and Python, sometimes even combined.
Do you like my content and would like to thank me for it? Consider making a small donation to my local fablab, the Dingfabrik Köln. Details on how to donate can be found here Spenden für die Dingfabrik.
More Posts - Website
2021-01-16, 20:49
Ich habe heute auf einer meiner Linux-Maschinen Jupyter Notebook installiert. Um die — für die Arbeit im lokalen Netz lästigen — Sicherheitsabfragen zu umgehen, habe ich mir ausgehend von https://stackoverflow.com/questions/41159797/how-to-disable-password-request-for-a-jupyter-notebook-session ein kleines Startskript geschrieben:
#! /bin/bash
jupyter notebook --ip='*' --NotebookApp.token='' --NotebookApp.password='' |
#! /bin/bash
jupyter notebook --ip='*' --NotebookApp.token='' --NotebookApp.password=''
Uwe Ziegenhagen likes LaTeX and Python, sometimes even combined.
Do you like my content and would like to thank me for it? Consider making a small donation to my local fablab, the Dingfabrik Köln. Details on how to donate can be found here Spenden für die Dingfabrik.
More Posts - Website
2021-01-16, 20:45
Mit cudf gibt es ein Paket, das pandas Datenstrukturen auf nvidia-Grafikkarten verarbeiten kann. Einen i7 3770 mit 24 GB RAM habe ich jetzt mit einer CUDA-fähigen Grafikkarte (Typ Quadro P400) ausgestattet, damit ich damit rumspielen arbeiten kann. Unter https://towardsdatascience.com/heres-how-you-can-speedup-pandas-with-cudf-and-gpus-9ddc1716d5f2 findet man passende Beispiele, diese habe ich in einem Jupyter-Notebook laufenlassen.

Ein Geschwindigkeitszuwachs ist erkennbar, insbesondere bei der Matrix-Größe aus dem verlinkten Beispiel war die CUDA-Variante mehr als 3x so schnell wie die CPU-Variante. Das Merge mit der vollen Matrix-Größe lief bei mir leider nicht, da limitieren vermutlich die 2 GB RAM, die die P400 bietet.
Uwe Ziegenhagen likes LaTeX and Python, sometimes even combined.
Do you like my content and would like to thank me for it? Consider making a small donation to my local fablab, the Dingfabrik Köln. Details on how to donate can be found here Spenden für die Dingfabrik.
More Posts - Website
2021-01-09, 20:37
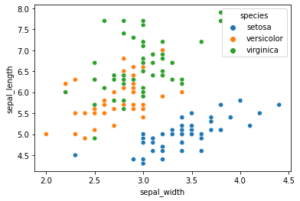
Hier ein einfaches Beispiel für einen Scatterplot mit Python und dem Seaborn Modul. Das Beispiel nutzt den bekannten Iris-Datensatz von R. Fisher, der gut für Klassifikationstechniken genutzt werden kann.
import seaborn as sns

iris=sns.load_dataset('iris')

sns.scatterplot(x=iris['sepal_width'],y=iris['sepal_length'],hue=iris['species']) |
import seaborn as sns
iris=sns.load_dataset('iris')
sns.scatterplot(x=iris['sepal_width'],y=iris['sepal_length'],hue=iris['species'])
Uwe Ziegenhagen likes LaTeX and Python, sometimes even combined.
Do you like my content and would like to thank me for it? Consider making a small donation to my local fablab, the Dingfabrik Köln. Details on how to donate can be found here Spenden für die Dingfabrik.
More Posts - Website
2020-12-26, 18:46
Nachdem wir bereits mit Excel und VBA Platzhalter in CSV Dateien gesucht und mit Inhalten ersetzt haben heute das ganze mit Python und OpenPyxl.
Ausgangspunkt ist eine Exceldatei „python_test.xlsx“ mit einer Named Range „Felder“ im Tabellenblatt „Tabelle2“.
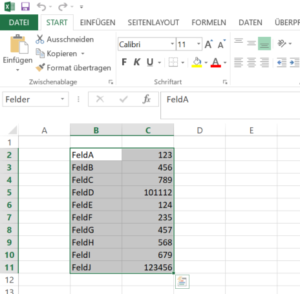
Mit der openpyxl Bibliothek laden wir das Excel-Blatt und holen uns die Inhalte der Range in ein Dictionary. Jeden der Keys aus dem Dictionary suchen wir dann in der CSV Datei und ersetzen ihn gegen den Wert aus der Excel-Datei.
# -*- coding: utf-8 -*-
import openpyxl

path = "python_test.xlsx"
workbook = openpyxl.load_workbook(path)

def get_sheet_and_location(workbook, named_range):
    x = list(workbook.defined_names['Felder'].destinations)[0]
    return x[0], x[1].replace('$','').split(':')[0],x[1].replace('$','').split(':')[1]


sheet, start, stop = get_sheet_and_location(workbook,'Felder')
worksheet = workbook[sheet]
rng=worksheet[start:stop]

replacements = {}

for row in rng:
    c1, c2 = row
    replacements[c1.value] = c2.value


with open('Python_test.txt') as input_file:

    text = input_file.read()

    for key in replacements:
        text = text.replace(key,str(replacements[key]))

    with open('Python_test_output.txt','w') as output_file:
output_file.write(text) |
# -*- coding: utf-8 -*-
import openpyxl
path = "python_test.xlsx"
workbook = openpyxl.load_workbook(path)
def get_sheet_and_location(workbook, named_range):
x = list(workbook.defined_names['Felder'].destinations)[0]
return x[0], x[1].replace('$','').split(':')[0],x[1].replace('$','').split(':')[1]
sheet, start, stop = get_sheet_and_location(workbook,'Felder')
worksheet = workbook[sheet]
rng=worksheet[start:stop]
replacements = {}
for row in rng:
c1, c2 = row
replacements[c1.value] = c2.value
with open('Python_test.txt') as input_file:
text = input_file.read()
for key in replacements:
text = text.replace(key,str(replacements[key]))
with open('Python_test_output.txt','w') as output_file:
output_file.write(text)
Uwe Ziegenhagen likes LaTeX and Python, sometimes even combined.
Do you like my content and would like to thank me for it? Consider making a small donation to my local fablab, the Dingfabrik Köln. Details on how to donate can be found here Spenden für die Dingfabrik.
More Posts - Website