Archive for the ‘Pakete’ Category.

EPUBs erstellen mit tex4ebook

This entry is part 1 of 1 in the series EPUBs mit LaTeX

Es gibt ein relativ neues LaTeX-Paket zum Erzeugen von EPUBs aus LaTeX heraus, hier ein kurzes Beispiel:

\documentclass[ngerman]{article}
\usepackage[utf8]{inputenc}
\usepackage[T1]{fontenc}
\usepackage{babel}
\usepackage{csquotes}
\usepackage{xcolor}
 
\title{Testdokument für tex4ebook}
\author{Uwe Ziegenhagen}
 
\begin{document}
\maketitle
\tableofcontents
 
\section{Hallo}
 
Hallo Welt
 
\section{Welt}
 
\end{document}

In diesem einfachen Beispiel hat das generierte EPUB noch Probleme:

  • Umlaute sind kaputt
  • Das Inhaltsverzeichnis befindet sich hinter dem eigentlichen Text

In den nächsten Artikeln werde ich schauen, was mit dem Paket geht und wo seine Grenzen liegen.

Uwe

Uwe Ziegenhagen likes LaTeX and Python, sometimes even combined. Do you like my content and would like to thank me for it? Consider making a small donation to my local fablab, the Dingfabrik Köln. Details on how to donate can be found here Spenden für die Dingfabrik.

More Posts - Website
Lebende Kolumnentitel mit scrlayer

Ausgehend von http://uweziegenhagen.de/?p=1615 habe ich mal testweise auf scrlayer umgestellt, hier der resultierende Quellcode:

\documentclass[a4paper,11pt]{scrbook}
\usepackage[headsepline=0.5pt,footsepline=0.5pt]{scrlayer-scrpage}
\usepackage[left=2cm,right=4cm]{geometry}
\KOMAoptions{headwidth=1.1\textwidth,footwidth=1.1\textwidth}
\usepackage{blindtext}
 
\pagestyle{scrheadings}
 
\ohead{\headmark}
\ofoot[\pagemark]{\pagemark}
 
\ifoot{ifoot} % inner foot
\ihead{ihead} % inner head
\cfoot{cfoot} % center foot
\chead{chead} % center head
 
\begin{document}
\chapter{Hello}
\section{World}
 
\blindtext[10]
 
\end{document}

Uwe

Uwe Ziegenhagen likes LaTeX and Python, sometimes even combined. Do you like my content and would like to thank me for it? Consider making a small donation to my local fablab, the Dingfabrik Köln. Details on how to donate can be found here Spenden für die Dingfabrik.

More Posts - Website

Creating Documents for Multiple Audiences (with the multiaudience package)

Boris Veytsman has recently published a new package to create output documents for multiple audiences in one single file.

The document creation process is divided into two steps: a) create the document and b) create the batch/bash file to automate the document creation.

Find below a sample document (save as ‚multdocument.tex‘) you can use as a starting point. As one can see, three audiences are defined here: „board“, „business“ and „tech“. The „shownto“ environment has one parameter, the comma-separated list of audiences, the content of the section shall be shown to. If the first item is a „-“ instead, the negates the meaning (so {-,board} means „show to every audience except the board). There are also commands for audience-specific footnotes or sections, check the manual for more information.

\begin{shownto}{board}
Some text for the board, for example an executive summary.
\end{shownto}

Remark 2015-08-17: With „tagging“ there is another package, that supports the creation of multiple editions in a single file.

\documentclass[12pt,english]{article}
\usepackage[utf8]{inputenc}
\usepackage[T1]{fontenc}
\usepackage{babel}
 
\usepackage{multiaudience}
 
\SetNewAudience{tech}
\SetNewAudience{business}
\SetNewAudience{board}
 
\begin{document}
 
This text is shown to everybody as it is outside any `multiaudience' environment
 
\begin{shownto}{board}
Some text for the board, for example an executive summary.
\end{shownto}
 
\begin{shownto}{tech,business}
Text for the tech department and the business users, for example a list of business requirements.
\end{shownto}
 
\begin{shownto}{-, board}
Text for every audience except the board.
\end{shownto}
 
Some text.\Footnote{board}{Some footnote just for the board}
 
 
\begin{Section}{board}[Short title]{Long Title of this Section}
 
Text in the section just for the board.
 
\end{Section}
 
 
\end{document}

After we have defined the document with the audiences we want to automate the PDF-creation process in which we tell LaTeX for which audience we want to create the document.

Since LaTeX can take definitions via LaTeX-commandline call, it’s quite easy to create a batch file with one line for each audience:

pdflatex -jobname file-board "\def\CurrentAudience{board}\input{multdocument}"
pdflatex -jobname file-tech "\def\CurrentAudience{tech}\input{multdocument}"
pdflatex -jobname file-business "\def\CurrentAudience{business}\input{multdocument}"

„-jobname“ defines the name of the PDF-file, the „\def{…}“ command sets the current audience. What you get when you run this batch is three different output files with just the information that shall be visible for each audience.

file-board

file-business

file-tech

Uwe

Uwe Ziegenhagen likes LaTeX and Python, sometimes even combined. Do you like my content and would like to thank me for it? Consider making a small donation to my local fablab, the Dingfabrik Köln. Details on how to donate can be found here Spenden für die Dingfabrik.

More Posts - Website
Embedding the TeX code in the PDF

There are a few packages out there which allow the user to add arbitrary files to the PDF container. The following example uses the „navigator“ package by Paul Isambert.

\documentclass[12pt,ngerman]{scrartcl}
\usepackage[utf8]{inputenc}
\usepackage[T1]{fontenc}
\usepackage{babel}
\usepackage{navigator}
 
\begin{document}
 
Hallo!
 
\embeddedfile[TeX code]{\jobname}{\jobname.tex}
 
\end{document}

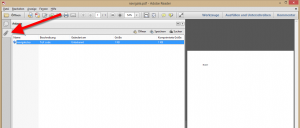
navi

Uwe

Uwe Ziegenhagen likes LaTeX and Python, sometimes even combined. Do you like my content and would like to thank me for it? Consider making a small donation to my local fablab, the Dingfabrik Köln. Details on how to donate can be found here Spenden für die Dingfabrik.

More Posts - Website

Stimmkarten mit LaTeX erstellen

Hier ein kleines Beispiel, wie man mit ticket.sty Stimmkarten für Vereinsversammlungen erstellen kann:

\documentclass[a4paper,12pt,ngerman]{scrartcl}
\usepackage[total={210mm,297mm},top=0mm,left=0mm, includefoot]{geometry}
\usepackage[badges]{ticket}
\usepackage{graphicx,palatino}
 
\usepackage{filecontents}
\begin{filecontents}{badges.tdf}
\unitlength=1mm
\hoffset=-5mm
\voffset=0mm
\ticketNumbers{1}{2}
\ticketSize{170}{120} % unitlength => mm
\ticketDistance{0}{0} % unitlength => mm
\end{filecontents}
 
\usepackage[utf8]{inputenc}
\usepackage[T1]{fontenc}
\usepackage{babel}
\usepackage{xcolor}
 
\renewcommand{\ticketdefault}{}%
\makeatletter
\@boxedtrue % Rahmen um Ticket
\@emptycrossmarkfalse % Falzmarken
\@cutmarktrue % Schnittmarken
\makeatother
 
\newcommand{\mylabel}[1]{
\ticket{%
\put(22,105){\Large \textit{Vereins-Mitgliedsversammlung September 2015}}
\put(30,55){\Huge\bfseries #1}
\put(67,15){\Large \textit{Stimmkarte}}
}}
 
\begin{document}
\mylabel{Max Mustermann}
\mylabel{Gabriele Musterfrau}
\end{document}

stimmkarten-01

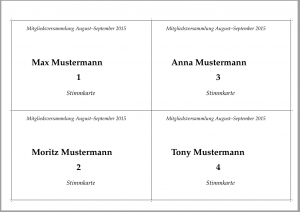
Durch einfaches Anpassen der badges.tdf (hier direkt im TeX-Dokument) kann man auch einfach 4-auf-1 Stimmkarten erstellen.

\documentclass[a4paper,12pt,ngerman]{scrartcl}
\usepackage[total={210mm,297mm},landscape,top=0mm,left=0mm, includefoot]{geometry}
\usepackage[badges]{ticket}
\usepackage{graphicx,palatino}
 
\usepackage{filecontents}
\begin{filecontents}{badges.tdf}
\unitlength=1mm
\hoffset=-15mm
\voffset=-10mm
\ticketNumbers{2}{2}
\ticketSize{140}{90} % unitlength => mm
\ticketDistance{0}{0} % unitlength => mm
\end{filecontents}
 
\usepackage[utf8]{inputenc}
\usepackage[T1]{fontenc}
\usepackage{babel}
 
\renewcommand{\ticketdefault}{}%
\makeatletter
\@boxedtrue % Rahmen um Ticket
\@emptycrossmarkfalse % Falzmarken
\@cutmarktrue % Schnittmarken
\makeatother
 
\newcommand{\mylabel}[2]{
\ticket{%
\put(15,80){\large \textit{Mitgliedsversammlung August--September 2015}}
\put(20,45){\Huge\bfseries #1}
\put(65,30){\Huge\bfseries #2}
\put(55,15){\Large \textit{Stimmkarte}}
}}
 
\begin{document}
\mylabel{Max Mustermann}{1}
\mylabel{Moritz Mustermann}{2}
\mylabel{Anna Mustermann}{3}
\mylabel{Tony Mustermann}{4}
\end{document}

stimmkarten-02

Uwe

Uwe Ziegenhagen likes LaTeX and Python, sometimes even combined. Do you like my content and would like to thank me for it? Consider making a small donation to my local fablab, the Dingfabrik Köln. Details on how to donate can be found here Spenden für die Dingfabrik.

More Posts - Website

The new scrletter package in KOMA-Script

Since version 3.15 of the KOMA-Script bundle there is a new scrletter package, providing the scrletter functionality in other document classes. Here’s an example of what can be done with the package:

\documentclass[12pt,ngerman]{scrartcl}
\usepackage[utf8]{inputenc}
\usepackage[T1]{fontenc}
\usepackage{booktabs}
\usepackage{babel}
\usepackage{graphicx}
\usepackage{csquotes}
\usepackage{paralist}
\usepackage{xcolor,blindtext}
 
\usepackage{scrletter}
 
\begin{document}
 
\blindtext[3]
 
\setkomavar{fromname}{Max Mustermann}
\setkomavar{fromaddress}{Musterstr. 12 \\ 12345~Musterstadt}
\setkomavar{place}{Musterstadt}
\setkomavar{subject}{Mahnung}
 
\begin{letter}{Martina Musterfrau \\ Musterweg 4 \\ 12346~Musterdorf}
\opening{Sehr geehrte Damen und Herren,}
 
\closing{Mit freundlichen Grüßen,}
\end{letter}
 
\end{document}

In generates a standard article on the first page while putting the letter on the second page. Pretty cool, right?

sc1

sc2

Uwe

Uwe Ziegenhagen likes LaTeX and Python, sometimes even combined. Do you like my content and would like to thank me for it? Consider making a small donation to my local fablab, the Dingfabrik Köln. Details on how to donate can be found here Spenden für die Dingfabrik.

More Posts - Website
Reading CSV files with LaTeX

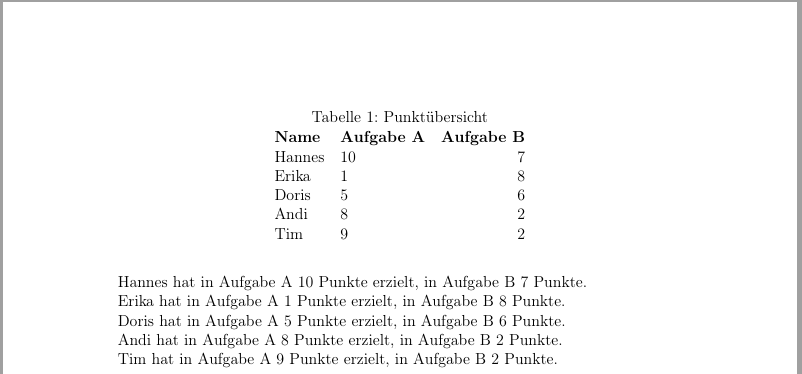
Reading CSV files is pretty easy in LaTeX, thanks to Nicola Talbot’s datatool package.

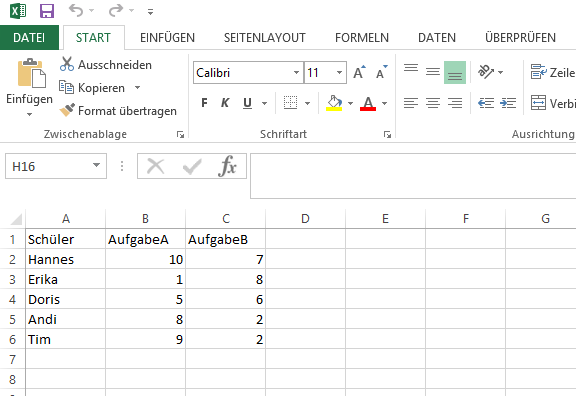
When you have an Excel file like the following Schueler.xlsx, simply save it as CSV (Comma-Separated Value).

excli

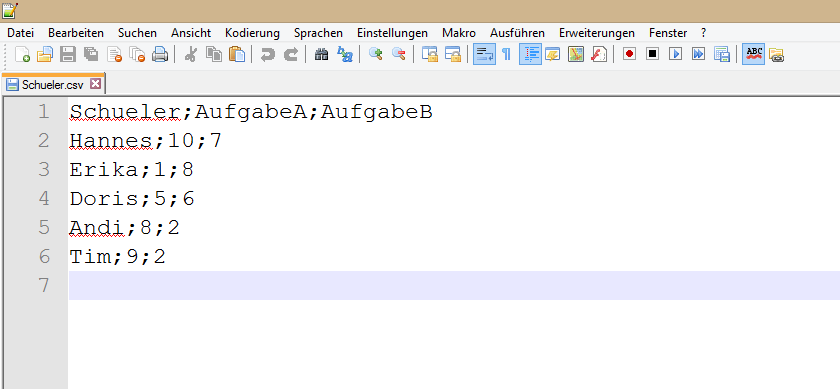
If you open the CSV file „Schueler.csv“ in a text editor you get the following:

excli2

We start by loading the datatool package. Since the German Excel uses semicolons as column separator, we are required to manually set the delimiter. In the next line we tell LaTeX to use our Schueler.csv file and to reference it as „scores“. In the DTLforeach commands the magic happens. The command has three parameters:

  • the file reference
  • the assignment of the file headers to LaTeX commands
  • the loop where the output for each row is defined
\documentclass[12pt,ngerman]{scrartcl}
\usepackage[utf8]{inputenc} 
\usepackage[T1]{fontenc}
\usepackage{babel}

\usepackage{datatool}

\DTLsetseparator{;}
\DTLloaddb{scores}{Schueler.csv}

\begin{document}

\begin{table}
\caption{Punktübersicht}
\centering
\begin{tabular}{llr}
\bfseries Name &
\bfseries Aufgabe A &
\bfseries Aufgabe B %
\DTLforeach{scores}{%
\name=Schueler,\aufgabea=AufgabeA,\aufgabeb=AufgabeB}{%
\\
\name & \aufgabea & \aufgabeb }
\end{tabular}
\end{table}

\DTLforeach{scores}{%
\name=Schueler,\aufgabea=AufgabeA,\aufgabeb=AufgabeB}{%

\name\ hat in Aufgabe A  \aufgabea~Punkte erzielt, in Aufgabe B \aufgabeb~Punkte.}


\end{document}

excli3

Uwe

Uwe Ziegenhagen likes LaTeX and Python, sometimes even combined. Do you like my content and would like to thank me for it? Consider making a small donation to my local fablab, the Dingfabrik Köln. Details on how to donate can be found here Spenden für die Dingfabrik.

More Posts - Website
Simple looping with LaTeX

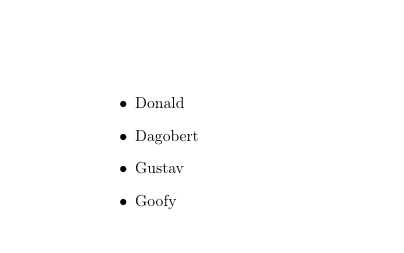
Here’s a fairly easy example how to loop through a LaTeX collection/list with the help of the pgffor package

\documentclass[12pt,ngerman]{scrartcl}
\usepackage[utf8]{inputenc}
\usepackage[T1]{fontenc}
\usepackage{babel}
\usepackage{pgffor}
\begin{document}

\begin{itemize}
\foreach \x in {Donald,Dagobert,Gustav,Goofy} {\item \x}
\end{itemize}

\end{document}

googy

Uwe

Uwe Ziegenhagen likes LaTeX and Python, sometimes even combined. Do you like my content and would like to thank me for it? Consider making a small donation to my local fablab, the Dingfabrik Köln. Details on how to donate can be found here Spenden für die Dingfabrik.

More Posts - Website
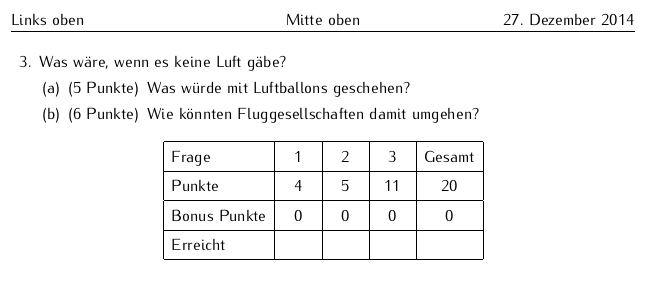
Deutsches Beispiel für die „exam“ Dokumentenklasse

Hier ein eingedeutschtes Beispiel für die exam Klasse, mit der sich recht einfach Klausuren setzen lassen.

Edit 30.12.2014: Nach Hinweisen von Axel Kielhorn habe ich das Beispiel noch erweitert.

\documentclass[addpoints,a4paper,ngerman,12pt,answers]{exam}
\usepackage{babel}
\usepackage[a4paper,top=2.5cm,bottom=3cm,left=2.5cm,right=2cm]{geometry}
\usepackage[utf8]{inputenc}
\usepackage[T1]{fontenc}
\usepackage{booktabs}
\usepackage{graphicx}
\usepackage{csquotes}
\usepackage{paralist}
\usepackage{wasysym}
\usepackage[math]{iwona}
 
 
\pointpoints{Punkt}{Punkte}
\bonuspointpoints{Bonuspunkt}{Bonuspunkte}
\renewcommand{\solutiontitle}{\noindent\textbf{Lösung:}\enspace}
 
\chqword{Frage}   
\chpgword{Seite} 
\chpword{Punkte}   
\chbpword{Bonus Punkte} 
\chsword{Erreicht}   
\chtword{Gesamt}
 
 
\checkboxchar{\Square}
\checkedchar{\CheckedBox}
 
 
\pagestyle{headandfoot}
\runningheadrule
\firstpageheader{Links oben}{Mitte oben}{\today}
\runningheader{Links oben}{Mitte oben}{\today}
\firstpagefooter{Links unten}{Mitte unten}{\thepage\,/\,\numpages}
\runningfooter{Links unten}{Mitte unten}{\thepage\,/\,\numpages}
 
\begin{document}
\vspace*{3em}
 
\makebox[\textwidth]{Name:\enspace\hrulefill}
 
\vspace*{2em}
 
\makebox[\textwidth]{Matrikelnummer:\enspace\hrulefill} 
 
\vspace*{3em}
 
\begin{questions}
\question[4] Warum gibt es Luft?
 
\begin{solution}
Damit wir atmen können.
\end{solution}
 
\bonusquestion[2] Wieviel Luft gibt es?
 
\begin{solution}
Ziemlich viel.
\end{solution}
 
 
\question[5] Warum gibt es Sauerstoff?
 
\clearpage
 
\question Was wäre, wenn es keine Luft gäbe?
\begin{parts} 
\part[5] Was würde mit Luftballons geschehen? 
\bonuspart[6] Wie könnten Fluggesellschaften damit umgehen?
\end{parts}
 
 
\question [100] Wird es morgen schneien?
\begin{checkboxes}
\CorrectChoice Ja
\choice Nein
\choice Vielleicht
\end{checkboxes}
 
\question Ein Name der folgenden Reihe passt nicht zu den anderen. Welcher?
\begin{oneparchoices}
\choice Donald
\choice Dagobert
\choice Daisy
\choice Micky
\CorrectChoice Balu
\end{oneparchoices}
 
\end{questions}


\begin{center}
\combinedgradetable[h][questions]
\end{center}
 
\end{document}

exam

Uwe

Uwe Ziegenhagen likes LaTeX and Python, sometimes even combined. Do you like my content and would like to thank me for it? Consider making a small donation to my local fablab, the Dingfabrik Köln. Details on how to donate can be found here Spenden für die Dingfabrik.

More Posts - Website
Animating TikZ Graphics

After drawing the cubic Bezier a few days ago I wanted to animate it. Using the animate package this is fairly simple:

\documentclass{article}
\usepackage[paperwidth=5.5cm,paperheight=5.3cm,left=0cm,right=0cm,bottom=0cm,top=0.25cm]{geometry}
\usepackage{tikz}
\definecolor{fom}{RGB}{0,153,139}
 
\newcommand{\dat}{0.7} % 0.67
\usepackage{animate}
 
\begin{document}
 
\begin{animateinline}[poster=last, controls, palindrome]{10}
\multiframe{70}{Ry=0.1+0.01}{
\begin{tikzpicture}[x=4cm,y=4cm]
\draw[line width=1pt,lightgray] (0,0) -- (1,1);
\draw (0,0) -- (1,0) -- (1,1) -- (0,1) -- (0,0); 
\draw (0,0) -- (0.17,0.67); 
\draw (1,1) -- (0.83,\Ry); 
 
\draw [magenta,fill=magenta](0.17,0.67) circle (.5ex); 
\draw [fom,fill=fom](0.83,\Ry) circle (.5ex); 
 
\draw[line width=1pt] (0,0) .. controls (0.17,0.67) and (0.83,\Ry) .. (1,1);
 
\node[label={[label distance=0.0cm,text depth=-1ex,rotate=90]left:Fortschritt in \%}] at (-0.1,.8) {};
\node[label={[label distance=0.0cm,text depth=-1ex]right:Zeit-Achse}] at (0,-0.05) {};
\end{tikzpicture}}
\end{animateinline}
 
\end{document}

I am animating in the TeX code (not externally) so I use animateinline with 10 frames per second. Inside this environment I prepare 70 frames, where I have the y-coordinate of the second point loop from 0.1 in steps of 0.01. The looping is controlled via Ry (that translates to \Ry in the loop). That’s it!

Here is the resulting PDF: bezier

PS: I used pdflatex from the TeX Live 2014.

Uwe

Uwe Ziegenhagen likes LaTeX and Python, sometimes even combined. Do you like my content and would like to thank me for it? Consider making a small donation to my local fablab, the Dingfabrik Köln. Details on how to donate can be found here Spenden für die Dingfabrik.

More Posts - Website