Posts tagged ‘LaTeX’

Business Requirements Documents mit LaTeX erstellen

Teil meiner Arbeit als Business Analyst ist die Aufnahme von fachlichen Anforderungen, die dann zu neuen Funktionen führt.

Hier ein Template, wie ein solches Dokument aussehen kann:

Business Requirements Document (PDF)

\documentclass[english,12pt]{scrartcl}
 
\usepackage[]{babel}
\usepackage[utf8]{inputenc}
\usepackage[T1]{fontenc}
\usepackage[]{palatino}
\usepackage[]{lastpage}
\usepackage[]{booktabs}
\usepackage[]{scrpage2}
\usepackage[]{blindtext}
 
\setlength{\parskip}{.333em}
 
\usepackage{colortbl}
\usepackage[table]{xcolor}
 
% Definition of colors for tables
\definecolor{cell}{RGB}{220,230,240}
\definecolor{line}{RGB}{80,130,190}
 
\renewcommand{\arraystretch}{1.25}
 
\renewcommand{\familydefault}{\sfdefault}
\usepackage{helvet}
 
\newcommand{\comment}[1]{\textless\textit{#1}\textgreater\vspace*{1ex}}
\newcommand{\project}{\textless Project 123\textgreater}
 
\title{Business Requirements Document (BRD) for \project}
\author{My name}
 
\pagestyle{scrheadings}
\setheadsepline[\textwidth]{1pt}{}
 
\ihead{\today}
\chead{}
\ohead{\project}
 
\ifoot{}  
\cfoot{}
\ofoot{\pagemark}
 
 
\usepackage{hyperref}
\hypersetup{%
  colorlinks=true,   % color references
  linkcolor = blue,  % Linkcolor blue
  citecolor = blue,  % cite-color  blue
  urlcolor = blue,  % cite-color blue
  pdfpagemode=UseNone,  % PDF-Viewer startet ohne Inhaltsverzeichnis et.al.
  pdfstartview=FitH} % PDF-Viewer benutzt beim Start bestimmte Seitenbreite
 
\begin{document}
\maketitle
 
\vfill
 
{\large
\begin{description}
\item [Status:] Draft 
\item [Version:] 0.1
\item [Authors:] AA
\end{description}}
 
\clearpage
 
\tableofcontents
 
\section{Document Change Control}
 
\subsection{Document Scope}
 
The scope of this requirements document will be to \comment{Describe high level goal of document}, and will include the following detail:
 
\begin{itemize}
\item \comment{Add Detail of what document will include}
\item 
\item 
\end{itemize}
 
\subsection{Document History}
 
\begin{tabular}{p{0.1\textwidth}p{0.3\textwidth}p{0.15\textwidth}p{0.15\textwidth}p{0.15\textwidth}    }\toprule
Version	& Change Description	&Author	&Date & Released \\ \midrule
1.0 & 	Initial Document Creation	& My Name & 09.06.2012 & 09.06.2012 \\ \bottomrule
\end{tabular}
 
\subsection{Document Approvers}
 
\begin{tabular}{p{0.25\textwidth}p{0.15\textwidth}p{0.125\textwidth}p{0.125\textwidth}p{0.2\textwidth}} \toprule
Role&Name&Signed Off& Date & Signature \\ \midrule
Business Approver & & 05.02.2012 & \\ \bottomrule
\end{tabular}		
 
 
\subsection{Document Guidelines}
 
Requested Delivery Date: \comment{Enter Target Date for Final Version} 
 
 
\begin{itemize}
\item Draft or Final Version: \comment{xx.xx}
\item Approvals via email will be stated as such under Signature column
\item Above list of people will also approve the deployment of the system into production
\end{itemize}
 
\subsection{Document References}
 
Documents below, related to the current initiative, have been created prior to or in conjunction with the Functional Requirements document and can be referenced for further detail:
 
\begin{tabular}{p{0.2\textwidth}p{0.125\textwidth}p{0.12\textwidth}p{0.15\textwidth}p{0.2\textwidth}} \toprule
Name &Date&Version & Author & Location \\ \midrule
Dok1 & 05.02.2012 & 1.0 & AA & \\ \bottomrule
\end{tabular}		
 
\comment{Documents can include the PID, PAD, workshop material, workflows, etc.}
 
 
\subsection{Abbreviations/Acronyms}
 
\comment{List of terms worth to be explained}
 
\begin{tabular}{p{0.2\textwidth}p{0.7\textwidth}} \toprule
Abbreviation &  Explanation \\ \midrule
$\alpha$ & The first letter in the Greek alphabet  \\ \bottomrule
\end{tabular}	
 
 
\section{Introduction}
 
\subsection{Background / Business Problem}
 
\comment{Provide business background and narrative around the issue the project is targeting.  Describe the business area clearly, how the business operates, what region is impacted, and provide a description of the current processing environment for which the project is directed at.  Talk about the current drawbacks of the current process and its impact on the business, IT, or Operations}
 
\subsection{Purpose and Benefits}
 
\comment{Discuss the project, its goals, and who is undertaking the effort.  Give a clear understanding of what the project benefits are and what will be accomplished.  If possible, include measurable benefits}
 
\subsection{Project Scope}
 
\comment{Detail what processes will be impacted by this project, how the project or process is being broken down (by phase or component if possible), and what applications might be involved.  A diagram can be included to provide further explanation or transparency.  Also clarify any items that are Out of Scope for this initiative}
 
\subsection{Critical Success Factors}
 
The following Critical Success Factors represent business driven criteria that, if met, will measure the success for the delivery of this initiative. 
 
\begin{itemize}
\item \comment{Add Criteria details}
\item 
\item 
\end{itemize}
 
\subsection{Requirements Governance}
The following organizational chart displays the Steering Committee, the Core Project Team, and Subject Matter Experts assembled to achieve stated objectives:
 
\comment{Provide a project org chart depicting the business, IT and Operations project leadership structure which will include groups/key individuals involved or directly impacted by the project, and any subject matter experts or oversight committee that are involved.  Org charts can be created in MS Visio or MS PowerPoint and pasted into the document}
 
 
\subsection{User Groups Impacted}
 
The primary users impacted by this initiative are listed below: 
 
\begin{tabular}{p{0.25\textwidth}p{0.25\textwidth}p{0.35\textwidth}} \toprule
User Group &	Location &	Role \\ \midrule
aaa & bbb & ccc \\ \bottomrule
\end{tabular}
 
 
\subsection{Requirement Assumptions and Constraints}
 
 
\comment{Requirement Assumptions and Constraints are future situations beyond the control of the requirement, whose outcomes influence the success of requirement. Examples of assumptions include: availability of a technical platform, legal changes and policy decisions, operations performing a necessary task in conjunction with the process change, etc.}
 
\subsection{Open Issues}
 
\comment{Section is used to show open issues at the time of signoff only (i.e. the document is being signed of with the knowledge of the open issues). The section can be used as a working area as the document is developed but all closed issues should be deleted before the quality gate.}
 
\begin{tabular}{p{0.05\textwidth}p{0.35\textwidth}p{0.5\textwidth}} \toprule
ID & Issue	& Resolution \\ \midrule
1 & & 	\\ \bottomrule
\end{tabular}
 
 
\subsection{Dependencies and Risks}
 
\comment{Dependencies and Risks are conditions that can create an impediment to the delivery and or implementation of the desired requirement.  These can be internal or external.  Examples include: legal requirements, technical standards, strategic decisions, external entities (e.g. a 3rd party supplier of data).  These can exist because of real business or IT conditions.}
 
\section{Business Requirements}
 
\subsection{Description of Current Business State}
 
\comment{Include a high level business state diagram illustrating the current business processing environment.  Depending on the project this can include an accounting state or process state (will include user groups and systems).  Below the diagram include a narrative of the state}
 
 
\subsection{Description of Proposed Business State}
 
\comment{Include a high level business state diagram illustrating the proposed business processing environment.  Depending on the project this can include an accounting state or process state (will include user groups and systems).  Below the diagram include a narrative of the state}
 
 
\subsection{Specific Business Requirements}
 
 
\begin{tabular}{p{0.1\textwidth}p{0.25\textwidth}p{0.4\textwidth}p{0.1\textwidth}} \\ \toprule
BR ID &	BR Name	&BR Description &	Priority \\ \midrule
1 & & & \\ \bottomrule
\end{tabular}
 
 
\section{GAP Analysis (Current State vs. Future State)}
 
\subsection{Current State}
 
\comment{Include a state diagram illustrating the current processing environment.  Depending on the project this can include an accounting state, data state, system diagram, process state (will include user groups and systems), etc.}
 
\subsection{Future State}
 
\comment{Include a state diagram illustrating the current processing environment.  Depending on the project this can include an accounting state, data state, system diagram, process state (will include user groups and systems), etc.}
 
\subsection{GAP Analysis}
 
\comment{A list of gaps identified can be provided within a table in this section.}
 
 
\section{Non-Functional Requirements}
 
\comment{The following are examples of non-functional requirements: Language, Security, Compliance, etc. Within this section, also include Current Volumes and Potential Growth, Performance Requirements and Availability Requirements}
 
\subsection{Current Volume and Potential Growth}
 
\blindtext
 
\subsection{Performance Requirements}
 
\blindtext
 
\subsection{Availability Requirements}
 
\blindtext
 
\subsection{Security Requirements}
 
\blindtext
 
\section{Specific Functional Requirements}
 
The following are the Functional Requirements for Attachments. Each requirement has a unique identifier for tracking and traceability purposes.
 
\begin{tabular}{p{0.1\textwidth}p{0.1\textwidth}p{0.6\textwidth}p{0.1\textwidth}} \\ \toprule
FR ID &	BR ID & FR Description &	Priority \\ \midrule
1 & & & \\ \bottomrule
\end{tabular}


\subsection{FR 1 - \comment{Title of FR1}}
 
Provide functional details of FR1
 
\subsection{FR 2 - \comment{Title of FR2}}
 
Provide functional details of FR2
 
\subsection{Usability Requirements / User Experience}
 
Usability Requirements, including Screen Shots and Screen Maps, to be included within this section.
 
\section{Planning Criteria}
This chapter describes the planning criteria specific to the <name> system.
 
\comment{Identify plans associated with the development of the new requirements, user acceptance testing, taking into consideration various activities involved right from the requirement development through development and testing, till the implementation. Interaction with other stakeholders should also be considered.}
 
\subsection{Specific Testing Requirements}
 
\comment{Summarise the specific requirements, which should be tested from a business perspective (for example, Industry-wide testing, Customer (external to DB) Acceptance testing, End-to-End testing, and so on.)}
 
\subsection{Implementation Requirements}
 
\comment{Describe the implementation requirements such as which requirement needs to be implemented in which region(s) and when, training, data migration, deployment related requirements, release schedule, and so on.}
 
\comment{Identify the extent of training and communication (for example, circulars, brochures, memos) to be imparted to the impacted groups.}
 
 
\section{Use Cases}
 
\subsection{UC1 - \comment{Title of UC1}}
 
\begin{enumerate}
\item Brief Description \newline The use case details the steps to be performed by users to <enter the purpose of UC1>
\item Actors
 
\begin{itemize}
\item <Enter name of application> User 
\item <Enter name of application> System
\end{itemize}
 
 
\item Preconditions
 
\begin{itemize}
\item The user should be entitled to act on the case.
\item Enter any other preconditions
\end{itemize}
 
 
\item Business Rules
 
\begin{itemize}
\item Add any specific business rules
\end{itemize}
 
\item Trigger 
 
\begin{itemize}
\item Enter the trigger for the use case to occur
\end{itemize}
 
\item Basic Flow of Events
 
\begin{tabular}{p{0.2\textwidth}p{0.7\textwidth}} \toprule
Step &	Description \\ \midrule
1	&    \\ 
2	&    \\ 
3	&    \\ \bottomrule
\end{tabular}
 
\end{enumerate}
 
\section{Appendix}
 
\subsection{Appendix Item1 }
 
\comment{Enter Details Here}
 
\subsection{Appendix Item 2}
 
\comment{Enter Details Here}
 
\arrayrulecolor{line}
\rowcolors{2}{cell}{white}
\begin{tabular}{p{0.2\textwidth}p{0.15\textwidth}p{0.25\textwidth}p{0.2\textwidth}} \toprule
Name &Date&Version & Author \\ \midrule
Line1 & 05.02.2012 & 1.0 & AA \\ 
Line2 & 05.02.2012 & 2.0 & BB \\ 
Line3 & 05.02.2012 & 3.0 & CC \\ 
Line4 & 05.02.2012 & 4.0 & DD \\ 
Line5 & 05.02.2012 & 5.0 & EE \\ \bottomrule
\end{tabular}		
\end{document}

Uwe

Uwe Ziegenhagen likes LaTeX and Python, sometimes even combined. Do you like my content and would like to thank me for it? Consider making a small donation to my local fablab, the Dingfabrik Köln. Details on how to donate can be found here Spenden für die Dingfabrik.

More Posts - Website

Mindmaps aus Freemind nach LaTeX exportieren – Teil 3

Nach Teil 1 und Teil 2 wird es jetzt Zeit, das XSLT anzupassen. Ziel ist es, ein selbstständig kompilierbares TeX-Dokument zu bekommen und — falls meine XSLT Kenntnisse reichen — den Export für die tieferen Ebenen als itemize zu fixen.

Teil 1 der Anforderung ist recht schnell umgesetzt. Es reicht, den Teil zu editieren, der das map Tag matcht:

<xsl:template match="map">
<xsl:text>
\documentclass[ngerman]{scrreprt}
\usepackage[utf8]{inputenc}
\usepackage[]{babel}
\usepackage[T1]{fontenc}
\author{Uwe Ziegenhagen}
\title{</xsl:text><xsl:value-of select="node/@TEXT"/><xsl:text>}
\begin{document}
\maketitle
\tableofcontents
 
</xsl:text>
 
<xsl:apply-templates/>
 
<xsl:text>
\end{document}
</xsl:text>

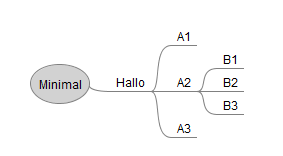
Für den zweiten Teil, die korrekte Ausgabe der itemize Umgebungen, müssen wir etwas tiefer in die Materie steigen. Um selbst wieder ins Thema reinzukommen, habe ich ein Minimalbeispiel minimal.xslt des XLST Sheets erstellt, das zum Testen genutzt wird.

Um nicht jedes Mal in Freemind den Export starten zu müssen, habe ich mir die Binärversion von Saxon installiert, der Aufruf lautet dann:

transform -xsl:minimal.xsl -t -s:minimal.mm -o:minimal.tex

Aus der folgenden Freemind Map wird dann der nachfolgende TeX-Code erzeugt:

\documentclass[ngerman]{scrreprt}
\usepackage[utf8]{inputenc}
\usepackage[]{babel}
\usepackage[T1]{fontenc}
\author{Uwe Ziegenhagen}
\title{Minimal}
\begin{document}
\maketitle
\tableofcontents


\section{Hallo}		\begin{itemize}	\item A1
			\item A2		\begin{itemize}	\item B1
			\item B2
			\item B3
		\end{itemize}
			\item A3
		\end{itemize}
 
 
\end{document}

Vom Umbruch noch nicht perfekt, es kompiliert aber problemlos. Wie sieht jetzt die entsprechende XSLT-Datei aus:

<?xml version='1.0'?>
 
<xsl:stylesheet xmlns:xsl='http://www.w3.org/1999/XSL/Transform' version='1.0'>  
<xsl:output omit-xml-declaration="yes" encoding="ISO-8859-1"/>
 
<xsl:template match="map">
	<xsl:text>
	\documentclass[ngerman]{scrreprt}
	\usepackage[utf8]{inputenc}
	\usepackage[]{babel}
	\usepackage[T1]{fontenc}
	\author{Uwe Ziegenhagen}
	\title{</xsl:text><xsl:value-of select="node/@TEXT"/><xsl:text>}
	\begin{document}
	\maketitle
	\tableofcontents
	</xsl:text>
 
		<xsl:apply-templates/>
 
	<xsl:text>
	\end{document}
	</xsl:text>
</xsl:template>
 
 
<xsl:template match="node">
	<xsl:if test="(count(ancestor::node())-2)=0">
	<xsl:apply-templates/>
	</xsl:if>
 
	<xsl:if test="(count(ancestor::node())-2)=1">
		<xsl:text>\section{</xsl:text><xsl:value-of select="@TEXT"/><xsl:text>}</xsl:text>
		<xsl:if test="current()/node">
			<xsl:call-template name="itemization"></xsl:call-template>
		</xsl:if>
	</xsl:if>
</xsl:template>
 
<xsl:template name="itemization">
	<xsl:param name="i" select="current()/node"/>
	<xsl:text>		\begin{itemize}</xsl:text>
	<xsl:for-each select="$i">
		<xsl:choose>
			<xsl:when test="@TEXT">
				<xsl:text>	\item </xsl:text><xsl:value-of select="@TEXT"/><xsl:text></xsl:text>
			</xsl:when>
			<xsl:otherwise>
			</xsl:otherwise>
		</xsl:choose>
		<xsl:if test="current()/node">
			<xsl:call-template name="itemization"></xsl:call-template>
		</xsl:if>
		<xsl:text>
		</xsl:text>	
	</xsl:for-each>
	<xsl:text>\end{itemize}</xsl:text>
	</xsl:template>
 
</xsl:stylesheet>

Es ist das gleiche map Matching, wie oben erwähnt. Von den Node Matches habe ich die meisten entfernt, nur das 0er und 1er sind übriggeblieben. Einen Unterschied gibt es: im 1er Matching wird explizit das itemize Matching aufgerufen: . Dieses wiederum habe ich der originalen XSL Datei von http://sites.google.com/site/freemind2beamer/Home/freemind2latex entnommen, hier fanden keine Anpassungen statt.

In Teil 4 werden wir das erlangte Wissen dann auf die ursprüngliche XSLT Datei anwenden und das Beispiel fertigstellen.

Uwe

Uwe Ziegenhagen likes LaTeX and Python, sometimes even combined. Do you like my content and would like to thank me for it? Consider making a small donation to my local fablab, the Dingfabrik Köln. Details on how to donate can be found here Spenden für die Dingfabrik.

More Posts - Website

Mindmaps aus Freemind nach LaTeX exportieren – Teil 2

Dies ist der zweite Teil der Reihe, Teil 1 liegt unter http://uweziegenhagen.de/?p=2032.

Schauen wir uns mal den Aufbau der FreeMind Datei an:

<map version="0.9.0">
<!-- To view this file, download free mind mapping software FreeMind from http://freemind.sourceforge.net -->
<node CREATED="1335794057887" ID="ID_1245350673" MODIFIED="1335794109247" TEXT="Zentrum">
<node CREATED="1335794071208" ID="ID_1530114542" MODIFIED="1335794074163" POSITION="right" TEXT="Level 1"/>
<node CREATED="1335794075246" ID="ID_1662348218" MODIFIED="1335794079639" POSITION="right" TEXT="Level 1">
<node CREATED="1335794081307" ID="ID_1399980217" MODIFIED="1335794085467" TEXT="Level 2">
<node CREATED="1335794088715" ID="ID_1065307715" MODIFIED="1335794091703" TEXT="Level 3">
<node CREATED="1335794092827" ID="ID_1370145863" MODIFIED="1335794094989" TEXT="Level 4">
<node CREATED="1335794096421" ID="ID_9970207" MODIFIED="1335794099648" TEXT="Level 5">
<node CREATED="1335794173930" ID="ID_919041832" MODIFIED="1335794177008" TEXT="Level 6">
<node CREATED="1335794178164" ID="ID_1274260836" MODIFIED="1335794180516" TEXT="Level 7"/>
</node>
</node>
</node>
</node>
</node>
</node>
</node>
</map>

Es gibt ein map Tag, das entsprechende verschachtelte node Tags enthält. Wenn ein node Tag keine „Kinder“ hat, wird es am Ende der Zeile mittels „/“ geschlossen. node Tags mit „Kindern“ enthalten diese nodes und werden dann rekursiv geschlossen.

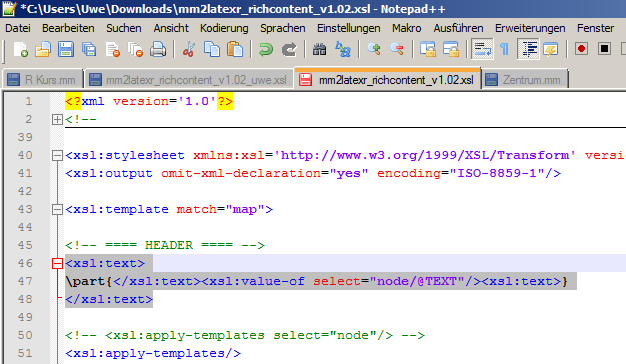
Schauen wir uns mal das XSLT an (Eine tiefgehende Einführung in XSLT kann ich hier jedoch nicht geben): Hinter dem Matching auf das map Tag wird die Text Eigenschaft des ersten node-Elements als part ausgegeben. Sehr interessant, an dieser Stelle können wir später ansetzen, um direkt ein kompilierbares LaTeX-Dokument zu erhalten.

Es gibt im Dokument noch drei weitere Matches:

  • richcontent
  • soll uns aktuell nicht interessieren, wird eventuell später mal behandelt.

  • node
  • Hier wird die Ausgabe der einzelnen node Tags gesteuert.

  • text
  • Dieses match steuert die Ausgabe der Notizen als einfachen Text, gehe ich eventuell später mal drauf ein.

In den node matches wird geschaut, wie tief sich der aktuelle Knoten befindet, in Abhängigkeit dessen wird das Text Attribut des Knotens einfach in ein entsprechendes LaTeX-Kommando eingebettet. Entsprechende Abschnitte wie den folgenden finden sich für alle Levels von \chapter bis \subparagraph.

Im nächsten Teil werden wir dieses XSLT Sheet auf unsere Bedürfnisse anpassen.

Uwe

Uwe Ziegenhagen likes LaTeX and Python, sometimes even combined. Do you like my content and would like to thank me for it? Consider making a small donation to my local fablab, the Dingfabrik Köln. Details on how to donate can be found here Spenden für die Dingfabrik.

More Posts - Website

Mindmaps aus Freemind nach LaTeX exportieren – Teil 1

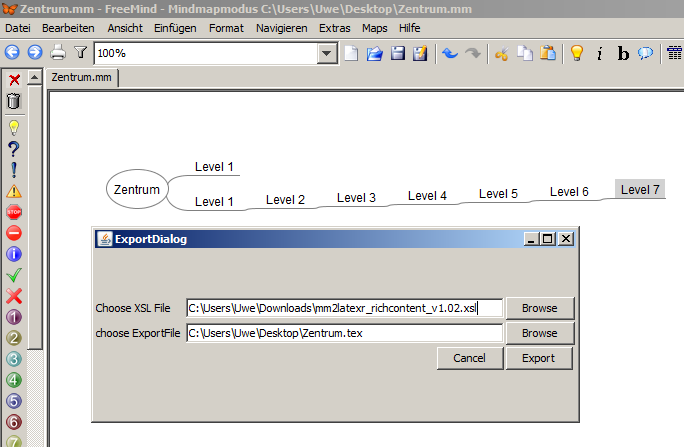
FreeMind ist meines Erachtens das beste OpenSource Tool für die Erstellung von Mindmaps, jedoch ist eine MindMap oft nicht das Format, das man zum Weiterbearbeiten benötigt. Neben diversen fertigen Export-Filtern für Grafikformate wie PDF oder PNG bietet FreeMind auch die Möglichkeit, eigene XSLT-Sheets für den Export zu nutzen. Das Rad muss man hier nicht komplett neu erfinden, mit Freemind to Latex gibt es schon ein entsprechendes Projekt, das eine passende XSLT Datei bereitstellt. Möchte man eine Mindmap exportieren, so geht man im „Datei“ Menü einfach auf den Export => „Mittels XSLT“ Eintrag und kann dann den Namen der Output Datei sowie das zu nutzende XSLT Sheet auswählen.

Mit der standardmäßigen mm2latexr_richcontent_v1.02.xsl erhält man für die Map aus dem Bild folgendes Ergebnis:

\part{Zentrum}


\chapter{Level 1}
\chapter{Level 1}
\section{Level 2}
\subsection{Level 3}
\subsubsection{Level 4}
\paragraph{Level 5}
\subparagraph{Level 6}

Man sieht:

  • Es fehlen Dokumentenpräambel und -struktur
  • Es wird nur bis Level 6 exportiert, danach fehlen die Inhalte (Laut der Webseite sollten eigentlich itemize Umgebungen daraus werden…)

Mit ein wenig XML/XSLT Kenntnissen lässt sich dieser Export aber sehr einfach auf die eigenen Bedürfnisse anpassen, was ich in Teil 2 zeigen werde.

Uwe

Uwe Ziegenhagen likes LaTeX and Python, sometimes even combined. Do you like my content and would like to thank me for it? Consider making a small donation to my local fablab, the Dingfabrik Köln. Details on how to donate can be found here Spenden für die Dingfabrik.

More Posts - Website

Wie man einen eigenen TeX Live Mirror aufsetzt

Wenn man zuhause mehr als einen (oder zwei, drei, vier) Rechner zu stehen hat, auf denen immer die neueste Version von TeX Live laufen soll, so empfiehlt es sich, einen eigenen Mirror-Server aufzusetzen. So muss man die Updates nur einmal aus dem Internet ziehen, alle Updates erfolgen dann über das lokale Netz zuhause.

Die Lösung fand sich bei stackexchange: http://tex.stackexchange.com/questions/22362/how-to-mirror-texlive.

Da ich zuhause ein Synology NAS im 24/7 Betrieb habe, bot es sich an, auch das TeX Live Mirroring darüber zu machen.

Der folgende Befehl holt die TeX Live Daten und speichert sie in einem über den NAS-Webserver zugänglichen Verzeichnis.

rsync -a --delete rsync://rsync.dante.ctan.org/CTAN/systems/texlive/tlnet/ /web/texlivemirror

Um das Mirroring zu automatisieren, habe ich den Befehl in einer ausführbaren Skript-Datei abgelegt und einen entsprechenden Cron-Job dafür angelegt. Details zum Aufsetzen des Cron-Jobs findet man unter http://www.synology-wiki.de/index.php/Cron.

Zu guter Letzt muss man nur noch den verschiedenen TeX Live-Installationen klar machen, dass sie ab sofort ihre Updates vom NAS holen sollen. Dazu nutzt man den tlmgr Befehl (siehe http://www.tug.org/texlive/doc/tlmgr.html):

tlmgr option repository http://<mein.webserver>/texlivemirror

oder bei der Installation zum Beispiel:

install-tl-windows.bat --location http://192.168.0.10/texlivemirror/

Uwe

Uwe Ziegenhagen likes LaTeX and Python, sometimes even combined. Do you like my content and would like to thank me for it? Consider making a small donation to my local fablab, the Dingfabrik Köln. Details on how to donate can be found here Spenden für die Dingfabrik.

More Posts - Website

LaTeX Befehle parsen mit PyParsing – Teil 1

Hier ein erster Versuch, LaTeX Befehle mit PyParsing zu parsen:

from pyparsing import *
 
# grammar definition
commandname = Word(alphas)
leftbrace = Literal("{")
rightbrace = Literal("}")
parameter = Word(alphas)
command = Literal("\\") + commandname + leftbrace + parameter + rightbrace
 
# input string
mystring = "\section{hello}"
 
# parse input string
print mystring, "->", command.parseString(mystring)

Beispiel:

\section{hello} -> [‚\\‘, ’section‘, ‚{‚, ‚hello‘, ‚}‘]

Als nächstes werde ich die Grammatik so erweitern, dass auch optionale Parameter geparst werden können. Eine Erweiterung wird dann das Parsing von Key=Value Parametern.

Uwe

Uwe Ziegenhagen likes LaTeX and Python, sometimes even combined. Do you like my content and would like to thank me for it? Consider making a small donation to my local fablab, the Dingfabrik Köln. Details on how to donate can be found here Spenden für die Dingfabrik.

More Posts - Website

A5 Dokumente zweispaltig setzen

Hier ein gelungener erster Versuch, Din A5 Dokumente zweispaltig zu setzen. In der ursprünglichen Version waren die linke und die rechte Spalte nicht mehr sauber ausgerichtet, sobald eine Tabelle oder ein Bild eingefügt wurden. Durch Laden des grid Pakets schaut’s jetzt aber recht ordentlich aus.

Das Beispiel nutzt noch einige andere interessante Pakete:

  • lastpage, für eine Referenz auf die letzte Seite des Dokuments
  • titlesec, für die Formatierung der Abschnitts-Überschriften
  • geometry, für die Anpassung der Seitengeometrie
  • booktabs, für die Anpassung der horizontalen Linien der Tabelle (nicht vergessen, vertikale Linien sind pfui)
\documentclass[ngerman, twocolumn,12pt]{scrartcl}
\usepackage{babel}
\usepackage[utf8]{inputenc}
\usepackage[T1]{fontenc}
\usepackage{booktabs}
\usepackage[]{blindtext}
\usepackage[]{microtype}
\usepackage[fontsize=12pt,baseline=13pt]{grid}
\usepackage[left=1cm, right=1cm,top=1.5cm, bottom=2.5cm,a5paper]{geometry}
 
\usepackage[]{titlesec}
 
\usepackage[]{scrpage2}
\clearscrheadfoot
 
\lehead{lehead} % nur bei gesetztem twoside 
\cehead{cehead}
\rehead{rehead}
\lefoot{lefoot}
\cefoot{cefoot}
\refoot{\thepage / \pageref{LastPage}}
 
\lohead{lohead}
\cohead{cohead}
\rohead{rohead}
\lofoot{lofoot}
\cofoot{cofoot}
\rofoot{\thepage / \pageref{LastPage}}
\pagestyle{scrheadings}
 
\usepackage{xcolor}
\usepackage{lastpage}
\definecolor{msdarkblue}{RGB}{54,95,145}
\definecolor{msblue}{RGB}{79,129,189}
 
%\titleformat{\section}[form]{layout}{labellayout}{abstand}{davorcode}[danachcode]
\titleformat
{\section}
[hang]
{\color{msdarkblue}\Large\sffamily\bfseries}
{}
{0pt}
{\rule{\columnwidth}{1pt} }
[\vspace*{-10pt}\rule{\columnwidth}{1pt}]
 
\titleformat{\subsection}[hang]{\color{msblue}\large\sffamily\bfseries}{}{0pt}{\vspace*{-4pt}}
\titleformat{\subsubsection}[hang]{\color{msblue}\normalsize\sffamily\bfseries}{}{0pt}{}
 
\usepackage[scaled=0.95]{helvet}
\renewcommand{\familydefault}{\sfdefault}
 
\setlength{\columnsep}{5mm}
\setlength{\columnseprule}{1pt}
 
\begin{document}
 
\begin{titlepage}
{\Huge\bfseries  Monatsreport}\vspace*{2em}
 
{\LARGE  Stand \& Ausblick}
 
 
\vfill
\noindent Uwe Ziegenhagen\\
\today
\end{titlepage}
 
\section{Der Testtitel}
 
\blindtext[5]
 
\begin{figure}
\rule{\columnwidth}{0.66\columnwidth}
\caption{Hallo Welt}
\end{figure}
 
\blindtext[5]
 
\begin{table}
\centering
\begin{tabular}{rcl} \toprule
Hallo & Welt & Hallo Welt! \\ \midrule
123 & 456 & 789 \\
234 & 567 & 890 \\
abc & def & ghi \\ \bottomrule
\end{tabular}
\caption{Eine Tabelle}
\end{table}
 
\blindtext[5]
 
\end{document}

Ergebnis (PDF): a5-report

Uwe

Uwe Ziegenhagen likes LaTeX and Python, sometimes even combined. Do you like my content and would like to thank me for it? Consider making a small donation to my local fablab, the Dingfabrik Köln. Details on how to donate can be found here Spenden für die Dingfabrik.

More Posts - Website

Alle Diagramme einer Excel-Mappe als PDF exportieren

Aus Interesse heraus hab ich heute versucht, per Excel VBA alle Diagramme eines Excel-Sheets als PDF zu exportieren. Google brachte als ersten Treffer einen Blogeintrag, der mich auf die richtige Fährte brachte: http://cschleiden.wordpress.com/2009/09/28/howto-export-excel-charts-as-pdf-to-include-in-latex-document/. Dieser Eintrag, zusammen mit einem aufgezeichneten Makro eines manuellen Export-Vorgangs und einige Codeschnipsel von http://www.vbaexpress.com/kb/getarticle.php?kb_id=482 haben mich innerhalb von 20 Minuten zu dem folgenden VBA Code gebracht:

Sub ExportAllCharts()
 
    If ActiveSheet.ChartObjects.Count > 0 Then
        For Each Diagram In ActiveSheet.ChartObjects
            ActiveSheet.ChartObjects(Diagram.Name).Activate
            Filename = ActiveChart.Name
            ActiveChart.Axes(xlValue).MajorGridlines.Select
            ActiveSheet.ExportAsFixedFormat Type:=xlTypePDF, Filename:= _
        "C:\Users\Uwe\Desktop\" & Filename, Quality:=xlQualityStandard, _
        IncludeDocProperties:=True, IgnorePrintAreas:=False, OpenAfterPublish:=False
        Next Diagram
    End If
 
End Sub

Was macht dieser Code? Wenn überhaupt Diagramme im aktuellen Worksheet vorhanden sind, dann wird für jedes gefundene Diagramm der Dateiname bestimmt (als Namen des Diagramms, z.B. „Tabelle1 Diagramm 1.pdf“ oder „Tabelle1 Diagramm 2.pdf“) und die Datei auf dem Desktop als PDF abgelegt. Der Code ist noch rudimentär und kann noch beliebig erweitert werden.

Uwe

Uwe Ziegenhagen likes LaTeX and Python, sometimes even combined. Do you like my content and would like to thank me for it? Consider making a small donation to my local fablab, the Dingfabrik Köln. Details on how to donate can be found here Spenden für die Dingfabrik.

More Posts - Website

LaTeX Mathematik mit den Keplerfonts

Hier ein kurzes Beispiel für die Nutzung der Kepler Fonts mit LaTeX:

\documentclass[12pt]{scrartcl}
\usepackage[utf8]{inputenc}
\usepackage[T1]{fontenc}
\usepackage[ngerman]{babel}
\usepackage{kpfonts}
\usepackage{blindtext}
\begin{document}
 
\blindtext
 
\begin{equation}
a^2+ b^2=c^2
\end{equation}
 
\begin{equation}
\int_{a=1}^\infty \sqrt{\frac{a^2+ b^2=c^2}{a^2+ b^2=c^2}}
\end{equation}
 
\end{document}

Mehr Informationen finden sich in der Paketbeschreibung unter http://www.tex.ac.uk/tex-archive/fonts/kpfonts/doc/kpfonts.pdf

Uwe

Uwe Ziegenhagen likes LaTeX and Python, sometimes even combined. Do you like my content and would like to thank me for it? Consider making a small donation to my local fablab, the Dingfabrik Köln. Details on how to donate can be found here Spenden für die Dingfabrik.

More Posts - Website

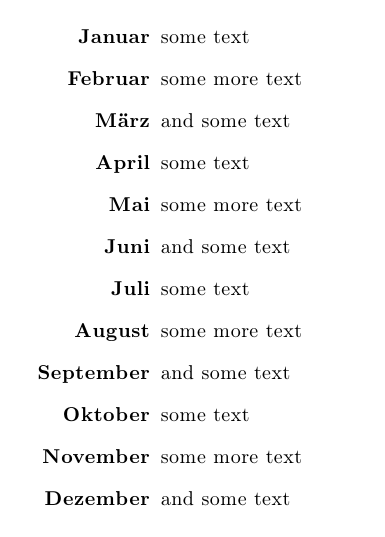
Description Items rechtsbündig ausrichten

Bei signifikant unterschiedlichen Breiten von Description Items möchte man manchmal die Beschreibungen rechtsbündig setzen, dank des enumitem Pakets ist dies problemlos möglich. Hier eine Antwort zu meiner Frage in tex.stackexchange.net:

\documentclass{article}
\usepackage{calc}
\usepackage[utf8]{inputenc}
\usepackage[T1]{fontenc}
\usepackage{enumitem}
 
\begin{document}
 
\begin{description}[labelwidth=\widthof{\bfseries September},align=right]
    \item[Januar] some text
    \item[Februar] some more text
    \item[März] and some text
    \item[April] some text
    \item[Mai] some more text
    \item[Juni] and some text
    \item[Juli] some text
    \item[August] some more text
    \item[September] and some text
    \item[Oktober] some text
    \item[November] some more text
    \item[Dezember] and some text
\end{description}
 
\end{document}

Uwe

Uwe Ziegenhagen likes LaTeX and Python, sometimes even combined. Do you like my content and would like to thank me for it? Consider making a small donation to my local fablab, the Dingfabrik Köln. Details on how to donate can be found here Spenden für die Dingfabrik.

More Posts - Website