Archive for the ‘Python / SciPy / pandas’ Category.
2020-10-04, 18:04
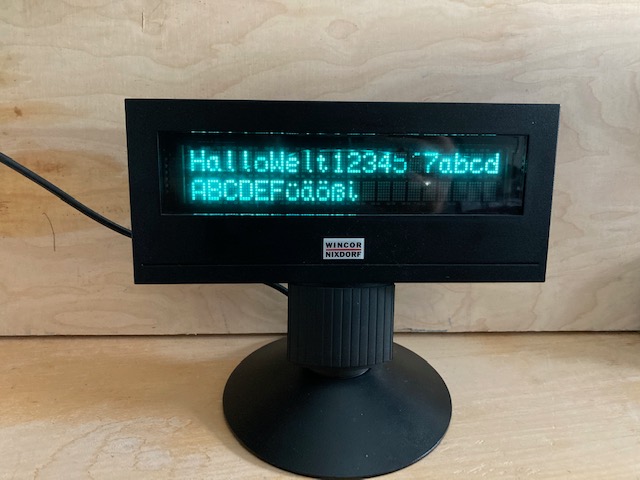
Vor einigen Monaten habe ich mir günstig auf Ebay ein Siemens Nixdorf BA 63 USB Display gekauft, das VFD (vacuum fluorescent display) Technologie für die Anzeige nutzt und 2×20 Zeichen bietet.
Als passendste Python-Bibliothek nutze ich https://github.com/stephanemouton/VFD-WCN, die Anleitung zur Einrichtung wird im github sehr gut beschrieben.
Hier der Quellcode, der die Ausgabe im Bild erzeugt:
from vfdpos import *
factory=WincorNixdorfDisplayFactory()
VFDs = factory.get_vfd_pos()
MyVFD = VFDs[0]

MyVFD.clearscreen()

MyVFD.poscur(1, 1)
MyVFD.write_msg("Hallo")
MyVFD.write_msg("Welt")
MyVFD.write_msg("1234567abcd\r")
MyVFD.poscur(2, 1)
MyVFD.write_msg("ABCDEFüäößi")

MyVFD.close()
Uwe Ziegenhagen likes LaTeX and Python, sometimes even combined.
Do you like my content and would like to thank me for it? Consider making a small donation to my local fablab, the Dingfabrik Köln. Details on how to donate can be found here Spenden für die Dingfabrik.
More Posts - Website
2020-09-27, 14:27
Im ersten Artikel zu diesem Thema hatte ich schon beschrieben, wie man mit Pi-Hole DNS Lookups so unterbinden kann, dass man Fortnite oder andere Zeitfresser temporär blockieren kann. In diesem Teil erweitern wir das Skript um eine Statusabfrage. Dazu fügen wir einfach eine Route hinzu, die die URL mit dem Parameter /status abfragt. Dann wird der Inhalt der epicstatus.txt abgefragt, die von den Routen /on und /off mit dem Zeitstempel versehen wurde.
import os
from datetime import datetime
from flask import Flask

app = Flask(__name__)

@app.route('/')
def index():
    return('<h1>Use /off and /on to enable/disable blocking, /status to get epic.log</h1>')

@app.route('/<param>')
def setter(param):
    if param=='status':
        with open('/home/pi/epicstatus.txt') as f:
            content = f.read()
            return '<h2>' + content + '</h2>'
    if param=='off':
        os.system("/usr/local/bin/pihole regex '.*\.epicgames.com' > /home/pi/epic.log")
        now = datetime.now().strftime('%Y-%m-%d %H:%M:%S')
        with open('/home/pi/epicstatus.txt','w') as ausgabe:
            ausgabe.write(now + ' off')
        return '<h1>Turning off Fortnite</h1>'
    elif param=='on':
        os.system("/usr/local/bin/pihole regex -d '.*\.epicgames.com' > /home/pi/epic.log")
        now = datetime.now().strftime('%Y-%m-%d %H:%M:%S')
        with open('/home/pi/epicstatus.txt','w') as ausgabe:
            ausgabe.write(now+ ' on')
return '<h1>Turning on Fortnite</h1>' |
import os
from datetime import datetime
from flask import Flask
app = Flask(__name__)
@app.route('/')
def index():
return('<h1>Use /off and /on to enable/disable blocking, /status to get epic.log</h1>')
@app.route('/<param>')
def setter(param):
if param=='status':
with open('/home/pi/epicstatus.txt') as f:
content = f.read()
return '<h2>' + content + '</h2>'
if param=='off':
os.system("/usr/local/bin/pihole regex '.*\.epicgames.com' > /home/pi/epic.log")
now = datetime.now().strftime('%Y-%m-%d %H:%M:%S')
with open('/home/pi/epicstatus.txt','w') as ausgabe:
ausgabe.write(now + ' off')
return '<h1>Turning off Fortnite</h1>'
elif param=='on':
os.system("/usr/local/bin/pihole regex -d '.*\.epicgames.com' > /home/pi/epic.log")
now = datetime.now().strftime('%Y-%m-%d %H:%M:%S')
with open('/home/pi/epicstatus.txt','w') as ausgabe:
ausgabe.write(now+ ' on')
return '<h1>Turning on Fortnite</h1>'
Uwe Ziegenhagen likes LaTeX and Python, sometimes even combined.
Do you like my content and would like to thank me for it? Consider making a small donation to my local fablab, the Dingfabrik Köln. Details on how to donate can be found here Spenden für die Dingfabrik.
More Posts - Website
2020-09-26, 19:53
Hier ein kurzes Beispiel, wie man mit Python-Modulen Dateien kopieren, zippen und löschen kann.
import zipfile
from shutil import copyfile
from os import unlink

# copy file
copyfile('dtk-authoryear.bbx'  , './dtk-bibliography/dtk-authoryear.bbx')
copyfile('dtk-authoryear.dbx'  , './dtk-bibliography/dtk-authoryear.dbx')
copyfile('dtk-bibliography.pdf', './dtk-bibliography/dtk-bibliography.pdf')
copyfile('dtk-bibliography.tex', './dtk-bibliography/dtk-bibliography.tex')

# create the zip file
with zipfile.ZipFile('dtk-bibliography.zip', 'w', zipfile.ZIP_DEFLATED) as z:
    z.write('./dtk-bibliography/README.md')
    z.write('./dtk-bibliography/dtk-authoryear.bbx')
    z.write('./dtk-bibliography/dtk-authoryear.dbx')
    z.write('./dtk-bibliography/dtk-bibliography.pdf')
    z.write('./dtk-bibliography/dtk-bibliography.tex')

# delete copied files
unlink('./dtk-bibliography/dtk-authoryear.bbx')
unlink('./dtk-bibliography/dtk-authoryear.dbx')
unlink('./dtk-bibliography/dtk-bibliography.pdf')
unlink('./dtk-bibliography/dtk-bibliography.tex') |
import zipfile
from shutil import copyfile
from os import unlink
# copy file
copyfile('dtk-authoryear.bbx' , './dtk-bibliography/dtk-authoryear.bbx')
copyfile('dtk-authoryear.dbx' , './dtk-bibliography/dtk-authoryear.dbx')
copyfile('dtk-bibliography.pdf', './dtk-bibliography/dtk-bibliography.pdf')
copyfile('dtk-bibliography.tex', './dtk-bibliography/dtk-bibliography.tex')
# create the zip file
with zipfile.ZipFile('dtk-bibliography.zip', 'w', zipfile.ZIP_DEFLATED) as z:
z.write('./dtk-bibliography/README.md')
z.write('./dtk-bibliography/dtk-authoryear.bbx')
z.write('./dtk-bibliography/dtk-authoryear.dbx')
z.write('./dtk-bibliography/dtk-bibliography.pdf')
z.write('./dtk-bibliography/dtk-bibliography.tex')
# delete copied files
unlink('./dtk-bibliography/dtk-authoryear.bbx')
unlink('./dtk-bibliography/dtk-authoryear.dbx')
unlink('./dtk-bibliography/dtk-bibliography.pdf')
unlink('./dtk-bibliography/dtk-bibliography.tex')
Uwe Ziegenhagen likes LaTeX and Python, sometimes even combined.
Do you like my content and would like to thank me for it? Consider making a small donation to my local fablab, the Dingfabrik Köln. Details on how to donate can be found here Spenden für die Dingfabrik.
More Posts - Website
2020-08-30, 20:08
Für Dante e.V. betreue ich einige E-Mail-Listen auf mailman-Basis, die seit einigen Tagen von Spammern geflutet werden. Jeden Tag sind dutzende bis hunderte Aufnahme-Requests in der Liste, die ich manuell wegwerfen müsste. Nachdem ich dies einmal händisch getan hatte, musste eine automatische Lösung gefunden werden.
Die Lösung bestand darin, einen Treiber für Firefox („geckodriver“) zu installieren, der das Fernsteuern des Browsers erlaubt. Dann kann mittels selenium Modul die Steuerung aus Python heraus erfolgen. Unten der wesentliche Quellcode als Basis für eigene Arbeiten, den Teil zum Erkennen von legitimen Anfragen habe ich weggelassen.
Nachtrag vom 25.10.2020: Siehe auch die Erweiterung unter https://www.uweziegenhagen.de/?p=4420
# -*- coding: utf-8 -*-
"""
https://www.edureka.co/community/47679/is-it-possible-to-run-headless-browser-using-python-selenium
"""

from selenium.webdriver import Firefox
from selenium.webdriver.firefox.options import Options

opts = Options()
#opts.set_headless() # Ich will sehen, wie selenium arbeitet
#assert opts.headless  # Operating in headless mode
browser = Firefox(executable_path=r"C:\Users\Uwe\Downloads\geckodriver-v0.27.0-win64\geckodriver.exe", options=opts)
browser.implicitly_wait(3)

# einloggen
browser.get('<url des mailman admin panels')
search_form = browser.find_element_by_name('<passwortfeld_ID>')
search_form.send_keys('<adminpasswort>')
search_form.submit()

#wegwerfen Button pro Zeile
fields = browser.find_elements_by_xpath("//input[@value='3']")
#email Adresse des Spammers
emails = browser.find_elements_by_xpath('//td[contains(text(),"@")]')

if len(fields) == len(emails):
    zipped_list = list(zip(emails, fields))

    for i in zipped_list:
        email, field = i
field.click() |
# -*- coding: utf-8 -*-
"""
https://www.edureka.co/community/47679/is-it-possible-to-run-headless-browser-using-python-selenium
"""
from selenium.webdriver import Firefox
from selenium.webdriver.firefox.options import Options
opts = Options()
#opts.set_headless() # Ich will sehen, wie selenium arbeitet
#assert opts.headless # Operating in headless mode
browser = Firefox(executable_path=r"C:\Users\Uwe\Downloads\geckodriver-v0.27.0-win64\geckodriver.exe", options=opts)
browser.implicitly_wait(3)
# einloggen
browser.get('<url des mailman admin panels')
search_form = browser.find_element_by_name('<passwortfeld_ID>')
search_form.send_keys('<adminpasswort>')
search_form.submit()
#wegwerfen Button pro Zeile
fields = browser.find_elements_by_xpath("//input[@value='3']")
#email Adresse des Spammers
emails = browser.find_elements_by_xpath('//td[contains(text(),"@")]')
if len(fields) == len(emails):
zipped_list = list(zip(emails, fields))
for i in zipped_list:
email, field = i
field.click()
Uwe Ziegenhagen likes LaTeX and Python, sometimes even combined.
Do you like my content and would like to thank me for it? Consider making a small donation to my local fablab, the Dingfabrik Köln. Details on how to donate can be found here Spenden für die Dingfabrik.
More Posts - Website
2020-06-07, 07:06
Per Zufall bin ich vor einigen Tagen auf ein Juwel im Steam-Shop gestoßen: „while True learn()“. Es ist kein Spiel im klassischen Sinne, sondern mehr eine Simulation zum Lernen von KL/ML-Algorithmen.
Die Geschichte ist schnell erzählt: Programmierer programmiert, kommt nicht weiter, seine Katze übernimmt und erklärt ihm in Katzensprache, was er tun muss. Da er kein Katzisch spricht, baut er mit Hilfe aus dem Netz schrttweise ein System zur Verständigung mit der Mieze.
Das Spiel geht anfangs recht einfach los, ein oder zwei Blöcke positionieren, Verbindungslinien setzen, los.
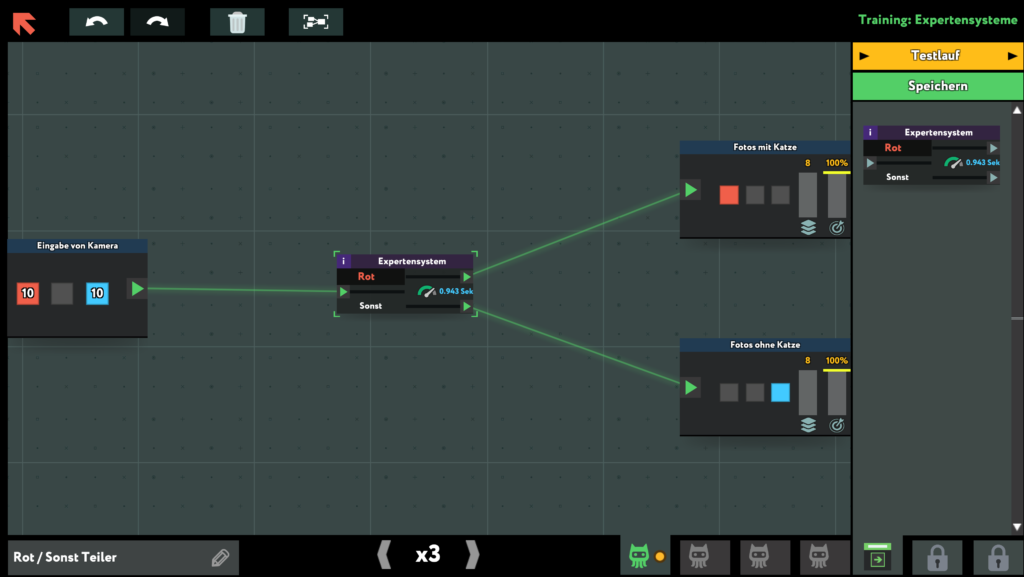
Über zeitliche Einschränkungen und Kostendruck kommt man aber schnell an den Punkt, an dem man denken muss.
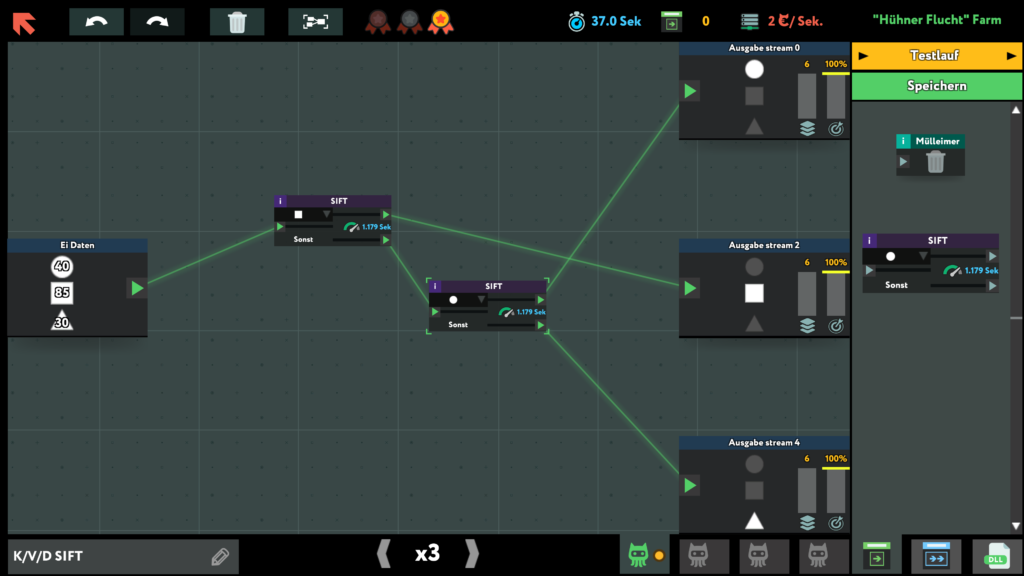
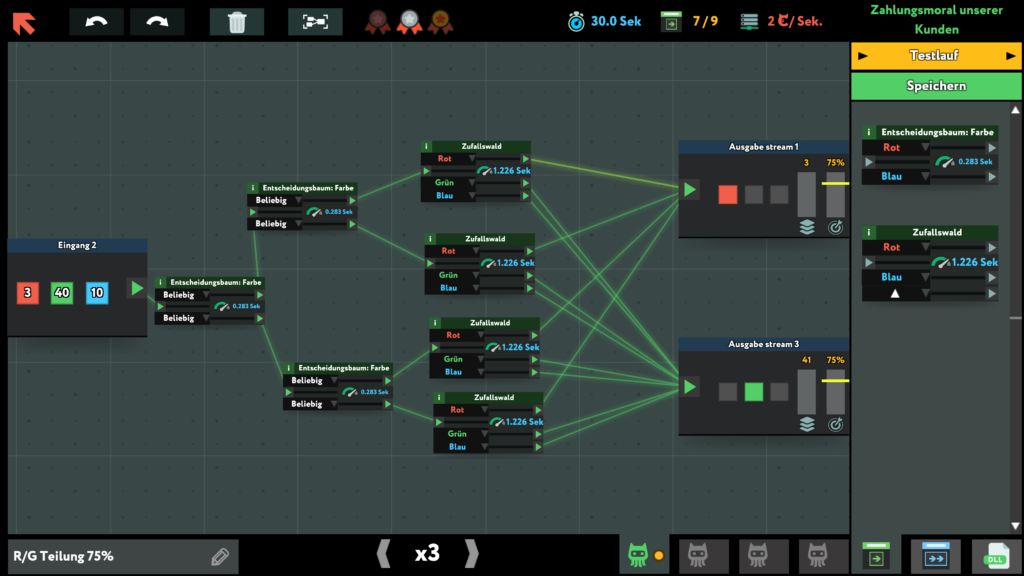
Von mir eine absolute Empfehlung!
Uwe Ziegenhagen likes LaTeX and Python, sometimes even combined.
Do you like my content and would like to thank me for it? Consider making a small donation to my local fablab, the Dingfabrik Köln. Details on how to donate can be found here Spenden für die Dingfabrik.
More Posts - Website
2020-06-06, 20:33
Hier ein Link zu einem Video, das die ersten Schritte mit Flask zeigt: https://www.youtube.com/watch?v=QjtW-wnXlUY
Über set FLASK_APP=fl-01.py (wenn der Name der Datei so lautet) und flask run startet man das ganze.
from flask import Flask

app = Flask(__name__)

@app.route('/')
def index():
    return('<h1>Hello World</h1>')


@app.route('/<name>')
def namer(name):
return('<h1>Hello {}</h1>').format(name) |
from flask import Flask
app = Flask(__name__)
@app.route('/')
def index():
return('<h1>Hello World</h1>')
@app.route('/<name>')
def namer(name):
return('<h1>Hello {}</h1>').format(name)
Uwe Ziegenhagen likes LaTeX and Python, sometimes even combined.
Do you like my content and would like to thank me for it? Consider making a small donation to my local fablab, the Dingfabrik Köln. Details on how to donate can be found here Spenden für die Dingfabrik.
More Posts - Website
2020-06-06, 17:33
Für eine Anwendung habe ich eine Möglichkeit gesucht, die „passendste“ Datei in einem Verzeichnis zu suchen. Dies kann relevant sein, wenn die Anwendung eine bestimmte Datei in einem Verzeichnis erwartet, die aber leicht anders benannt wurde als es die Vorgabe erfordert.
Das folgende Beispielprogramm nutzt die Levenshtein-Funktionen der fuzzywuzzy Bibliothek, um die Datei zu finden, die das größte Maß an Gleichheit zum Muster besitzt.
Man kann natürlich auch RegExps benutzen, mit der fuzzywuzzy Bibliothek ist es aber auch recht intuitiv.
# -*- coding: utf-8 -*-
import os
from fuzzywuzzy import fuzz

def guess_file(template, path):
    max_ratio = 0
    file_max_ratio = ''

    for file in os.listdir(path):
        file_wo_suffix = os.path.splitext(file)[0]

        ratio = fuzz.ratio(file_wo_suffix, template)
        if ratio > max_ratio:
            max_ratio = ratio
            file_max_ratio = file

    return(file_max_ratio, max_ratio)


print(guess_file('Meine Inputdaten','R:/')) |
# -*- coding: utf-8 -*-
import os
from fuzzywuzzy import fuzz
def guess_file(template, path):
max_ratio = 0
file_max_ratio = ''
for file in os.listdir(path):
file_wo_suffix = os.path.splitext(file)[0]
ratio = fuzz.ratio(file_wo_suffix, template)
if ratio > max_ratio:
max_ratio = ratio
file_max_ratio = file
return(file_max_ratio, max_ratio)
print(guess_file('Meine Inputdaten','R:/'))
Uwe Ziegenhagen likes LaTeX and Python, sometimes even combined.
Do you like my content and would like to thank me for it? Consider making a small donation to my local fablab, the Dingfabrik Köln. Details on how to donate can be found here Spenden für die Dingfabrik.
More Posts - Website
2020-06-06, 12:10
Bisher nutze ich immer die lokale Python-Installation bzw. Distributionen wie WinPython oder Anaconda, für einen meiner Linux-Server möchte ich jedoch virtuelle Umgebungen nutzen, die von der lokalen Python-Installation strikt getrennt sind. Hier die notwendigen Schritte:
python3 -m venv /home/uwe/vpython
Falls das nicht geht: apt-get install python3-venv installiert das venv Modul
cd /home/uwe/vpython/bin
source activate kann nicht direkt aufgerufen werden, es muss (bei der Bash/zsh) mittels source aufgerufen werden. Verlassen kann man die virtuelle Umgebung mittels deactivate.
Der Prompt ändert sich zu (vpython) uwe@zotac:~/vpython/bin$, unsere virtuelle Umgebung ist fertig.
In der Umgebung können wir jetzt weitere Pakete installieren:
(vpython) uwe@zotac:~/vpython/bin$ pip3 install pandas
Collecting pandas
  Downloading https://files.pythonhosted.org/packages/a4/5f/1b6e0efab4bfb738478919d40b0e3e1a06e3d9996da45eb62a77e9a090d9/pandas-1.0.4-cp37-cp37m-manylinux1_x86_64.whl (10.1MB)
    100% |████████████████████████████████| 10.1MB 33kB/s
Collecting pytz>=2017.2 (from pandas)
  Downloading https://files.pythonhosted.org/packages/4f/a4/879454d49688e2fad93e59d7d4efda580b783c745fd2ec2a3adf87b0808d/pytz-2020.1-py2.py3-none-any.whl (510kB)
    100% |████████████████████████████████| 512kB 629kB/s
Collecting python-dateutil>=2.6.1 (from pandas)
  Downloading https://files.pythonhosted.org/packages/d4/70/d60450c3dd48ef87586924207ae8907090de0b306af2bce5d134d78615cb/python_dateutil-2.8.1-py2.py3-none-any.whl (227kB)
    100% |████████████████████████████████| 235kB 1.2MB/s
Collecting numpy>=1.13.3 (from pandas)
  Downloading https://files.pythonhosted.org/packages/d6/c6/58e517e8b1fb192725cfa23c01c2e60e4e6699314ee9684a1c5f5c9b27e1/numpy-1.18.5-cp37-cp37m-manylinux1_x86_64.whl (20.1MB)
    100% |████████████████████████████████| 20.1MB 16kB/s
Collecting six>=1.5 (from python-dateutil>=2.6.1->pandas)
  Downloading https://files.pythonhosted.org/packages/ee/ff/48bde5c0f013094d729fe4b0316ba2a24774b3ff1c52d924a8a4cb04078a/six-1.15.0-py2.py3-none-any.whl
Installing collected packages: pytz, six, python-dateutil, numpy, pandas
Successfully installed numpy-1.18.5 pandas-1.0.4 python-dateutil-2.8.1 pytz-2020.1 six-1.15.0
(vpython) uwe@zotac:~/vpython/bin$
Uwe Ziegenhagen likes LaTeX and Python, sometimes even combined.
Do you like my content and would like to thank me for it? Consider making a small donation to my local fablab, the Dingfabrik Köln. Details on how to donate can be found here Spenden für die Dingfabrik.
More Posts - Website
2020-04-26, 18:42
Hier ein Beispiel, wie man mit Python kleine Monatskalender erzeugen kann. Geht auch mit LaTeX allein, ich möchte aber verschiedene Output-Formate (Markdown, HTML, etc.) erzeugen und dabei die komplette Kontrolle über den Code behalten.
# -*- coding: utf-8 -*-

import calendar
import datetime

def number_of_weeks(year, month):
    """
        Returns a tupel with the ISO no of the first and week and the no of weeks
    """
    tup_month_days = calendar.monthrange(year, month)
    first = datetime.date(year, month, 1)
    last = datetime.date(year, month, tup_month_days[1])
    first_week = first.isocalendar()[1]
    last_week = last.isocalendar()[1]
    return (first_week, last_week, last_week-first_week+1)

def gen_cal_latex(year, month):
    """
        https://stackoverflow.com/questions/9459337/assign-value-to-an-individual-cell-in-a-two-dimensional-python-array
    """
    c = calendar.TextCalendar()
    week_month_first, week_month_last, no_of_weeks = number_of_weeks(year, month)

    # generate calendar list, using tupel as a key
    m = {(i, j):' ' for i in range(no_of_weeks) for j in range(7)}

    for tupel_date in c.itermonthdays4(year, month):
        t_year, t_month, t_day, t_weekday = tupel_date
        # use only dates inside the required month
        if t_month == month:
            temp_date = datetime.date(t_year, t_month, t_day)
            # check in which week we are with the current date
            # to get index for the list
            week_no = temp_date.isocalendar()[1]
            m[week_no % week_month_first, t_weekday] = t_day

    print(r'\begin{tabular}{rrrrrrr}')
    print(r'Mo & Di & Mi & Do & Fr & Sa & So \\')
    for i in m:
        if i[1] < 6:
            print('{0} &'.format(m[i]), end='')
        else:
            print('{0}'.format(m[i]),end='')
        if i[1] == 6:
            print(r'\\')
    print(r'\end{tabular}')

gen_cal_latex(2020, 4) |
# -*- coding: utf-8 -*-
import calendar
import datetime
def number_of_weeks(year, month):
"""
Returns a tupel with the ISO no of the first and week and the no of weeks
"""
tup_month_days = calendar.monthrange(year, month)
first = datetime.date(year, month, 1)
last = datetime.date(year, month, tup_month_days[1])
first_week = first.isocalendar()[1]
last_week = last.isocalendar()[1]
return (first_week, last_week, last_week-first_week+1)
def gen_cal_latex(year, month):
"""
https://stackoverflow.com/questions/9459337/assign-value-to-an-individual-cell-in-a-two-dimensional-python-array
"""
c = calendar.TextCalendar()
week_month_first, week_month_last, no_of_weeks = number_of_weeks(year, month)
# generate calendar list, using tupel as a key
m = {(i, j):' ' for i in range(no_of_weeks) for j in range(7)}
for tupel_date in c.itermonthdays4(year, month):
t_year, t_month, t_day, t_weekday = tupel_date
# use only dates inside the required month
if t_month == month:
temp_date = datetime.date(t_year, t_month, t_day)
# check in which week we are with the current date
# to get index for the list
week_no = temp_date.isocalendar()[1]
m[week_no % week_month_first, t_weekday] = t_day
print(r'\begin{tabular}{rrrrrrr}')
print(r'Mo & Di & Mi & Do & Fr & Sa & So \\')
for i in m:
if i[1] < 6:
print('{0} &'.format(m[i]), end='')
else:
print('{0}'.format(m[i]),end='')
if i[1] == 6:
print(r'\\')
print(r'\end{tabular}')
gen_cal_latex(2020, 4)
Erzeugt werden kleine Monatskalender der Form
\begin{tabular}{rrrrrrr}
Mo & Di & Mi & Do & Fr & Sa & So \\
  &  &1 &2 &3 &4 &5\\
6 &7 &8 &9 &10 &11 &12\\
13 &14 &15 &16 &17 &18 &19\\
20 &21 &22 &23 &24 &25 &26\\
27 &28 &29 &30 &  &  & \\
\end{tabular}
Per Copy & Paste kann man den Code in ein LaTeX-Dokument kopieren, natürlich lässt sich das alles auch direkt in eine LaTeX-Datei schreiben.
Uwe Ziegenhagen likes LaTeX and Python, sometimes even combined.
Do you like my content and would like to thank me for it? Consider making a small donation to my local fablab, the Dingfabrik Köln. Details on how to donate can be found here Spenden für die Dingfabrik.
More Posts - Website
2020-04-15, 21:54
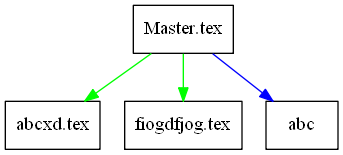
Hier ein Code-Schnipsel, um die Inputs und Includes von LaTeX-Dokumenten zu visualisieren. Ist noch ein wenig rudimentär und hardcoded, in den nächsten Tagen werde ich den Code mal in ein Github-Repo packen und dann ein wenig aufräumen. Aktuell wird eine Datei Master.tex erwartet, eine Graph.dot Datei wird als Output geschrieben. Das Skript geht rekursiv durch die TeX-Dateien durch und sucht nach \input, \include, \includegraphics und \lstinputlisting Befehlen.
# -*- coding: utf-8 -*-
import re

nodes = []

# which commands indicate following
commandsToFollow = ('input', 'include')

def find_ext_references(somefile):
    with open(somefile) as file:
        filecontent = file.readlines()
        for i in filecontent:
            search_results = re.findall(r"(\\)(includegraphics|include|lstinputlisting|input)(\[?.*\]?{)(.+?)(})", i)
            for j in search_results:
                print(j)
                nodes.append((somefile, j[3], j[1]))
                if j[1].endswith(commandsToFollow):
                    find_ext_references(j[3]+'.tex') # assume that no extension is used for input/include

find_ext_references('Master.tex')

print(nodes)

if len(nodes)>0:
    with open('graph.dot','w') as output:
            output.write('digraph IncludesInputs {\n')
            output.write('node [shape=box];\n\n')
            for k in nodes:
                if k[2].endswith(commandsToFollow):
                    output.write('"'+k[0] + '"->"' + k[1] + '.tex" [color="green"];\n')
                elif k[2].endswith('graphics'):
                    output.write('"'+k[0] + '"->"' + k[1] + '" [color="blue"];\n')
                elif k[2].endswith('listing'):
                    output.write('"'+k[0] + '"->"' + k[1] + '" [color="red"];\n')

output.write('}') |
# -*- coding: utf-8 -*-
import re
nodes = []
# which commands indicate following
commandsToFollow = ('input', 'include')
def find_ext_references(somefile):
with open(somefile) as file:
filecontent = file.readlines()
for i in filecontent:
search_results = re.findall(r"(\\)(includegraphics|include|lstinputlisting|input)(\[?.*\]?{)(.+?)(})", i)
for j in search_results:
print(j)
nodes.append((somefile, j[3], j[1]))
if j[1].endswith(commandsToFollow):
find_ext_references(j[3]+'.tex') # assume that no extension is used for input/include
find_ext_references('Master.tex')
print(nodes)
if len(nodes)>0:
with open('graph.dot','w') as output:
output.write('digraph IncludesInputs {\n')
output.write('node [shape=box];\n\n')
for k in nodes:
if k[2].endswith(commandsToFollow):
output.write('"'+k[0] + '"->"' + k[1] + '.tex" [color="green"];\n')
elif k[2].endswith('graphics'):
output.write('"'+k[0] + '"->"' + k[1] + '" [color="blue"];\n')
elif k[2].endswith('listing'):
output.write('"'+k[0] + '"->"' + k[1] + '" [color="red"];\n')
output.write('}')
Übersetzt man die Graph.dot dann mit der dot.exe aus Graphviz, so erhält man für ein kleines Beispiel den folgenden Graphen. (Beispielaufruf: dot -Tpng Graph.dot)
Uwe Ziegenhagen likes LaTeX and Python, sometimes even combined.
Do you like my content and would like to thank me for it? Consider making a small donation to my local fablab, the Dingfabrik Köln. Details on how to donate can be found here Spenden für die Dingfabrik.
More Posts - Website