Archive for the ‘Allgemein’ Category.

Generating Tables of Contents with jQuery

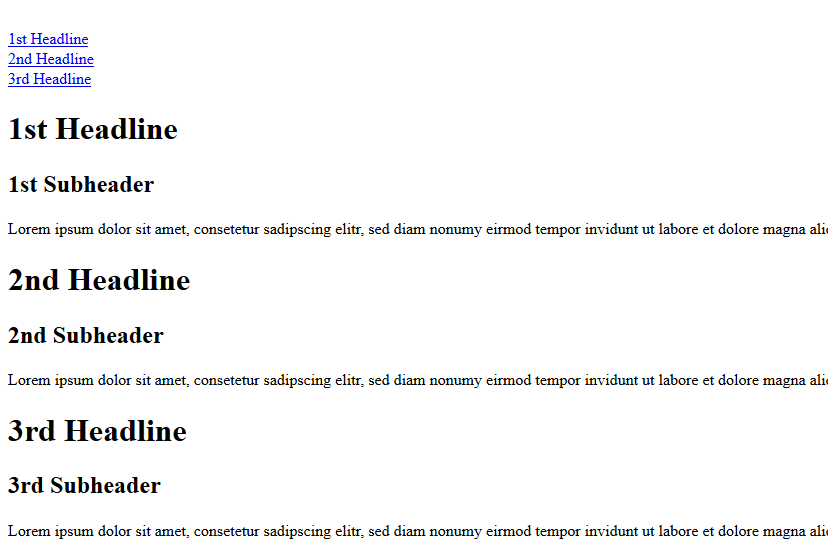
For my FOM lecture on webprogramming I created a small jQuery example to automatically generate tables of contents. The following code just extracts h1-headings, using jQuery’s pseudoclasses („:header“) other extractions are of course possible.

Update 2015-06-21: I removed the ‚counter‘ variable, since ‚index‘ is already providing a counter.

<!DOCTYPE html>
<html>
<head>
	<meta charset="utf-8">
<script type="text/javascript" src="jquery-2.1.1.min.js"></script>
 
</head>
<body>
 
<div id="toc"></div>
 
<h1>1st Headline</h1>
<h2>1st Subheader</h2>
 
<p>Lorem ipsum dolor sit amet, consetetur sadipscing elitr, sed diam nonumy eirmod tempor invidunt ut labore et dolore magna aliquyam erat, sed diam voluptua. At vero eos et accusam et justo duo dolores et ea rebum. Stet clita kasd gubergren, no sea takimata sanctus est Lorem ipsum dolor sit amet.</p>
 
<h1>2nd Headline</h1>
<h2>2nd Subheader</h2>
 
<p>Lorem ipsum dolor sit amet, consetetur sadipscing elitr, sed diam nonumy eirmod tempor invidunt ut labore et dolore magna aliquyam erat, sed diam voluptua. At vero eos et accusam et justo duo dolores et ea rebum. Stet clita kasd gubergren, no sea takimata sanctus est Lorem ipsum dolor sit amet.</p>
 
<h1>3rd Headline</h1>
<h2>3rd Subheader</h2>
 
<p>Lorem ipsum dolor sit amet, consetetur sadipscing elitr, sed diam nonumy eirmod tempor invidunt ut labore et dolore magna aliquyam erat, sed diam voluptua. At vero eos et accusam et justo duo dolores et ea rebum. Stet clita kasd gubergren, no sea takimata sanctus est Lorem ipsum dolor sit amet.</p>
 
<script>
$(document).ready(function() {
	$("h1" ).each(function(index) {
		$(this).html($(this).html()+"<a name='lnk" + index +  "'></a>");
  	console.log(index + ": " + $(this).text());
  	$("#toc").html($("#toc").html() + "<br><a href='#lnk" + index + "'>" + $(this).text() + "</a>");
	});
}
);
</script>
 
</body>
</html>

autotoc

Uwe

Uwe Ziegenhagen likes LaTeX and Python, sometimes even combined. Do you like my content and would like to thank me for it? Consider making a small donation to my local fablab, the Dingfabrik Köln. Details on how to donate can be found here Spenden für die Dingfabrik.

More Posts - Website

Visualizing Graphs with GraphViz

Here’s a nice example of GraphViz visualizing Fund structures.

digraph G {
graph [label="GraphViz example", splines=ortho, nodesep=0.2]
                subgraph cluster_ {
                                node [style=filled];
                                i0;
                                label = "Level 0";
                }
 
                subgraph cluster_0 {
                                node [style=filled];
                                a0  a1  a2;
                                label = "Level 1";
                }
 
                subgraph cluster_1 {
                                node [style=filled];
                                rank=same;
                                b0 b1 b2 b3 b4 b5;
                                label = "Level 2";
                }
                
                i0 [label="Investor"];
                a0 [label="FoF A"];
                a1 [label="FoF B"];
                a2 [label="FoF C"];
                b0 [label="Fund 1"];
                b1 [label="Fund 2"];
                b2 [label="Fund 3"];
                b3 [label="Fund 4"];
                b4 [label="Fund 5"];
                b5 [label="Fund 6"];
                
                i0->a2;
                a0->b4;
                a1->b5;
                a2->b0;
                a2->b1;
                a2->b2;
                a2->b3;
}

gv-01

Uwe

Uwe Ziegenhagen likes LaTeX and Python, sometimes even combined. Do you like my content and would like to thank me for it? Consider making a small donation to my local fablab, the Dingfabrik Köln. Details on how to donate can be found here Spenden für die Dingfabrik.

More Posts - Website

Buchkritik: „JavaScript & jQuery: The Missing Manual“ von David Sawyer McFarland

Wie einige Leser meines Blogs möglicherweise wissen, unterrichte ich auch an der FOM hier in Köln. Für die Vorlesung zu „Web Programmierung“ hatte ich noch ein Buch gesucht, das die Grundlagen zu JavaScript/jQuery gut vermittelt. Über einen Kontakt der Kölner Python-Usergroup (vielen Dank auch dorthin) habe ich dann vom O’Reilly Verlag freundlicherweise ein Rezensionsexemplar der mittlerweile dritten Ausgabe von „JavaScript & jQuery: The Missing Manual“ erhalten, die ich hier kurz besprechen möchte.

Das Buch gliedert sich in sechs Teile:

  1. Getting Started with JavaScript
  2. Getting Started with jQuery
  3. Getting Started with jQuery UI
  4. Advanced jQuery and JavaScript
  5. Tips, Tricks, and Troubleshooting
  6. Appendix

Das Buch geht (zu Recht) davon aus, dass man grundlegende HTML-Kenntnisse hat. Am Anfang wird zwar kurz über HTML-Tags gesprochen — auch CSS wird kurz erwähnt — dann geht es aber los mit der JavaScript Programmierung. Nach dem obligatorischen „Hello World“ bekommt man die grammatikalischen Grundlagen der Sprache nähergebracht und welche Datentypen und Schlüsselwörter es gibt. Sehr ausführlich ist auch die Beschreibung von Flusssteuerung und Schleifen.

Im zweiten Teil startet man dann mit jQuery. Im direkten Vergleich mit JavaScript merkt man als Leser schnell, dass die Nutzung von jQuery doch einige Vorteile hat. Was in reinem JavaScript mühsame Konstrukte erfordert, ist in jQuery meist in einer kurzen Zeile erledigt. Der Autor zeigt hier auch sehr ausführlich, wie man Elemente in jQuery selektieren und auswerten kann. In Kapitel 5 geht es dann um die Behandlung von Events, in Kapitel 6 um die Steuerung von Animationen mittels jQuery.

Kapitel 7 vermittelt, wie häufig vorkommende Aufgaben wie das Austauschen von Bildern in jQuery schnell & einfach gelöst werden können, Kapitel 8 geht auf die Nutzung von jQuery in Web-Formularen ein.

Der dritte Teil ab Kapitel 9 behandelt jQuery UI, ein Thema, das ich aus Zeitmangel in der Vorlesung nur am Rande behandeln konnte. Der Autor zeigt hier, wie man die verschiedenen Komponenten aus dem jQuery UI Paket nutzt und wie man das gewonnene Wissen nutzen kann, um eine TODO-Listen Anwendung zu schreiben.

Fazit

Auf über 650 Seiten und bei einem aktuellen Preis von etwas mehr als 30 Euro bietet dieses Buch einen sehr guten und umfassenden Einstieg in das Thema. Ich konnte eine ganze Reihe von Inhalten — auch in Bezug auf die Vermittlung des Wissens — direkt in der Vorlesung einsetzen. Ich empfehle dieses Buch auch meinen Studenten, wenn sie mehr wissen wollen zu JavaScript & jQuery.

Uwe

Uwe Ziegenhagen likes LaTeX and Python, sometimes even combined. Do you like my content and would like to thank me for it? Consider making a small donation to my local fablab, the Dingfabrik Köln. Details on how to donate can be found here Spenden für die Dingfabrik.

More Posts - Website

Reading CSV files with LaTeX

Reading CSV files is pretty easy in LaTeX, thanks to Nicola Talbot’s datatool package.

When you have an Excel file like the following Schueler.xlsx, simply save it as CSV (Comma-Separated Value).

excli

If you open the CSV file „Schueler.csv“ in a text editor you get the following:

excli2

We start by loading the datatool package. Since the German Excel uses semicolons as column separator, we are required to manually set the delimiter. In the next line we tell LaTeX to use our Schueler.csv file and to reference it as „scores“. In the DTLforeach commands the magic happens. The command has three parameters:

  • the file reference
  • the assignment of the file headers to LaTeX commands
  • the loop where the output for each row is defined
\documentclass[12pt,ngerman]{scrartcl}
\usepackage[utf8]{inputenc} 
\usepackage[T1]{fontenc}
\usepackage{babel}

\usepackage{datatool}

\DTLsetseparator{;}
\DTLloaddb{scores}{Schueler.csv}

\begin{document}

\begin{table}
\caption{Punktübersicht}
\centering
\begin{tabular}{llr}
\bfseries Name &
\bfseries Aufgabe A &
\bfseries Aufgabe B %
\DTLforeach{scores}{%
\name=Schueler,\aufgabea=AufgabeA,\aufgabeb=AufgabeB}{%
\\
\name & \aufgabea & \aufgabeb }
\end{tabular}
\end{table}

\DTLforeach{scores}{%
\name=Schueler,\aufgabea=AufgabeA,\aufgabeb=AufgabeB}{%

\name\ hat in Aufgabe A  \aufgabea~Punkte erzielt, in Aufgabe B \aufgabeb~Punkte.}


\end{document}

excli3

Uwe

Uwe Ziegenhagen likes LaTeX and Python, sometimes even combined. Do you like my content and would like to thank me for it? Consider making a small donation to my local fablab, the Dingfabrik Köln. Details on how to donate can be found here Spenden für die Dingfabrik.

More Posts - Website

Simple looping with LaTeX

Here’s a fairly easy example how to loop through a LaTeX collection/list with the help of the pgffor package

\documentclass[12pt,ngerman]{scrartcl}
\usepackage[utf8]{inputenc}
\usepackage[T1]{fontenc}
\usepackage{babel}
\usepackage{pgffor}
\begin{document}

\begin{itemize}
\foreach \x in {Donald,Dagobert,Gustav,Goofy} {\item \x}
\end{itemize}

\end{document}

googy

Uwe

Uwe Ziegenhagen likes LaTeX and Python, sometimes even combined. Do you like my content and would like to thank me for it? Consider making a small donation to my local fablab, the Dingfabrik Köln. Details on how to donate can be found here Spenden für die Dingfabrik.

More Posts - Website

Using Powershell to create MD5 files

This entry is part 2 of 4 in the series MD 5 Calculation

Following up on an article a few days ago here’s a script that creates a MD5 file.

# Uwe Ziegenhagen, 12.11.2014
# Reference: http://onlinemd5.com/
 
### Step A: Get the name of the file
# http://blogs.technet.com/b/heyscriptingguy/archive/2009/09/01/hey-scripting-guy-september-1.aspx
Function Get-FileName($initialDirectory)
{  
 [System.Reflection.Assembly]::LoadWithPartialName("System.windows.forms") | Out-Null
$OpenFileDialog = New-Object System.Windows.Forms.OpenFileDialog
$OpenFileDialog.initialDirectory = $initialDirectory
$OpenFileDialog.filter = "All files (*.*)| *.*"
$OpenFileDialog.ShowDialog() | Out-Null
$OpenFileDialog.filename
} #end function Get-FileName
 
# *** Entry Point to Script ***
$file =  Get-FileName -initialDirectory "C:\"
# write-host "file: " $file
 
### Step B: Create a file handle from this string and calculate the MD5 sum
$filehandle = Get-ChildItem $file
 
write-host "Filename: " $filehandle.Name
 
# http://stackoverflow.com/questions/10521061/how-to-get-an-md5-checksum-in-powershell
$md5 = New-Object -TypeName System.Security.Cryptography.MD5CryptoServiceProvider
$hash = [System.BitConverter]::ToString($md5.ComputeHash([System.IO.File]::ReadAllBytes($filehandle))).ToLower().Replace("-","")
 
write-host "Calculated Hashsum: "  $hash
 
### Step C: Write the MD5 sum from the MD5 sum file matching the other filename
$hash | out-file -FilePath $($filehandle.DirectoryName + "\" + $filehandle.BaseName + ".md5")

Uwe

Uwe Ziegenhagen likes LaTeX and Python, sometimes even combined. Do you like my content and would like to thank me for it? Consider making a small donation to my local fablab, the Dingfabrik Köln. Details on how to donate can be found here Spenden für die Dingfabrik.

More Posts - Website

Windows Phone versus iPhone

Since my iPhone 4 was getting slower and I was not willing to purchase a new iPhone for hundreds of Euro I decided to give a Windows phone a try. I purchased a rarely used Nokia Lumia 630 with dual-SIM option via Amazon Marketplace for slightly more than 100 Euro.

I have been using it for a few weeks now, here’s a subjective comparison of the pros & cons:

PRO Lumia 630

Battery
The accu is not glued to the case but can simply be switched.
Price
With littler more than 100 Euro it is much cheaper if compared to the iPhone
Size
Compared with my iPhone 4 the Lumia has a bigger screen, so watching videos on the treadmill is a significantly experience
SD Card
The Lumi comes with 8GB Flash and a SD card slot accepting cards with up to 128 GB. Going from a 16 GB iPhone to 64 GB would have cost around 200 Euro for the iPhone 5.
no more iTunes
No iTunes or any other app is needed, Windows recognizes the phone as standard storage device, I can easily add content to the flash memory or the SD card.
Tiles
Not a bad idea by Microsoft to divide the start screen into tiles. It works, I guess, as good as the iPhone’s icons
Apps
The store comes with only a small part of apps if compared to the Apple or Google store. However as I do not intend to play with my phone I must confess, I have not missed anything in the app selection. One can even get offline navigation for free.
Radio
The Lumia comes with builtin radio, usable as soon as headphones are plugged in. Nice feature!

CON Lumia 630

Okay, now the Con part

Headset
My Sennheiser in-ears with builtin microphone do not work completely, I can’t adjust the volume. I could buy some new ones from Nokia, but they most likely inferior to my Sennheisers.
Audio Player
The Audio player is simply not a thought through as the corresponding Apple app. I guess it’s just a matter of user experience, but it „ain’t feel right“
Video Player
The Video Player sucks! It really sucks in two ways: It constantly nags me that a XBox account would need to be created. Microsoft, if I wanted I would but I DON’T WANT TO! It also has a technical bug: sometimes when I want to continue watching a video a click on the play button does NOTHING! Only pausing and pushing the play button again does the trick.
SMS and Call
Not sure but I haven’t found a way to call a number from which a SMS was sent. Need to investigate further…
Bluetooth Keyboards
I own two BT keyboards, one from HP, the other one the Apple BT keyboard. None is working with the Windows phone, which really sucks. Earlier versions of Windows Phone had Bluetooth HID support, Windows Phone 8.1 does not! (more info)

Conclusion

As of today I am satisfied with the Lumia, unfortunately not because it is technically superior or at least on a similar level as my iPhone, but because of the value I got for a small buck. To have a modern smartphone it’s not necessary to invest hundreds of Euros. Windows had delivered a good, but not very good, operating system that can handle everyday tasks pretty good. The Lumia 630 had good hardware, I was really suprised what is possible for 100 Euro. To get rid of the App issues I will have a closer look on the app market, I’t likely that I will be able to find simpler apps which do not bother me to create unwanted accounts.

Will I keep the Lumia: Yes, but probably not as long as my iPhone 4 which I used since 2010.

Uwe

Uwe Ziegenhagen likes LaTeX and Python, sometimes even combined. Do you like my content and would like to thank me for it? Consider making a small donation to my local fablab, the Dingfabrik Köln. Details on how to donate can be found here Spenden für die Dingfabrik.

More Posts - Website

Dateien verschlüsseln mit ccrypt

Auf der Suche nach einem Werkzeug, das Dateien mit hinreichender Sicherheit verschlüsseln kann, bin ich jetzt auf ccrypt (http://ccrypt.sourceforge.net/) gestoßen.

Dieses kleine Programm läuft unter allen möglichen Betriebssystemen und verschlüsselt eine Datei per AES.

Mit ccrypt --help bzw. man ccrypt kommt man an die Hilfeseite von ccrypt.

C:\Windows\System32>ccrypt --help
ccrypt 1.10. Secure encryption and decryption of files and streams.

Usage: ccrypt [mode] [options] [file...]
       ccencrypt [options] [file...]
       ccdecrypt [options] [file...]
       ccat [options] file...

Modes:
    -e, --encrypt         encrypt
    -d, --decrypt         decrypt
    -c, --cat             cat; decrypt files to stdout
    -x, --keychange       change key
    -u, --unixcrypt       decrypt old unix crypt files

Options:
    -h, --help            print this help message and exit
    -V, --version         print version info and exit
    -L, --license         print license info and exit
    -v, --verbose         print progress information to stderr
    -q, --quiet           run quietly; suppress warnings
    -f, --force           overwrite existing files without asking
    -m, --mismatch        allow decryption with non-matching key
    -E, --envvar var      read keyword from environment variable (unsafe)
    -K, --key key         give keyword on command line (unsafe)
    -k, --keyfile file    read keyword(s) as first line(s) from file
    -P, --prompt prompt   use this prompt instead of default
    -S, --suffix .suf     use suffix .suf instead of default .cpt
    -s, --strictsuffix    refuse to encrypt files which already have suffix
    -F, --envvar2 var     as -E for second keyword (for keychange mode)
    -H, --key2 key        as -K for second keyword (for keychange mode)
    -Q, --prompt2 prompt  as -P for second keyword (for keychange mode)
    -t, --timid           prompt twice for encryption keys (default)
    -b, --brave           prompt only once for encryption keys
    -y, --keyref file     encryption key must match this encrypted file
    -r, --recursive       recurse through directories
    -R, --rec-symlinks    follow symbolic links as subdirectories
    -l, --symlinks        dereference symbolic links
    -T, --tmpfiles        use temporary files instead of overwriting (unsafe)
    --                    end of options, filenames follow

Wichtigste Funktionen

  • ccrypt Dateiname verschlüsselt die übergebene Datei, fragt das Passwort interaktiv ab. Über den Parameter -K kann das Passwort auch übergeben werden.
  • ccrypt -d Dateiname.cpt entschlüsselt die übergebene Datei, fragt das Passwort interaktiv ab. -d muss zum Verschlüsseln angegeben werden, sonst wird die verschlüsselte Datei erneut verschlüsselt.

Emacs Einbindung

ccrypt kann auch in Emacs eingebunden werden, Details dazu unter http://ccrypt.sourceforge.net/#emacs. Die mitgelieferte Lisp Datei habe ich in einen Unterordner meines Emacs-Verzeichnisses gelegt und lade diese in der .emacs:

;; CCrypt Support
(setq load-path (cons "C:/Programme/emacs-24.3/myLisp/ccrypt" load-path))
(require 'ps-ccrypt "ps-ccrypt.el")

Lade ich jetzt eine verschlüsselte Datei, so fragt Emacs nach dem Passwort und entschlüsselt den Inhalt im Buffer. Auf der Dateiablage bleibt die Datei verschlüsselt.

Uwe

Uwe Ziegenhagen likes LaTeX and Python, sometimes even combined. Do you like my content and would like to thank me for it? Consider making a small donation to my local fablab, the Dingfabrik Köln. Details on how to donate can be found here Spenden für die Dingfabrik.

More Posts - Website

Testing TeX Live’s Aurial font

A few days ago I checked the LaTeX Font Catalogue and found a nice font, Aurial.

\documentclass[12pt,ngerman]{scrartcl}
\usepackage[utf8]{inputenc}
\usepackage[T1]{fontenc}
\usepackage{aurical}
 
\begin{document}
 
\section{Fontlukas}\Fontlukas
 
 
\noindent Lorem ipsum dolor sit amet, consectetur adipiscing elit. Nullam dictum felis a nibh, eu condimentum lectus auctor. Cras quis euismod lorem. Aliquam in nisi felis. Etiam sit amet mauris at magna rhoncus commodo. Nulla neque ipsum, condimentum in nibh sed, eleifend consectetur est. Suspendisse ac laoreet urna. Vivamus sit amet tempor nunc, ac porta mi. Pha\-sellus et ligula ullamcorper, congue ligula non, porta purus. Etiam cursus eros ante, sit amet porta enim adipiscing sed. 
 
\section{Fontamici}\Fontamici
 
\noindent Lorem ipsum dolor sit amet, consectetur adipiscing elit. Nullam dictum felis a nibh, eu condimentum lectus auctor. Cras quis euismod lorem. Aliquam in nisi felis. Etiam sit amet mauris at magna rhoncus commodo. Nulla neque ipsum, condimentum in nibh sed, eleifend consectetur est. Suspendisse ac laoreet urna. Vivamus sit amet tempor nunc, ac porta mi. Pha\-sellus et ligula ullamcorper, congue ligula non, porta purus. Etiam cursus eros ante, sit amet porta enim adipiscing sed. 
\section{Fontlukas-bfseries} \Fontlukas\bfseries
 
\noindent Lorem ipsum dolor sit amet, consectetur adipiscing elit. Nullam dictum felis a nibh, eu condimentum lectus auctor. Cras quis euismod lorem. Aliquam in nisi felis. Etiam sit amet mauris at magna rhoncus commodo. Nulla neque ipsum, condimentum in nibh sed, eleifend consectetur est. Suspendisse ac laoreet urna. Vivamus sit amet tempor nunc, ac porta mi. Pha\-sellus et ligula ullamcorper, congue ligula non, porta purus. Etiam cursus eros ante, sit amet porta enim adipiscing sed. 
 
\section{Fontlukas-slshape} \Fontlukas\slshape
 
\noindent Lorem ipsum dolor sit amet, consectetur adipiscing elit. Nullam dictum felis a nibh, eu condimentum lectus auctor. Cras quis euismod lorem. Aliquam in nisi felis. Etiam sit amet mauris at magna rhoncus commodo. Nulla neque ipsum, condimentum in nibh sed, eleifend consectetur est. Suspendisse ac laoreet urna. Vivamus sit amet tempor nunc, ac porta mi. Pha\-sellus et ligula ullamcorper, congue ligula non, porta purus. Etiam cursus eros ante, sit amet porta enim adipiscing sed. 
 
\section{Fontlukas-bfseries-slshape} \Fontlukas\bfseries\slshape
 
\noindent Lorem ipsum dolor sit amet, consectetur adipiscing elit. Nullam dictum felis a nibh, eu condimentum lectus auctor. Cras quis euismod lorem. Aliquam in nisi felis. Etiam sit amet mauris at magna rhoncus commodo. Nulla neque ipsum, condimentum in nibh sed, eleifend consectetur est. Suspendisse ac laoreet urna. Vivamus sit amet tempor nunc, ac porta mi. Pha\-sellus et ligula ullamcorper, congue ligula non, porta purus. Etiam cursus eros ante, sit amet porta enim adipiscing sed. 
 
\end{document}

fonti

Uwe

Uwe Ziegenhagen likes LaTeX and Python, sometimes even combined. Do you like my content and would like to thank me for it? Consider making a small donation to my local fablab, the Dingfabrik Köln. Details on how to donate can be found here Spenden für die Dingfabrik.

More Posts - Website

How to define several listing environments

The following example shows how to define several listing environments with different highlightings and style settings.

\documentclass{scrartcl}
\usepackage{listings}
\usepackage{xcolor}
\usepackage{bera}
 
\definecolor{hellgelb}{rgb}{1,1,0.8}
\definecolor{colKeys}{rgb}{0,0,1}
\definecolor{colIdentifier}{rgb}{0,0,0}
\definecolor{colComments}{rgb}{1,0,0}
\definecolor{colString}{rgb}{0,0.5,0}
 
\lstset{%
    basicstyle=\ttfamily\small%
}
 
% http://tex.stackexchange.com/questions/159419/different-colors-for-default-and-language-specific-listings
 
\lstdefinestyle{mytexstyle}{
    float=hbp,%
    identifierstyle=\color{colIdentifier}, %
    keywordstyle=\color{colKeys}, %
    stringstyle=\color{colString}, %
    commentstyle=\color{colComments}, %
    columns=flexible, %
    tabsize=2, %
 %   frame=single, %
    extendedchars=true, %
    showspaces=false, %
    showstringspaces=false, %
    backgroundcolor=\color{hellgelb}, %
    breakautoindent=true, %
    captionpos=b%
}
 
\lstdefinestyle{mypythonstyle}{
    float=hbp,%
    identifierstyle=\color{colIdentifier}, %
    keywordstyle=\color{colKeys}, %
    stringstyle=\color{colString}, %
    commentstyle=\color{colComments}, %
    columns=flexible, %
    tabsize=2, %
  %  frame=single, %
    extendedchars=true, %
    showspaces=false, %
    showstringspaces=false, %
    backgroundcolor=\color[gray]{0.95},
    breakautoindent=true, %
    captionpos=b%
 }


% http://stackoverflow.com/questions/741985/latex-source-code-listing-like-in-professional-books?rq=1
\usepackage{caption}
\DeclareCaptionFont{white}{\color{white}}
\DeclareCaptionFormat{listing}{\colorbox{gray}{\parbox{\textwidth}{#1#2#3}}}
\captionsetup[lstlisting]{format=listing,labelfont=white,textfont=white}


% http://www.golatex.de/caption-fuer-lstnewenvironment-t9200.html
 
\lstnewenvironment{mytex}[2]
  {\lstset{language={[LaTeX]TeX},style=mytexstyle,caption={#1},label={#2}}}
  {}
 
 \lstnewenvironment{mypython}[2]
  {\lstset{language={Python},style=mypythonstyle,caption={#1},label={#2}}}
  {} 
 
\begin{document}
 
Here's some \LaTeX\ source code.
 
\begin{mytex}{Some \LaTeX\ code}{latex}
%!TEX TS-program = Arara
% arara: pdflatex
\documentclass[12pt,ngerman]{scrartcl}
 
\begin{document}
Hello \LaTeX!
 
\end{document}
\end{mytex}
 
Here's some Python source code.
 
\begin{mypython}{Some Python source to calculate the Fibonacchi number for a given number. This caption exceeds one line.}{py1}
def calcFibo(n):
	if n==0:
		return 0
	if n==1:
		return 1
	else:
		return calcFibo(n-1)+calcFibo(n-2)
 
print(calcFibo(25))
\end{mypython}
 
 
See listing \ref{latex} on page \pageref{latex}
 
\end{document}

listi

Uwe

Uwe Ziegenhagen likes LaTeX and Python, sometimes even combined. Do you like my content and would like to thank me for it? Consider making a small donation to my local fablab, the Dingfabrik Köln. Details on how to donate can be found here Spenden für die Dingfabrik.

More Posts - Website