Archive for the ‘Pakete’ Category.
2020-12-22, 19:54
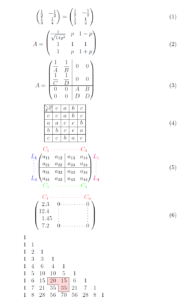
Um ansprechende Matrizen zu setzen gibt es mit dem nicematrix Paket ein recht neues Paket, das sich alle anschauen sollten, die viel mit Matrizen zu tun haben. Die folgenden Beispiele sind der Dokumentation entnommen, teilweise braucht man mehrere LaTeX-Läufe für das finale Ergebnis.
%!TEX TS-program = Arara
% arara: pdflatex: {shell: yes}
\documentclass[12pt,ngerman]{scrartcl}

\usepackage[utf8]{inputenc}
\usepackage[T1]{fontenc}
\usepackage{babel}
\usepackage{xcolor}

\usepackage{tikz}
\usepackage{siunitx}
\usepackage{nicematrix}
\NiceMatrixOptions{cell-space-top-limit = 1pt,cell-space-bottom-limit = 1pt}
\begin{document}

\begin{equation}
\begin{pmatrix}
\frac12 & -\frac12 \\
\frac13 & \frac14 \\
\end{pmatrix}
=
\begin{pNiceMatrix}
\frac12 & -\frac12 \\
\frac13 & \frac14 \\
\end{pNiceMatrix}
\end{equation}

\begin{equation}
A = \begin{pNiceMatrix}[baseline=2]
\frac{1}{\sqrt{1+p^2}} & p & 1-p \\
1 & 1 & 1 \\
1 & p & 1+p
\end{pNiceMatrix}
\end{equation}


\NiceMatrixOptions{cell-space-top-limit=1pt,cell-space-bottom-limit=1pt}

\begin{equation}
A=\begin{pNiceArray}{cc|cc}[baseline=line-3]
\dfrac1A & \dfrac1B & 0 & 0 \\
\dfrac1C & \dfrac1D & 0 & 0 \\
\hline
0 & 0 & A & B \\
0 & 0 & D & D \\
\end{pNiceArray}
\end{equation}


\begin{equation}
\begin{NiceArray}{*{5}{c}}[hvlines]
\diagbox{x}{y} & e & a & b & c \\
e & e & a & b & c \\
a & a & e & c & b \\
b & b & c & e & a \\
c & c & b & a & e
\end{NiceArray}
\end{equation}


\NiceMatrixOptions{code-for-first-row = \color{red},
code-for-first-col = \color{blue},
code-for-last-row = \color{green},
code-for-last-col = \color{magenta}}

\begin{equation}
\begin{pNiceArray}{cc|cc}[first-row,last-row=5,first-col,last-col,nullify-dots]
& C_1 & \Cdots & & C_4 & \\
L_1 & a_{11} & a_{12} & a_{13} & a_{14} & L_1 \\
\Vdots & a_{21} & a_{22} & a_{23} & a_{24} & \Vdots \\
\hline
& a_{31} & a_{32} & a_{33} & a_{34} & \\
L_4 & a_{41} & a_{42} & a_{43} & a_{44} & L_4 \\
& C_1 & \Cdots & & C_4 &
\end{pNiceArray}
\end{equation}

\begin{equation}
\begin{pNiceArray}{ScWc{1cm}c}[nullify-dots,first-row]
{C_1} & \Cdots & & C_n \\
2.3 & 0 & \Cdots & 0 \\
12.4 & \Vdots & & \Vdots \\
1.45 \\
7.2 & 0 & \Cdots & 0
\end{pNiceArray}
\end{equation}

\[\begin{NiceMatrix}[
code-before =
{
\tikz \draw [fill = red!15]
(row-7-|col-4) -- (row-8-|col-4) -- (row-8-|col-5) --
(row-9-|col-5) -- (row-9-|col-6) |- cycle ;
}
]1
\\
1 & 1 \\
1 & 2 & 1 \\
1 & 3 & 3 & 1 \\
1 & 4 & 6 & 4 & 1 \\
1 & 5 & 10 & 10 & 5 & 1 \\
1 & 6 & 15 & 20 & 15 & 6 & 1 \\
1 & 7 & 21 & 35 & 35 & 21 & 7 & 1 \\
1 & 8 & 28 & 56 & 70 & 56 & 28 & 8 & 1
\end{NiceMatrix}\]


\(
\begin{bNiceMatrix}
C[a_1,a_1] & \Cdots & C[a_1,a_n]
& \hspace*{20mm} & C[a_1,a_1^{(p)}] & \Cdots & C[a_1,a_n^{(p)}] \\
\Vdots & \Ddots & \Vdots
& \Hdotsfor{1} & \Vdots & \Ddots & \Vdots \\
C[a_n,a_1] & \Cdots & C[a_n,a_n]
& & C[a_n,a_1^{(p)}] & \Cdots & C[a_n,a_n^{(p)}] \\
\rule{0pt}{15mm} & \Vdotsfor{1} & & \Ddots & & \Vdotsfor{1} \\
C[a_1^{(p)},a_1] & \Cdots & C[a_1^{(p)},a_n]
& & C[a_1^{(p)},a_1^{(p)}] & \Cdots & C[a_1^{(p)},a_n^{(p)}] \\
\Vdots & \Ddots & \Vdots
& \Hdotsfor{1} & \Vdots & \Ddots & \Vdots \\
C[a_n^{(p)},a_1] & \Cdots & C[a_n^{(p)},a_n]
& & C[a_n^{(p)},a_1^{(p)}] & \Cdots & C[a_n^{(p)},a_n^{(p)}]
\end{bNiceMatrix}
\)

\end{document} |
%!TEX TS-program = Arara
% arara: pdflatex: {shell: yes}
\documentclass[12pt,ngerman]{scrartcl}
\usepackage[utf8]{inputenc}
\usepackage[T1]{fontenc}
\usepackage{babel}
\usepackage{xcolor}
\usepackage{tikz}
\usepackage{siunitx}
\usepackage{nicematrix}
\NiceMatrixOptions{cell-space-top-limit = 1pt,cell-space-bottom-limit = 1pt}
\begin{document}
\begin{equation}
\begin{pmatrix}
\frac12 & -\frac12 \\
\frac13 & \frac14 \\
\end{pmatrix}
=
\begin{pNiceMatrix}
\frac12 & -\frac12 \\
\frac13 & \frac14 \\
\end{pNiceMatrix}
\end{equation}
\begin{equation}
A = \begin{pNiceMatrix}[baseline=2]
\frac{1}{\sqrt{1+p^2}} & p & 1-p \\
1 & 1 & 1 \\
1 & p & 1+p
\end{pNiceMatrix}
\end{equation}
\NiceMatrixOptions{cell-space-top-limit=1pt,cell-space-bottom-limit=1pt}
\begin{equation}
A=\begin{pNiceArray}{cc|cc}[baseline=line-3]
\dfrac1A & \dfrac1B & 0 & 0 \\
\dfrac1C & \dfrac1D & 0 & 0 \\
\hline
0 & 0 & A & B \\
0 & 0 & D & D \\
\end{pNiceArray}
\end{equation}
\begin{equation}
\begin{NiceArray}{*{5}{c}}[hvlines]
\diagbox{x}{y} & e & a & b & c \\
e & e & a & b & c \\
a & a & e & c & b \\
b & b & c & e & a \\
c & c & b & a & e
\end{NiceArray}
\end{equation}
\NiceMatrixOptions{code-for-first-row = \color{red},
code-for-first-col = \color{blue},
code-for-last-row = \color{green},
code-for-last-col = \color{magenta}}
\begin{equation}
\begin{pNiceArray}{cc|cc}[first-row,last-row=5,first-col,last-col,nullify-dots]
& C_1 & \Cdots & & C_4 & \\
L_1 & a_{11} & a_{12} & a_{13} & a_{14} & L_1 \\
\Vdots & a_{21} & a_{22} & a_{23} & a_{24} & \Vdots \\
\hline
& a_{31} & a_{32} & a_{33} & a_{34} & \\
L_4 & a_{41} & a_{42} & a_{43} & a_{44} & L_4 \\
& C_1 & \Cdots & & C_4 &
\end{pNiceArray}
\end{equation}
\begin{equation}
\begin{pNiceArray}{ScWc{1cm}c}[nullify-dots,first-row]
{C_1} & \Cdots & & C_n \\
2.3 & 0 & \Cdots & 0 \\
12.4 & \Vdots & & \Vdots \\
1.45 \\
7.2 & 0 & \Cdots & 0
\end{pNiceArray}
\end{equation}
\[\begin{NiceMatrix}[
code-before =
{
\tikz \draw [fill = red!15]
(row-7-|col-4) -- (row-8-|col-4) -- (row-8-|col-5) --
(row-9-|col-5) -- (row-9-|col-6) |- cycle ;
}
]1
\\
1 & 1 \\
1 & 2 & 1 \\
1 & 3 & 3 & 1 \\
1 & 4 & 6 & 4 & 1 \\
1 & 5 & 10 & 10 & 5 & 1 \\
1 & 6 & 15 & 20 & 15 & 6 & 1 \\
1 & 7 & 21 & 35 & 35 & 21 & 7 & 1 \\
1 & 8 & 28 & 56 & 70 & 56 & 28 & 8 & 1
\end{NiceMatrix}\]
\(
\begin{bNiceMatrix}
C[a_1,a_1] & \Cdots & C[a_1,a_n]
& \hspace*{20mm} & C[a_1,a_1^{(p)}] & \Cdots & C[a_1,a_n^{(p)}] \\
\Vdots & \Ddots & \Vdots
& \Hdotsfor{1} & \Vdots & \Ddots & \Vdots \\
C[a_n,a_1] & \Cdots & C[a_n,a_n]
& & C[a_n,a_1^{(p)}] & \Cdots & C[a_n,a_n^{(p)}] \\
\rule{0pt}{15mm} & \Vdotsfor{1} & & \Ddots & & \Vdotsfor{1} \\
C[a_1^{(p)},a_1] & \Cdots & C[a_1^{(p)},a_n]
& & C[a_1^{(p)},a_1^{(p)}] & \Cdots & C[a_1^{(p)},a_n^{(p)}] \\
\Vdots & \Ddots & \Vdots
& \Hdotsfor{1} & \Vdots & \Ddots & \Vdots \\
C[a_n^{(p)},a_1] & \Cdots & C[a_n^{(p)},a_n]
& & C[a_n^{(p)},a_1^{(p)}] & \Cdots & C[a_n^{(p)},a_n^{(p)}]
\end{bNiceMatrix}
\)
\end{document}
Uwe Ziegenhagen likes LaTeX and Python, sometimes even combined.
Do you like my content and would like to thank me for it? Consider making a small donation to my local fablab, the Dingfabrik Köln. Details on how to donate can be found here Spenden für die Dingfabrik.
More Posts - Website
2020-12-22, 19:48
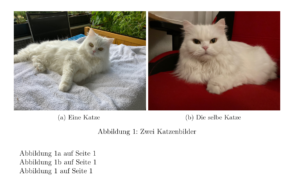
Um mehreren nebeneinander gesetzten Bildern separate Bildunterschriften zu geben, war das subfigure Paket lange Standard. Mit dem subcaption Paket von Axel Sommerfeldt gibt es einen würdigen Nachfolger, der aktiv gepflegt wird.
Hier ein Beispiel, zum Übersetzen bitte eigene Bilder nutzen:
\documentclass[12pt,ngerman]{scrartcl}

\usepackage[utf8]{inputenc}
\usepackage[T1]{fontenc}
\usepackage{babel}
\usepackage{graphicx}
\usepackage{subcaption}

\begin{document}

\begin{figure}
\centering
\subcaptionbox{Eine Katze \label{cat1}}
{\includegraphics[width=0.49\textwidth]{Bilder/Katze1}}
\subcaptionbox{Die selbe Katze \label{cat2}}
{\includegraphics[width=0.49\textwidth]{Bilder/Katze2}}
\caption{Zwei Katzenbilder}\label{katzenbilder}
\end{figure}

Abbildung \ref{cat1} auf Seite \pageref{katzenbilder}

Abbildung \ref{cat2} auf Seite \pageref{katzenbilder}

Abbildung \ref{katzenbilder} auf Seite \pageref{katzenbilder}

\end{document} |
\documentclass[12pt,ngerman]{scrartcl}
\usepackage[utf8]{inputenc}
\usepackage[T1]{fontenc}
\usepackage{babel}
\usepackage{graphicx}
\usepackage{subcaption}
\begin{document}
\begin{figure}
\centering
\subcaptionbox{Eine Katze \label{cat1}}
{\includegraphics[width=0.49\textwidth]{Bilder/Katze1}}
\subcaptionbox{Die selbe Katze \label{cat2}}
{\includegraphics[width=0.49\textwidth]{Bilder/Katze2}}
\caption{Zwei Katzenbilder}\label{katzenbilder}
\end{figure}
Abbildung \ref{cat1} auf Seite \pageref{katzenbilder}
Abbildung \ref{cat2} auf Seite \pageref{katzenbilder}
Abbildung \ref{katzenbilder} auf Seite \pageref{katzenbilder}
\end{document}
Uwe Ziegenhagen likes LaTeX and Python, sometimes even combined.
Do you like my content and would like to thank me for it? Consider making a small donation to my local fablab, the Dingfabrik Köln. Details on how to donate can be found here Spenden für die Dingfabrik.
More Posts - Website
2020-12-22, 19:42
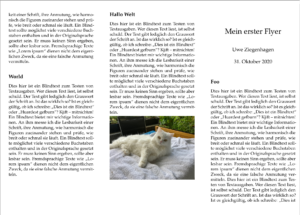
Um einen einfachen Flyer zu erstellen gibt es nichts besseres als die leaflet-Klasse. Hier ein einfaches Beispiel, die Katzenbilder muss man zum Übersetzen auskommentieren oder ersetzen.
\documentclass[12pt,ngerman]{leaflet}

\usepackage[utf8]{inputenc}
\usepackage[T1]{fontenc}
\usepackage{booktabs}
\usepackage{babel}
\usepackage{graphicx}
\usepackage{csquotes}
\usepackage{paralist}
\usepackage{xcolor}
\usepackage{palatino}
\usepackage{blindtext}
\usepackage{microtype}

\author{Uwe Ziegenhagen}
\title{Mein erster Flyer}

\begin{document}
\maketitle
\thispagestyle{empty}

\section{Foo}

\blindtext[2]

\section{Bar}

\includegraphics[width=\textwidth]{Bilder/Katze2}

\blindtext

\section{Hello}

\blindtext[4]

\section{World}

\blindtext

\section{Hallo Welt}

\blindtext

\includegraphics[width=\textwidth]{Bilder/Katze1}

\end{document} |
\documentclass[12pt,ngerman]{leaflet}
\usepackage[utf8]{inputenc}
\usepackage[T1]{fontenc}
\usepackage{booktabs}
\usepackage{babel}
\usepackage{graphicx}
\usepackage{csquotes}
\usepackage{paralist}
\usepackage{xcolor}
\usepackage{palatino}
\usepackage{blindtext}
\usepackage{microtype}
\author{Uwe Ziegenhagen}
\title{Mein erster Flyer}
\begin{document}
\maketitle
\thispagestyle{empty}
\section{Foo}
\blindtext[2]
\section{Bar}
\includegraphics[width=\textwidth]{Bilder/Katze2}
\blindtext
\section{Hello}
\blindtext[4]
\section{World}
\blindtext
\section{Hallo Welt}
\blindtext
\includegraphics[width=\textwidth]{Bilder/Katze1}
\end{document}
leaflet-01
Uwe Ziegenhagen likes LaTeX and Python, sometimes even combined.
Do you like my content and would like to thank me for it? Consider making a small donation to my local fablab, the Dingfabrik Köln. Details on how to donate can be found here Spenden für die Dingfabrik.
More Posts - Website
Schlagwörter:
LaTeX,
Flyer Category:
LaTeX,
Pakete |
Kommentare deaktiviert für Flyer mit LaTeX gestalten
2020-07-19, 21:31
Remark: An English version of this article has been published on latex.net.
Stellen wir uns vor, dass wir in einer Präsentation eine Abschlussarbeit verteidigen müssen. Es kann sein, dass weitergehende Fragen kommen, die dann tiefergehend beantwortet werden müssen.
Wir könnten das entsprechende Material direkt in die Präsentation setzen, müssen dann beim Vortrag aber eventuell Folien überspringen, was auch kein guter Präsentationsstil ist. Die zusätzlichen Inhalte einfach nur ans Ende setzen ist auch schlecht, im schlimmsten Fall muss man dann während der Präsentation hin- und herspringen.
Eine elegante Lösung gibt es mit dem beamerappendixnote Paket. Es nutzt zwei Befehle, \appxnote und \printappxnotes, um Material für den Anhang zu integrieren.
Der erste Befehl erstellt den Link zum Anhang und den anzuzeigenden Link-Text, der zweite Befehl setzt alle Appendix-Notizen.
\documentclass[12pt,ngerman]{beamer}
\usepackage[T1]{fontenc}
\usepackage{babel}
\usepackage{beamerappendixnote}

\begin{document}

\begin{frame}
\frametitle{Some Beamer Slide}

\begin{itemize}
	\item Some stuff
	\item that requires
	\item more background
\end{itemize}

\appxnote{Proof}{We can easily prove this.}

\end{frame}

\printappxnotes

\end{document} |
\documentclass[12pt,ngerman]{beamer}
\usepackage[T1]{fontenc}
\usepackage{babel}
\usepackage{beamerappendixnote}
\begin{document}
\begin{frame}
\frametitle{Some Beamer Slide}
\begin{itemize}
\item Some stuff
\item that requires
\item more background
\end{itemize}
\appxnote{Proof}{We can easily prove this.}
\end{frame}
\printappxnotes
\end{document}

Uwe Ziegenhagen likes LaTeX and Python, sometimes even combined.
Do you like my content and would like to thank me for it? Consider making a small donation to my local fablab, the Dingfabrik Köln. Details on how to donate can be found here Spenden für die Dingfabrik.
More Posts - Website
2020-04-27, 21:52
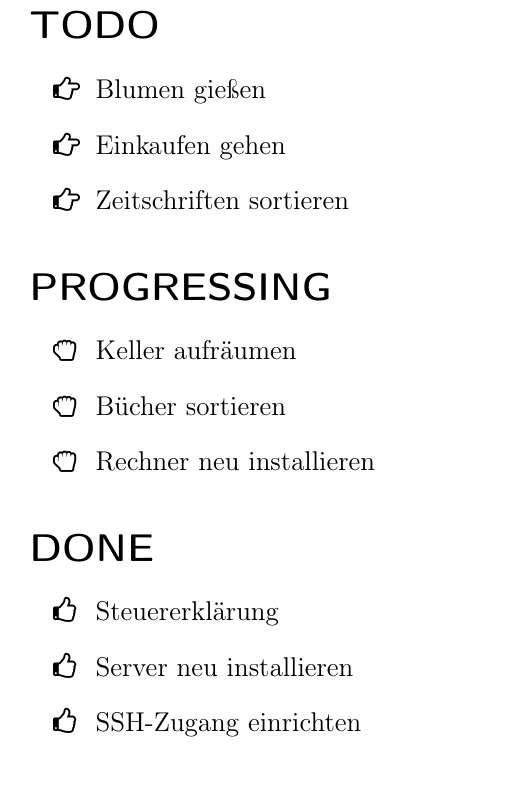
Heute mal ein Beispiel, wie man mit dem tasks Paket Aufgabenlisten setzen kann. Im nächsten Schritt werde ich dann die Listen per Export aus Trello befüllen.
\documentclass[12pt,ngerman]{scrartcl}
\usepackage[utf8]{inputenc}
\usepackage[T1]{fontenc}
\usepackage{babel}
\usepackage{tasks}
\usepackage{fontawesome}

\NewTasksEnvironment[label=\faHandORight,label-width=15pt]{todo}[*](1)
\NewTasksEnvironment[label=\faHandRockO,label-width=15pt]{progress}[*](1)
\NewTasksEnvironment[label=\faThumbsOUp,label-width=15pt]{done}[*](1)

\begin{document}

\section*{TODO}

\begin{todo}
* Blumen gießen
* Einkaufen gehen
* Zeitschriften sortieren
\end{todo}

\section*{PROGRESSING}

\begin{progress}
* Keller aufräumen
* Bücher sortieren
* Rechner neu installieren
\end{progress}

\section*{DONE}

\begin{done}
* Steuererklärung
* Server neu installieren
* SSH-Zugang einrichten
\end{done}

\end{document} |
\documentclass[12pt,ngerman]{scrartcl}
\usepackage[utf8]{inputenc}
\usepackage[T1]{fontenc}
\usepackage{babel}
\usepackage{tasks}
\usepackage{fontawesome}
\NewTasksEnvironment[label=\faHandORight,label-width=15pt]{todo}[*](1)
\NewTasksEnvironment[label=\faHandRockO,label-width=15pt]{progress}[*](1)
\NewTasksEnvironment[label=\faThumbsOUp,label-width=15pt]{done}[*](1)
\begin{document}
\section*{TODO}
\begin{todo}
* Blumen gießen
* Einkaufen gehen
* Zeitschriften sortieren
\end{todo}
\section*{PROGRESSING}
\begin{progress}
* Keller aufräumen
* Bücher sortieren
* Rechner neu installieren
\end{progress}
\section*{DONE}
\begin{done}
* Steuererklärung
* Server neu installieren
* SSH-Zugang einrichten
\end{done}
\end{document}
Uwe Ziegenhagen likes LaTeX and Python, sometimes even combined.
Do you like my content and would like to thank me for it? Consider making a small donation to my local fablab, the Dingfabrik Köln. Details on how to donate can be found here Spenden für die Dingfabrik.
More Posts - Website
Category:
LaTeX,
Pakete |
Kommentare deaktiviert für Aufgabenlisten mit dem tasks Paket setzen
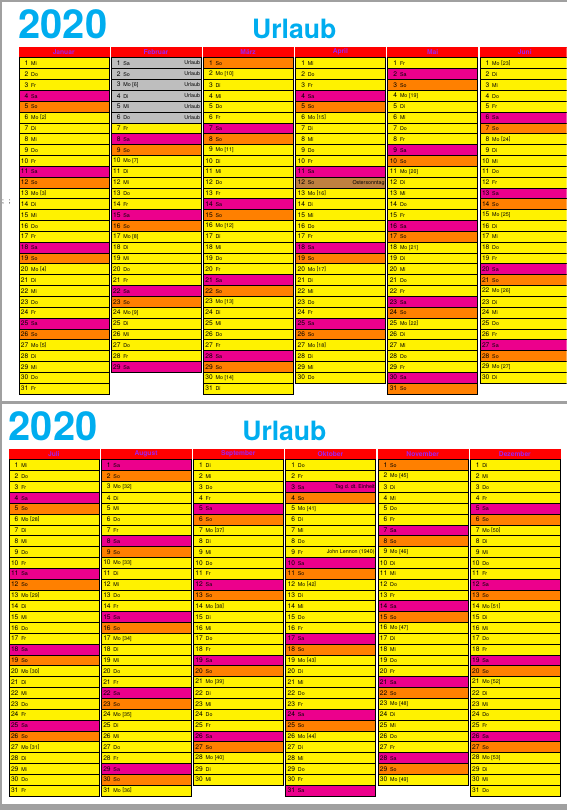
2019-11-24, 21:02
Hier ein Beispiel, wie man mit tikz-calendar Jahreskalender erstellen kann. Kalenderereignisse müssen in einer externen Datei abgelegt werden, im Beispiel ist das die meineevents.events.
Die Farbnamen für die einzelnen Elemente lassen sich in https://www.sciencetronics.com/greenphotons/wp-content/uploads/2016/10/xcolor_names.pdf nachlesen.
\documentclass{tikz-kalender}

\setup{%
lang=german,
year=2020,
showweeknumbers=true,
title={Urlaub},
xcoloroptions={x11names},
titleColor=cyan,
eventColor=brown,
periodColor=lime,
monthBGcolor=red,
monthColor=Purple0,
workdayColor=yellow,
saturdayColor=magenta,
sundayColor=orange,
events={meineevents} % Einbinden der events-Datei
}

\begin{document}
\makeKalender
\end{document} |
\documentclass{tikz-kalender}
\setup{%
lang=german,
year=2020,
showweeknumbers=true,
title={Urlaub},
xcoloroptions={x11names},
titleColor=cyan,
eventColor=brown,
periodColor=lime,
monthBGcolor=red,
monthColor=Purple0,
workdayColor=yellow,
saturdayColor=magenta,
sundayColor=orange,
events={meineevents} % Einbinden der events-Datei
}
\begin{document}
\makeKalender
\end{document}
Hier der Inhalt der meineevents.events:
\event{\year-10-09}{John Lennon (1940)}
\event{2020-10-03}{Tag d. dt. Einheit}
\event*{2020-04-12}{Ostersonntag}
\period{2020-02-01}{2020-02-06}[color=Gray0,name={Urlaub}];
Uwe Ziegenhagen likes LaTeX and Python, sometimes even combined.
Do you like my content and would like to thank me for it? Consider making a small donation to my local fablab, the Dingfabrik Köln. Details on how to donate can be found here Spenden für die Dingfabrik.
More Posts - Website
2019-08-21, 21:34
This year I was able to visit the TUG 2019 meeting in Palo Alto, California. I gave two talks, one on LaTeX & Python, the other one on the creation of exams using the exam class. Find below the slides, all sources are included in the PDF and accessible at least via Adobe Reader.
Uwe Ziegenhagen likes LaTeX and Python, sometimes even combined.
Do you like my content and would like to thank me for it? Consider making a small donation to my local fablab, the Dingfabrik Köln. Details on how to donate can be found here Spenden für die Dingfabrik.
More Posts - Website
2019-04-07, 09:30
Hier die Folien von meinem Vortrag zum Thema „Briefvorlagen erstellen mit LaTeX und scrlttr2“, gehalten auf der Dante e.V. Vereinstagung in Darmstadt.
Alle Code-Beispiele sowie der Quelltext der Folien selbst sind Teil des PDF, dazu nutze ich das attachfile-Paket. Mit einem einfachen \newcommand Befehl baue ich dann den \ta Befehl, der als Parameter nur den Dateinamen entgegennimmt und im PDF dann ein rotes klickbares Paragraph-Symbol setzt.
\usepackage{attachfile}
\newcommand{\ta}[1]{\textattachfile[color=1 0 0]{#1}{\textparagraph}} |
\usepackage{attachfile}
\newcommand{\ta}[1]{\textattachfile[color=1 0 0]{#1}{\textparagraph}}
Vortragsfolien
Das github-Repository liegt unter https://github.com/UweZiegenhagen/scrlttr2_darmstadt
Uwe Ziegenhagen likes LaTeX and Python, sometimes even combined.
Do you like my content and would like to thank me for it? Consider making a small donation to my local fablab, the Dingfabrik Köln. Details on how to donate can be found here Spenden für die Dingfabrik.
More Posts - Website
2018-11-17, 18:23
Mit dem typed-checklist Paket lassen sich einfach komplexe Checklisten setzen, hier ein Beispiel aus der Dokumentation:
\documentclass{article}
\usepackage{typed-checklist}
\begin{document}
\begin{CheckList}{Goal}
\Goal{open}{I have a trendy haircut}
\begin{CheckList}{Task}
\Task{done}{find a hairdresser}
\Task{started}{make an appointment}
\Task{open}{go to the hairdresser}
\end{CheckList}
\Goal{achieved}{I have a typed checklist}
\end{CheckList}
\end{document} |
\documentclass{article}
\usepackage{typed-checklist}
\begin{document}
\begin{CheckList}{Goal}
\Goal{open}{I have a trendy haircut}
\begin{CheckList}{Task}
\Task{done}{find a hairdresser}
\Task{started}{make an appointment}
\Task{open}{go to the hairdresser}
\end{CheckList}
\Goal{achieved}{I have a typed checklist}
\end{CheckList}
\end{document}

Uwe Ziegenhagen likes LaTeX and Python, sometimes even combined.
Do you like my content and would like to thank me for it? Consider making a small donation to my local fablab, the Dingfabrik Köln. Details on how to donate can be found here Spenden für die Dingfabrik.
More Posts - Website
Category:
LaTeX,
Pakete |
Kommentare deaktiviert für Checklisten setzen mit
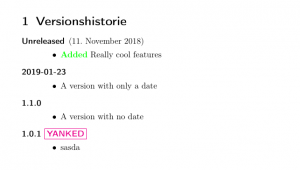
2018-11-17, 18:21
Mit dem changelog Paket gibt es eine komfortable Möglichkeit, changelogs in Dokumenten zu setzen. Hier ein Beispiel, entnommen der Dokumentation.
\documentclass[12pt,ngerman]{scrartcl}
\usepackage[utf8]{inputenc}
\usepackage[T1]{fontenc}
\usepackage{booktabs}
\usepackage{babel}
\usepackage{graphicx}
\usepackage{csquotes}
\usepackage{paralist}
\usepackage{xcolor}
\usepackage[color]{changelog}
\begin{document}

\begin{changelog}[sectioncmd=\section,title={Versionshistorie}]

\begin{version}{0.9}
\added Really cool features
\end{version}

\begin{version}[date=2019-01-23]
\item A version with only a date
\end{version}

\begin{version}[v=1.1.0]
\item A version with no date
\end{version}

\begin{version}[v=1.0.1, yanked]
\item sasda
\end{version}
\end{changelog}

\end{document} |
\documentclass[12pt,ngerman]{scrartcl}
\usepackage[utf8]{inputenc}
\usepackage[T1]{fontenc}
\usepackage{booktabs}
\usepackage{babel}
\usepackage{graphicx}
\usepackage{csquotes}
\usepackage{paralist}
\usepackage{xcolor}
\usepackage[color]{changelog}
\begin{document}
\begin{changelog}[sectioncmd=\section,title={Versionshistorie}]
\begin{version}{0.9}
\added Really cool features
\end{version}
\begin{version}[date=2019-01-23]
\item A version with only a date
\end{version}
\begin{version}[v=1.1.0]
\item A version with no date
\end{version}
\begin{version}[v=1.0.1, yanked]
\item sasda
\end{version}
\end{changelog}
\end{document}
Uwe Ziegenhagen likes LaTeX and Python, sometimes even combined.
Do you like my content and would like to thank me for it? Consider making a small donation to my local fablab, the Dingfabrik Köln. Details on how to donate can be found here Spenden für die Dingfabrik.
More Posts - Website
Category:
LaTeX,
Pakete |
Kommentare deaktiviert für Changelogs setzen mittels „changelog“ Paket